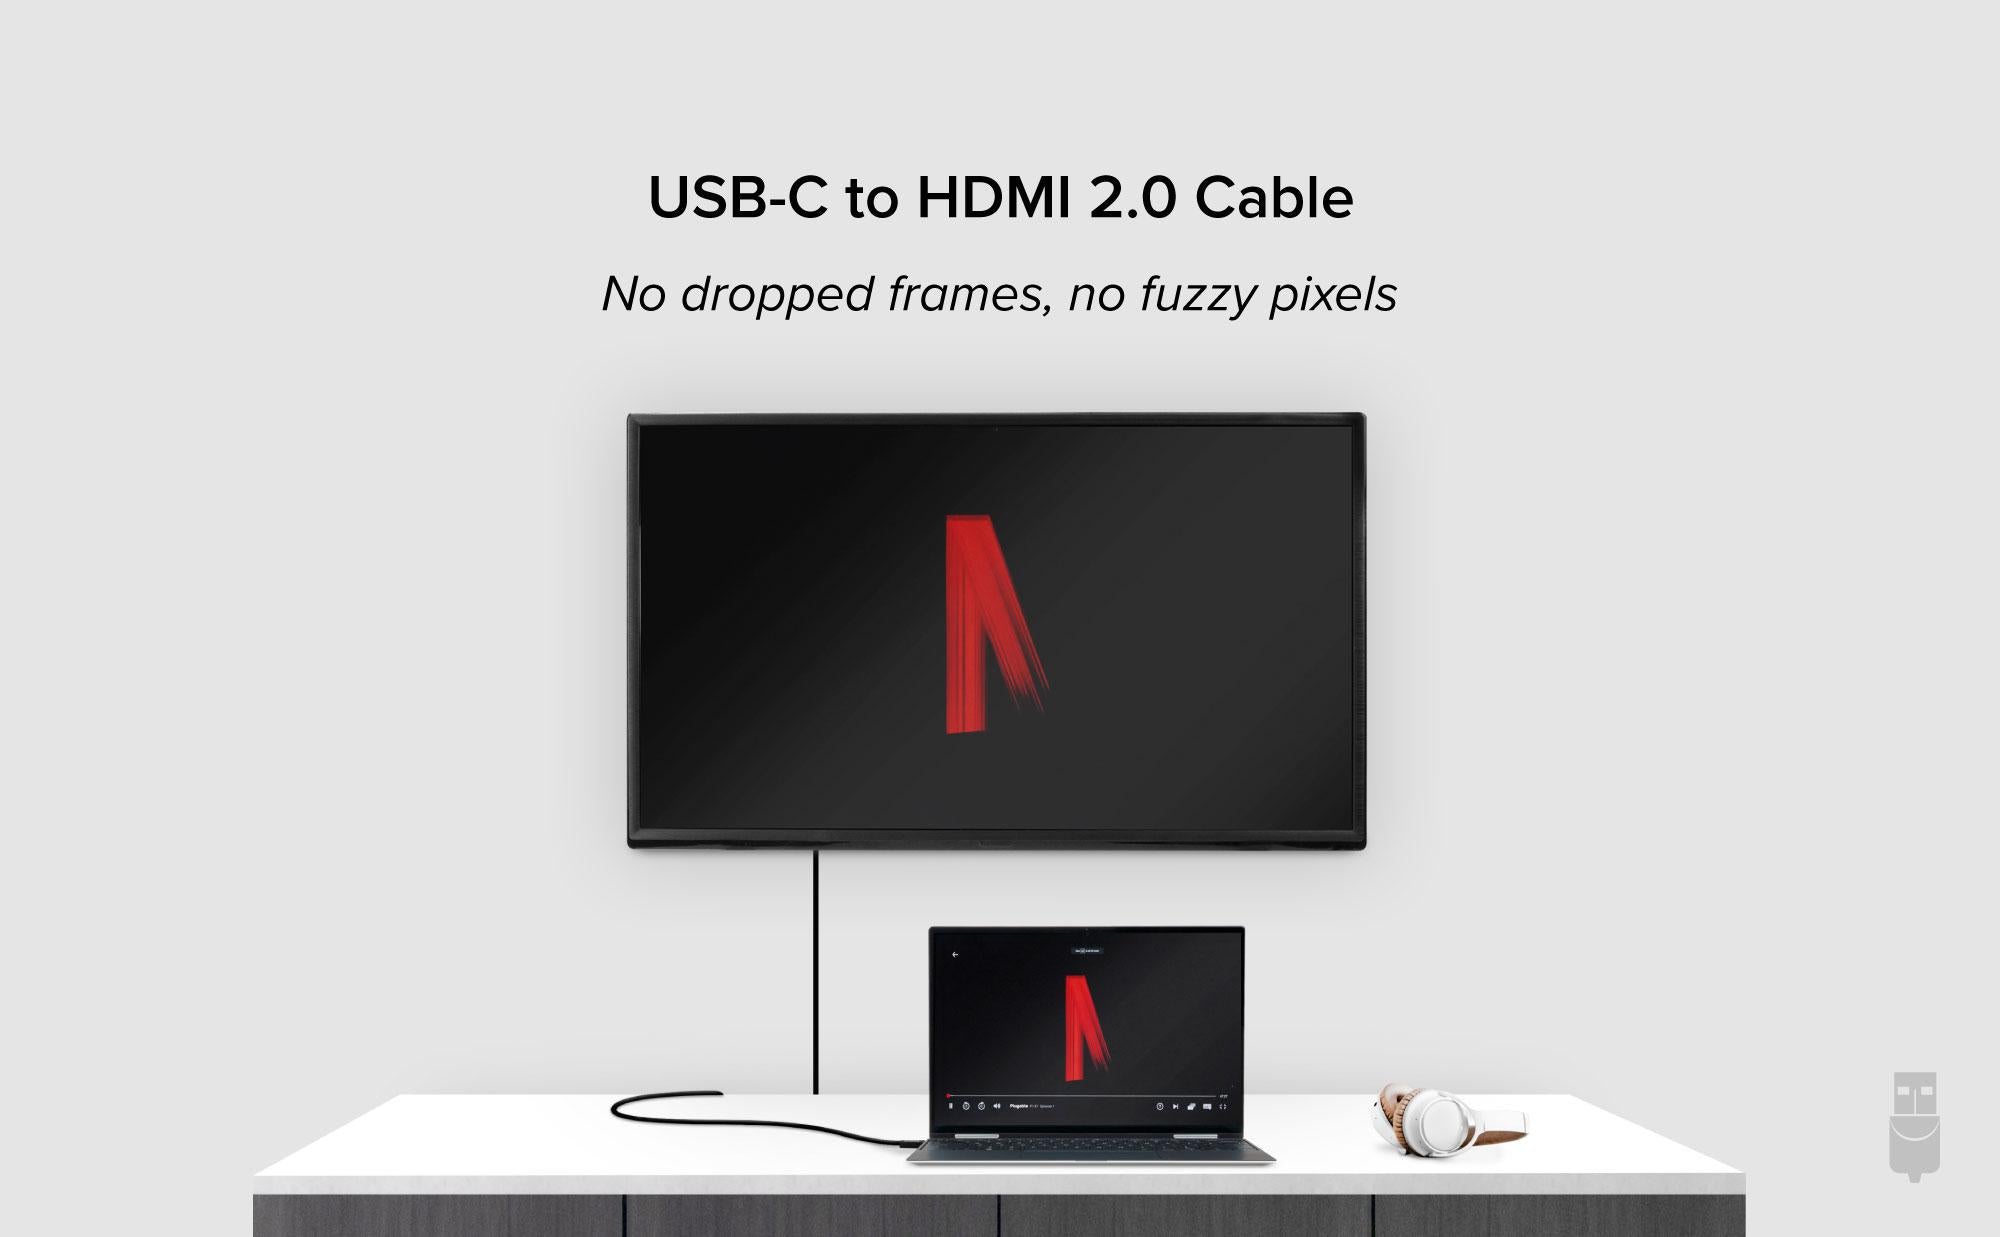
At a Glance—
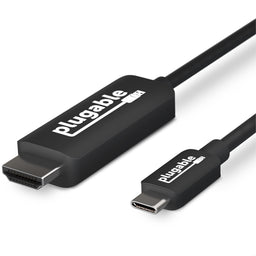
HDMI 2.0 Plug and Play 4K USBC to HDMI adapter cable (
USBC-HDMI
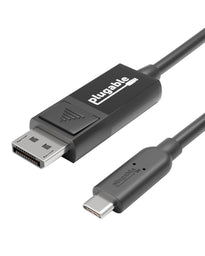
-CABLE) with this 6ft/1.8m supports HDMI 4K 60Hz, HDR, and HDCP. Compatible with USB4, Thunderbolt, or USB-C DP 1.2 and 1.4 for high-res gaming, home theater & professional use. This USB-C to HDMI cable ensures seamless connectivity.
Resolutions—
Cable utilizes USB-C and HDMI 2.0 bandwidth for HDR support and resolutions up to 3840x2160 @ 60Hz (4K). Also supports HDMI 1.4 displays and common resolutions below 4K such as 3840x1440, 2560x1440, 2560x1080, 1920x1080 (1080p) and more
Ready to Go—
Extend your viewing with crisp resolutions up to 4K and clear audio with this single cable - perfect for video, gaming, and working. No drivers to download, just plug and play.
Works With—
This USB C HDMI adapter cable is Plug and Play compatible with Windows, macOS, and ChromeOS systems with USB-C, USB4, or Thunderbolt. Works with iPhone 15 and above, Samsung phone, iPad Pro, MacBook Pro/Air, Dell XPS, Microsoft Surface family, and other systems.
2-Year Coverage, Lifetime Support—
Every Plugable product, including this USB C to HDMI cable, is covered against defects for 2 years and comes with lifetime support. If you ever have questions, contact our North American-based team - even before purchase
The Plugable USB-C to HDMI 2.0 Adapter Cable enables an HDMI display to be connected to a computer via a USB-C port or Thunderbolt 3 port which supports “VESA DisplayPort Alternate Mode over USB-C" ("Alt Mode"). DisplayPort signaling is converted to HDMI 2.0 by a chip in the adapter cable.
6 foot/1.8m cable is a seamless, single cable solution for connectiing from your Thunderbolt 3 or USB-C system to your HDMI display, allowing for tidy installation and cable management without the need for additional dongles and HDMI extension cables.
Utilizes USB-C and HDMI 2.0 bandwidth to enable resolutions up to 3840x2160@60Hz (4K 60) and is backwards compatible with HDMi 1.4 displays and common resolutions below 4K such as: 3840x1440, 2560x1440, 2560x1080, 1920x1080 (1080P) and more.
4K at 60Hz Support Note: The host system must be able to support 3840x2160@60Hz and the connected monitor must comply with HDMI 2.0 standards in order to display 4K resolutions at a 60Hz refresh rate.
Uncompromising Performance
Alt Mode adapters like this USB-C to DisplayPort cable are a convenient option for adding an additional display output on supported systems. Since DisplayPort Alternate Mode is a direct pipeline to the host graphics processor (GPU) in your system, the connected display will function with the same performance as a natively attached display.
Video and photo editing, gaming, and other resource-intensive tasks are possible assuming that the system's GPU capabilities are sufficient for the application being used.
Compatibility & Details
Compatible Systems
Plug and Play installation on any Windows, Mac, or Linux host which supports DisplayPort Alternate Mode (Alt Mode) video output functionality.
Adapter has been fully tested for functionality on the 2018 iPad Pro (mirroring only), 2018 MacBook Air, 2017 iMac/iMac Pro, 2017 & 2018 MacBook/MacBook Pro, MacBook Retina 12" 2016 / 2017, Google Pixelbook, Chromebook Pixel 2015, Dell XPS 13 9360 / 9370 & XPS 15 9560 / 9570, and Samsung Galaxy S8 / S8+.
Audio is supported on HDMI-equipped TVs and monitors with built-in speakers. Multi-channel audio supported via LPCM encoding only.
Late 2016 MacBook Pro can support multiple displays via Alt Mode adapters. (Up to 2 external displays on MBP with Intel graphics, and 4 external displays on MBP with AMD graphics.)
Note: The 2015 12" MacBook Retina supports maximum resolution of 4K@30Hz.
Incompatible Systems
Most current phones and tablets with USB-C ports do not support Alt Mode video output.
ASMedia USB 3.1 controllers do not support Alt Mode video at this time.
Most motherboards with dual USB-C/Thunderbolt 3 ports are limited to a single Alt Mode output, and typically only support 1 USB-C Alt Mode adapter per system.
The Plugable USBC-HDMI-CABLE works with devices that support USB-C DisplayPort Alt Mode or Thunderbolt 3/4. Below are some examples of some compatible devices across Windows, macOS, ChromeOS, and mobile platforms.
Windows Laptops
Dell XPS 13/15 (9315, 9530)
Lenovo ThinkPad X1 Carbon Gen 11
Lenovo Yoga 7i (Gen 8)
HP Spectre x360 (2023)
Microsoft Surface Laptop 5
ASUS ROG Zephyrus G14 (2023)
Gigabyte Aero 16 OLED
Acer Swift X 14 (2024)
Razer Blade 14 (2023)
macOS Laptops & Desktops
MacBook Pro (M1/M2/M3 models)
MacBook Air (M2/M3 models)
Mac Mini (M2/M3)
Mac Studio (M1/M2/M3 Max/Ultra)
Chromebooks
Google Pixelbook Go
ASUS Chromebook Flip CX5
HP Dragonfly Pro Chromebook
Acer Chromebook Spin 714
Smartphones & Tablets
Samsung Galaxy S24 Ultra, Z Fold 5 (DeX support)
Google Pixel 8 Pro
Motorola Edge+ (2023) (Ready For mode)
Lenovo Tab P12 Pro
iPad Pro (M2/M4 models)
iPhone 15/16 Pro & Pro Max
Not Compatible Devices
Older MacBooks (Pre-2016, Intel-based with no USB-C video support)
iPads with Lightning ports
Samsung A-series, Galaxy Z Flip 5, Note 10 Lite (devices without DeX support)
Systems with USB-C ports that do not support video output
For the best experience, verify that your device supports USB-C DisplayPort Alt Mode or Thunderbolt 3/4 before purchasing.
Get Started
This device is fully Plug and Play. Simply;
1. Insert the USB-C end of the adapter cable into the host system.
2. Plug the HDMI end of the adapter cable into your desired display.
Filter Help Articles and Frequent Questions by Category
Choose one or more filters within each category to narrow down the articles. Each selection will result in only displaying articles that include all of your choices.
Selected filters:
Articles
Well how about that, it looks like we don't have any articles matching your filters! Try removing one of your choices or clear the filters to show all articles.
No. Most DisplayPort to HDMI cables and adapters are one-way adapters from a DisplayPort Source (computer or docking station) to a HDMI Sink (television, computer monitor, or projector). These cables do not work in reverse.
DisplayPort uses packet-based data transmission, breaking the video stream into individual packets of data allows for longer cable runs, use in both copper and fiber-optic cables, and allows for higher bandwidth than other video formats. It is relatively easy to convert from DisplayPort to HDMI (computers with HDMI output ports already do this internally) and dual-mode DisplayPort outputs have built-in adapters to output a HDMI signal for use with passive DisplayPort to HDMI adapters.
HDMI uses a video signal, similar to DVI, this requires more power to operate at the same cable lengths as DisplayPort and requires significantly more processing power to create DisplayPort packet-based data.
Externally powered HDMI to DisplayPort adapters do exist, these generally have a USB or small barrel plug for power, and can convert from a HDMI Source to DisplayPort Sink. In most cases they have reduced resolution or refresh rates compared to modern signal sources and can introduce delay in the data connection between the display and computer potentially causing reduced connectivity or display performance problems.
We do not currently recommend using HDMI to DisplayPort adapter with our docking stations. In our testing they have been unreliable compared to a native DisplayPort connection. Many of our newer docking stations include both HDMI and DisplayPort outputs to reduce the need for additional adapters or adapter cables.
Whether you're on Windows, macOS, or Linux, it's common to add new audio devices to your computer.
Some examples of additional audio devices you may want to switch to include:
Bluetooth headsets, headphones, and speakers
Speakers built into a display, such as a TV or monitor
A USB sound card, digital audio converter (DAC), or analog to digital converter (ADC)
USB microphones
Audio jacks on a docking station
These steps don't apply to the Plugable Performance NIX HDMI Capture Card (USBC-CAP60).
Here are the steps that you need to set a new default audio recording or output device on different operating systems.
Set Audio Output Device
Set Audio Recording Device
Set Default Playback Device in Windows
Check that your device is properly connected, and that any necessary drivers are installed
It is also a good idea to make sure that your sound device is turned on, and that the device's volume control is not at the absolute minimum setting
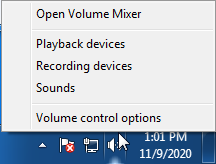
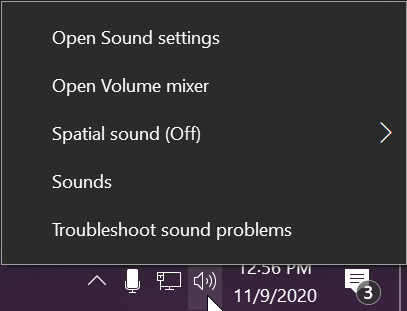
Right-click on the speaker symbol in the Windows taskbar/system tray
Windows 7/8.x—Select Playback Devices. The Sound window will open with the Playback tab highlighted
Windows 10/11—Select Open Sound Settings then click the link under 'Related Settings' for Sound Control Panel, then click the Playback tab
Alternatively, after selecting Open Sound Settings, use the dropdowns under the Output header
Find your device in the window
A Plugable USB 3.0 docking station or sound-enabled display adapter will appear as Plugable Audio
A Plugable USB 3.0 Silicon Motion docking station or sound-enabled display adapter will appear as SMI USB Audio
A Plugable USB 2.0 docking station will appear as USB Multimedia Audio Device
A Plugable USB Audio adapter will appear as USB Audio Device
Right-click on the device you found in step 3 and select Set as Default Device. A check mark should appear next to your device, and sound should now play through it
A Plugable USB Audio adapter will appear as USB Audio Device
Set Default Playback Device in Linux
Ensure that you audio device is connected to the PC
If the audio device is self-powered, it is a good idea to make sure that it is powered on, and that the device's volume control is not at the absolute minimum setting
Launch the 'Settings' application in your distro
Go to the 'Sound' option
Find the dropdown for your 'Output Device', and change it to your preferred output device
For additional sound device controls, you may want to consider using Pulseaudio Volume Controls (package name pavucontrol)
Set Default Recording Device in Windows
Check that your device is properly connected, and that any necessary drivers are installed
It is also a good idea to make sure that your sound device is turned on, and that the device's volume control is not at the absolute minimum setting
Right-click on the speaker symbol in the Windows taskbar/system tray
Windows 7/8.x—Select Recording Devices. The Sound window will open with the Recording tab highlighted
Windows 10/11—Select Open Sound Settings then click the link under 'Related Settings' for Sound Control Panel, then click the Recording tab
Alternatively, after selecting Open Sound Settings, use the dropdowns under the Input header
Find your device in the window
A Plugable USB 3.0 DisplayLink docking station or sound-enabled display adapter will appear as Plugable Audio
A Plugable USB 2.0 docking station will appear as USB Multimedia Audio Device
A Plugable USB Audio adapter will appear as USB Audio Device
Right-click on the device you found in step 3 and select Set as Default Device. A check mark should appear next to your device, and sound should now play through it
A Plugable USB Audio adapter will appear as USB Audio Device
Set Default Recording Device in Linux
Ensure that you audio device is connected to the PC
If the audio device is self-powered, it is a good idea to make sure that it is powered on, and that the device's volume control is not at the absolute minimum setting
Launch the 'Settings' application in your distro
Go to the 'Sound' option
Find the dropdown for your 'Input Device', and change it to your preferred input device
For additional sound device controls, you may want to consider using Pulseaudio Volume Controls (package name pavucontrol)
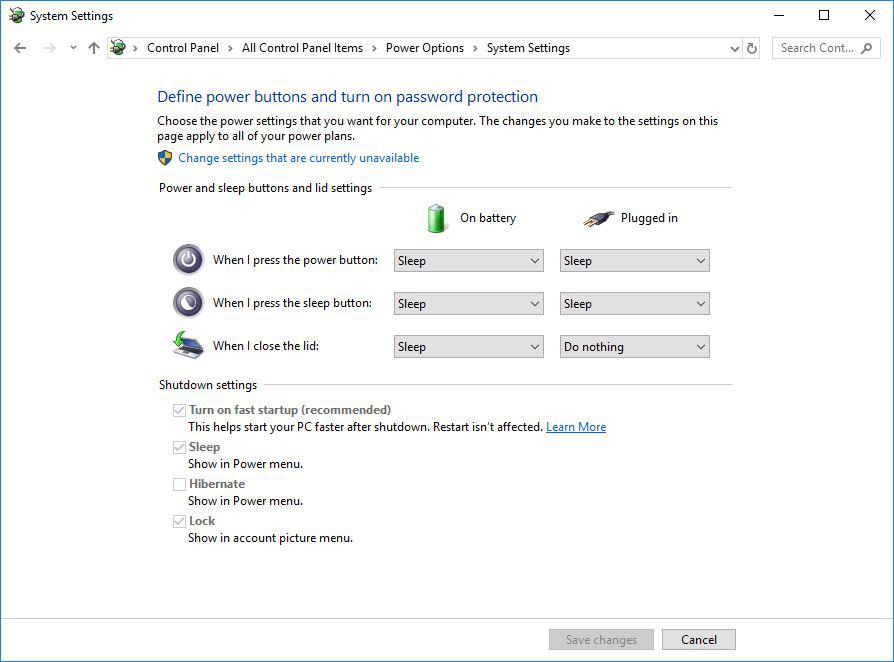
Most Windows notebook computers power management settings will default to putting the computer to sleep with the lid closed, regardless of any external displays, keyboard, or mouse connected to the computer. If this is happening but you would prefer the system to remain active with the lid closed utilizing the external display or displays, these settings can be changed by performing the following:
For Windows 10:
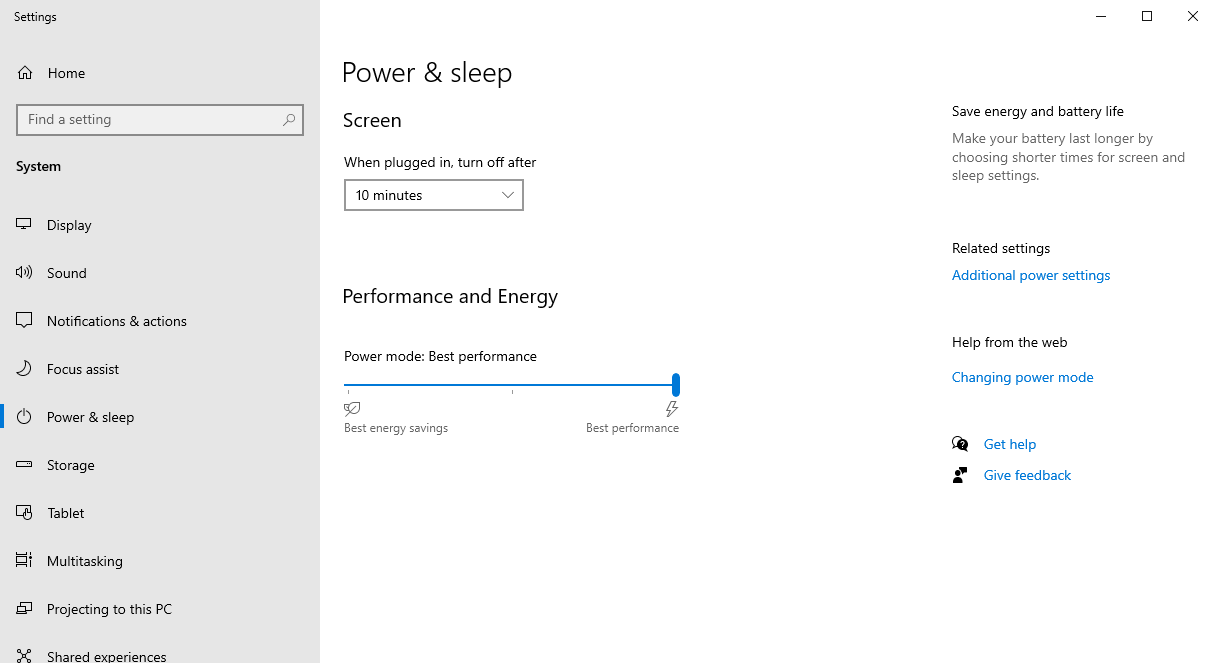
Start by right-clicking on the Start button and select Power Options from the menu.
From the right side of the Power Options settings page, select the blue link for Additional power settings
From the choices present on the left-hand side of the Power Options window, please click on Choose what closing the lid does
Make sure the setting for When I close the lid under the Plugged In column is set to Do Nothing
Click the Save Changes button and restart the system (making sure that the laptop’s power adapter is also connected) and test the behavior again.
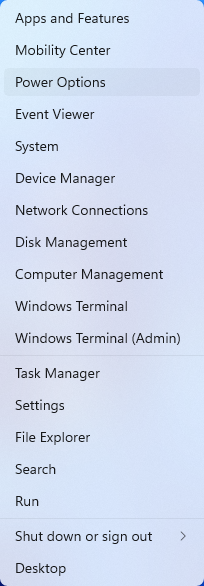
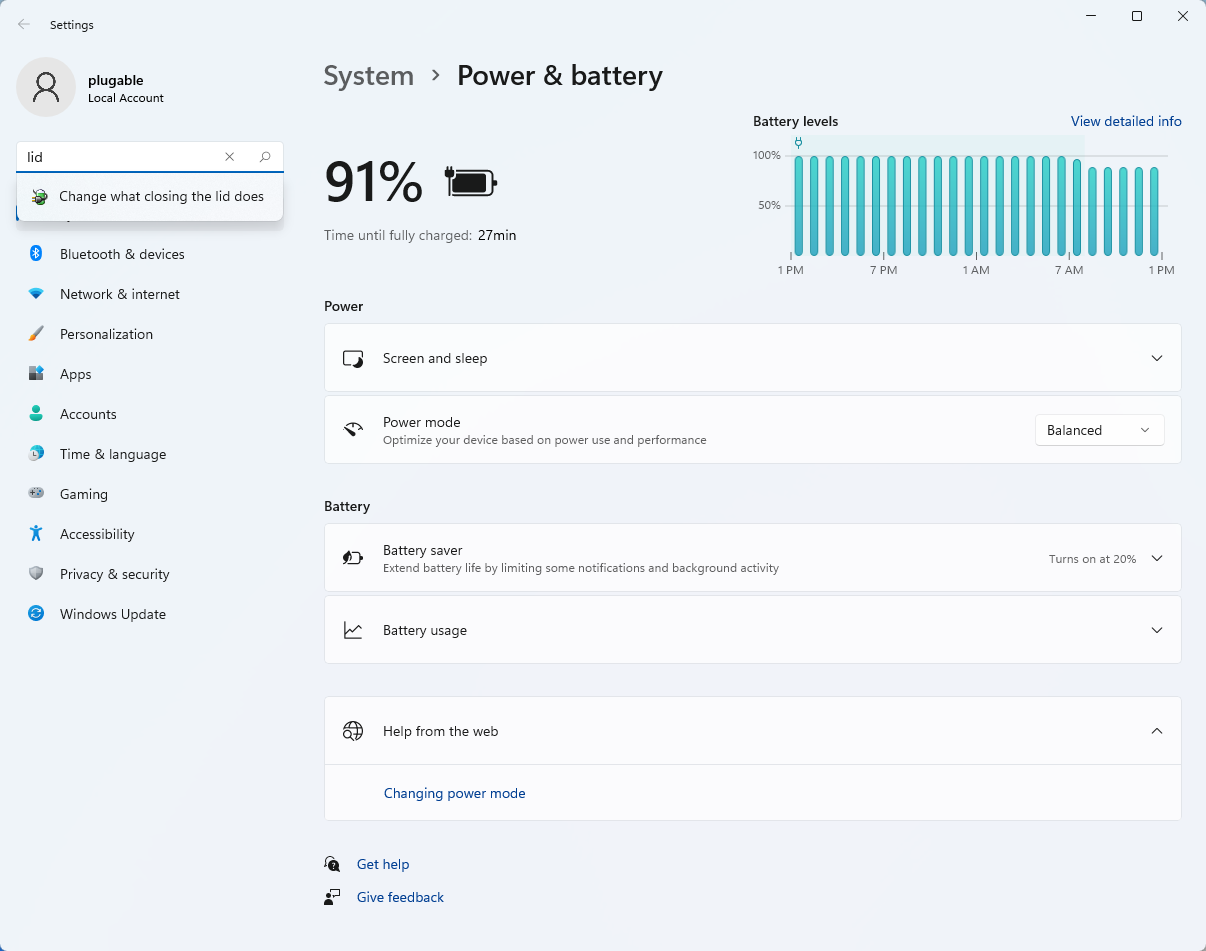
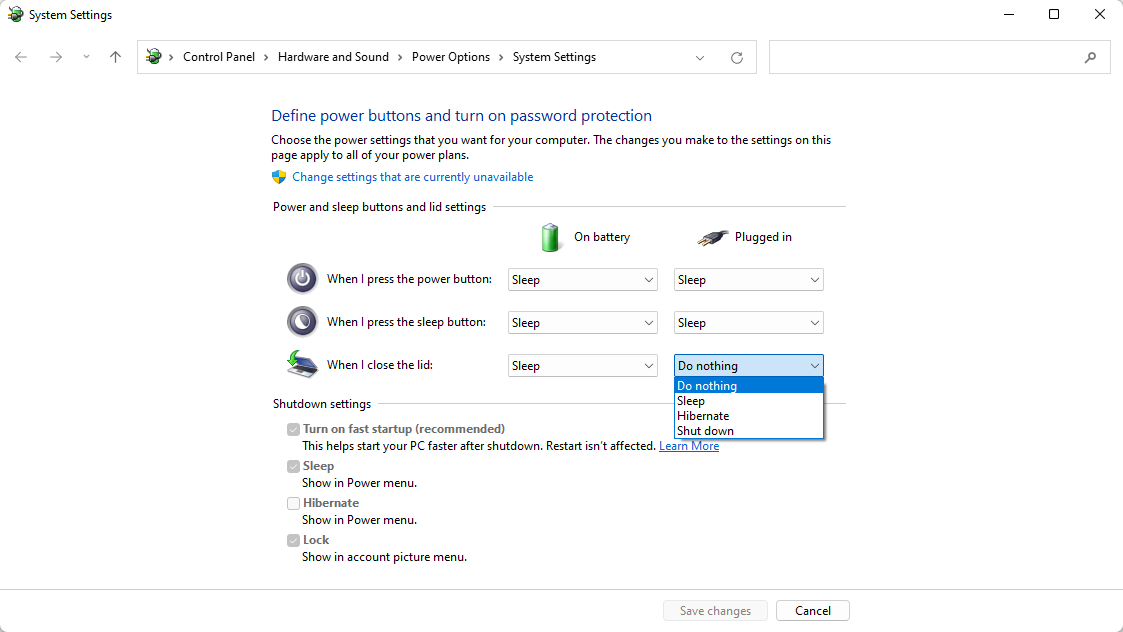
For Windows 11:
Start by right-clicking on the Start button and select Power Options from the menu.
In the upper left corner of the settings window, in the search box, type "lid" then select Change what closing the lid does from the search results
Make sure the setting for When I close the lid under the Plugged In column is set to Do Nothing
Click the Save Changes button to apply the new settings.
Closing the lid should no longer put the computer into sleep mode when an external display and power source is connected, instead one of the external displays should now become the Primary display with the desktop icons instead of the laptop's built-in display.
The lid may still need to be opened to perform the following tasks:
To power on the computer from a fully powered off state
To log into the computer if logged out or if the computer is restarted with the lid closed
To wake the computer from a deep sleep state ( hibernation, or Windows hybrid sleep states )
If your system supports multiple Thunderbolt 3 or USB-C Alt Mode outputs, then you will be able to use multiple adapters on one system. However, there are some Thunderbolt 3/USB-C Alt Mode systems that limit the video output to one port.
Most modern MacBooks with USB-C, USB4, or Thunderbolt 3/4 ports support Alt Mode-based video adapters, making them compatible with Plugable Alt Mode video adapters. This includes:
MacBook Pro (2016 and later)
MacBook Air (2018 and later)
Mac Mini (2018 and later)
iMac (2017 and later)
Mac Studio
Important Note:
M1, M2, M3, and newer MacBooks support only one external display via Alt Mode (with exceptions for the MacBook Pro 14-inch and 16-inch with M1 Pro/Max, M2 Pro/Max, M3 Pro/Max). If you need multiple external displays for a Mac with a base M1, M2, or M3 chip, consider Plugable’s USB Graphics Adapters instead.
Many modern displays can support above the default 60Hz refresh rate, however this may need to be manually set within Windows 11. Please note, not all computers, graphics adapters, and docking stations can support all resolutions and refresh rates.
Setting the Display Refresh Rate in Windows 11
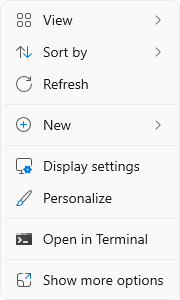
1. Right-click on the desktop and select Display Settings from the drop-down menu
2. Scroll down to the Related settings subsection and select Advanced display
3. At the top of the Advanced display window, select the external display from the drop-down menu
4. From the Choose a refresh rate drop-down menu select the desired refresh rate
Refresh Rate Limitations
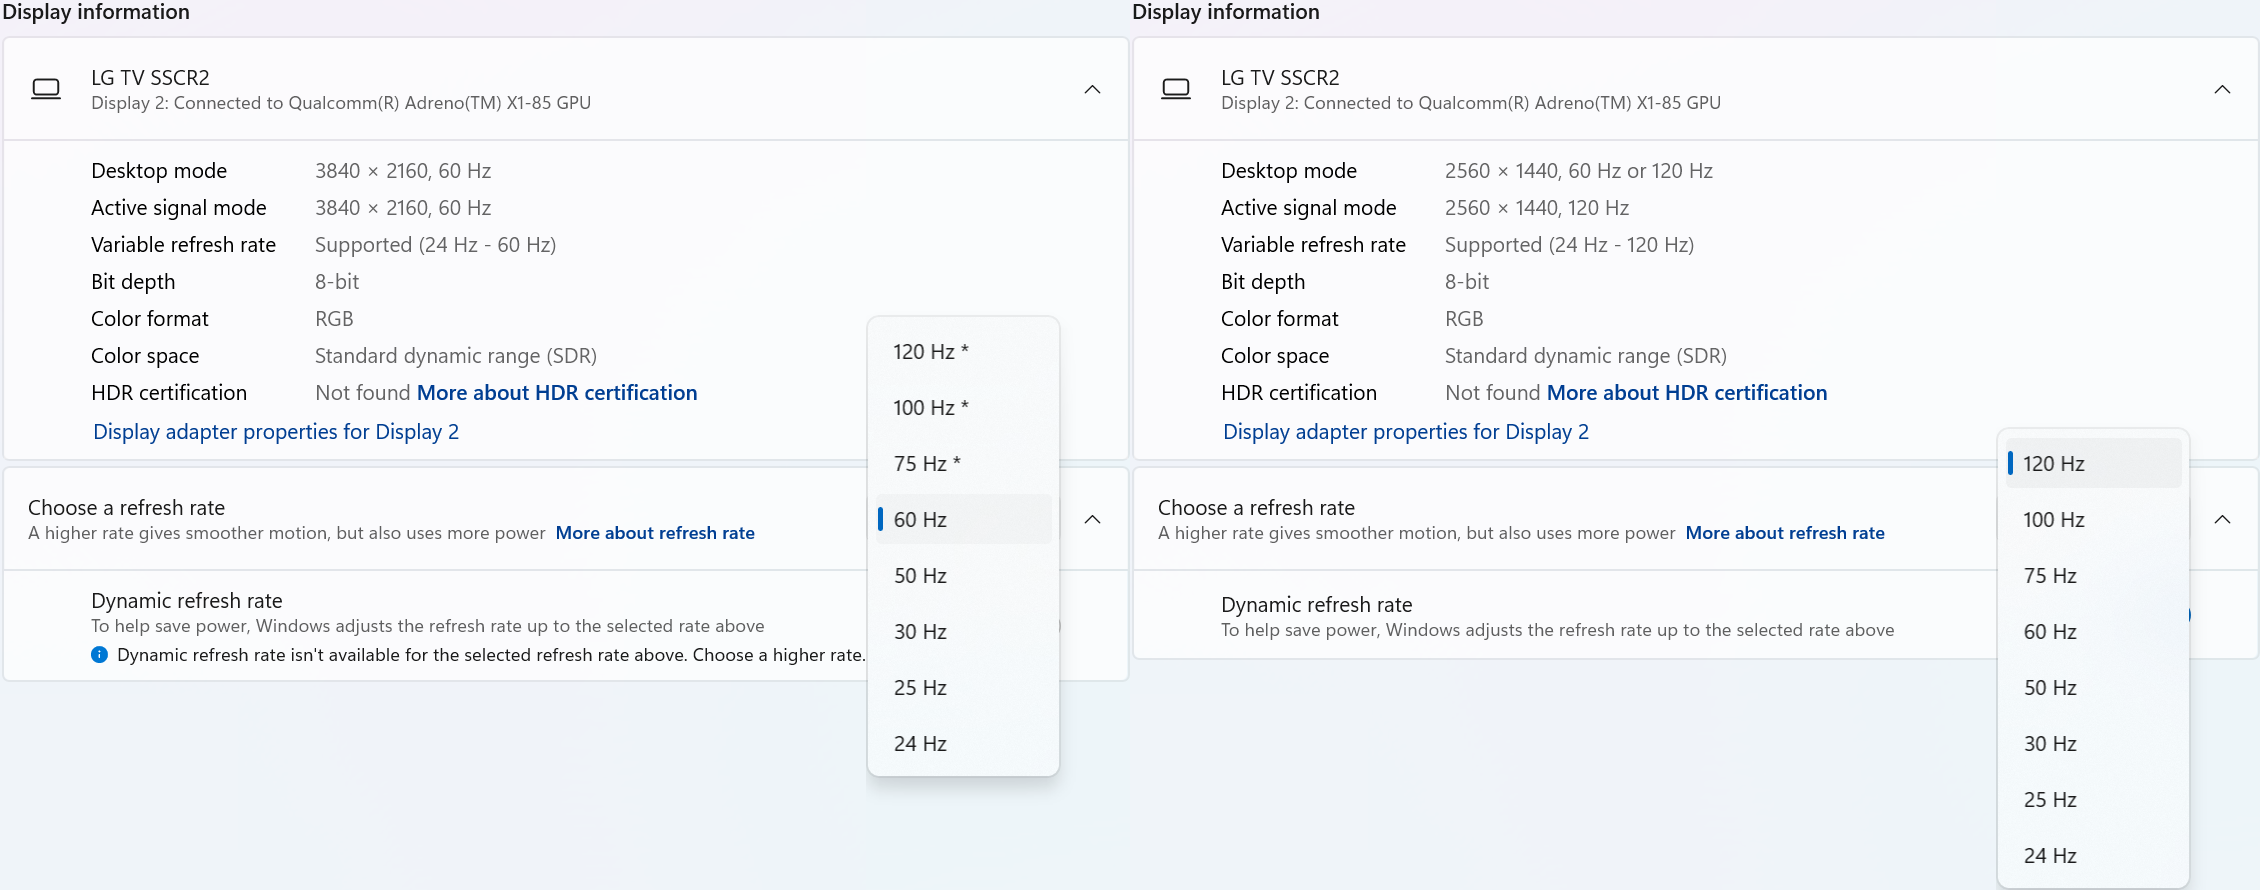
With Windows 24H2 and newer, dynamic refresh rates are supported, this allows the system to adjust the display refresh rate to save power, up to the selected refresh rate. As a consequence of this new mode, when selecting the display refresh rate you may see an asterisk. This indicates that selecting the specific refresh rate may reduce the display resolution or image quality in order to prioritize the refresh rate. This exposes the refresh rate option from the display even if the display cable or computer is incapable of supporting that refresh rate at the native resolution and is the intended behavior per Microsoft. [1]
In the screenshot below the left side shows the 4K 120Hz capable display limited to 60Hz refresh rate without asterisks, and on the right the same display after setting the refresh rate to “120 Hz*”, the “Desktop mode” resolution has been reduced to 2560 x 1440 (1440p) instead of 3840 x 2160 (4K UHD). Unlike when using the display scaling option this also causes a reduction in image quality. On the right side asterisks are no longer shown in the refresh rate list. Setting the refresh rate back to 60Hz does not change the resolution, you will have to go back one page and set the resolution manually.
References
[1] Windows Insider description of new behavior (https://blogs.windows.com/windows-insider/2023/08/31/announcing-windows-11-insider-preview-build-25941-canary-channel/)
Understanding your laptop's video output capabilities is essential when connecting to external displays. This guide will help you identify what video technologies your laptop supports and how to find the relevant information.
Common Video Output Technologies
Modern laptops commonly use one or more of the following technologies to transmit video to external monitors:
1. Thunderbolt 3
Supports video output using the DisplayPort protocol.
Capable of driving up to two 4K displays at 60Hz or one 5K display at 60Hz.
Uses a USB-C connector and features a lightning bolt symbol next to the port.
Note: An example of Thunderbolt 3 ports
2. Thunderbolt 4
Provides improved performance over Thunderbolt 3.
Supports up to two 4K displays at 60Hz or one 8K display.
Uses a USB-C connector with the same lightning bolt symbol but may also include the number "4" for identification.
Note: Thunderbolt 4 has the same physical connection and “lightning” bolt icon as Thunderbolt 3
3. Thunderbolt 5 (As of 2024)
Up to 80 Gbps bi-directional bandwidth (Double that of Thunderbolt 4’s 40 Gbps).
Up to 120 Gbps bandwidth for displays (With Bandwidth Boost — 120 Gbps upstream and 40 Gbps downstream for display-intensive use cases).
Support for dual 6K or 8K displays (Compared to Thunderbolt 4’s dual 4K support).
4. USB-C DisplayPort "Alt Mode"
Allows video output directly through the USB-C port using DisplayPort technology.
Commonly supports one 4K display at 60Hz, but capabilities may vary.
Often marked with a DisplayPort ("DP") symbol, but this feature may also be specified in your system's documentation.
Note: An example of a USB-C port with DisplayPort capabilities
How to Identify Your Laptop's Video Capabilities
To determine what video technologies your laptop supports, follow these steps:
1. Check Your Laptop's User Manual:
Locate your laptop's user manual (often available online from the manufacturer's support site).
Search for keywords like "Thunderbolt," "DisplayPort Alt Mode," or "video output capabilities."
2. Visit the Manufacturer's Website:
Go to the support page for your laptop model and find the technical specifications section.
Look for details on Thunderbolt or USB-C video capabilities.
3. Inspect Your Laptop's Ports:
Check for identifying symbols next to USB-C ports:
Thunderbolt 3/4 ports may have a lightning bolt symbol.
DisplayPort Alt Mode may be marked with a "DP" icon.
“What if I do not have the above technologies?”: USB 3.0 (Type-A) and Display Expansion
While USB 3.0 (Type-A) ports do not support native video output, they can still be used to extend to two or more displays using software-based solutions like DisplayLink or Silicon Motion's InstantView. These technologies enable video through USB-A ports by utilizing dedicated drivers and software.
If your laptop lacks Thunderbolt or USB-C video capabilities, DisplayLink or InstantView may be a viable alternative for expanding your display setup. A few other things to consider:
Not all USB-C ports support video output. Checking your laptop's documentation is crucial to confirm this capability.
Thunderbolt ports are backward compatible with USB-C DisplayPort Alt Mode but provide enhanced performance and flexibility.
If you have further questions about connecting your Plugable docking station or adapter to your laptop, please reach out to our support team for guidance.
All Thunderbolt docking stations include the appropriate Thunderbolt cable in order to connect the docking station to the host computer. As of this writing, all Plugable Thunderbolt host cables that are included with Plugable Thunderbolt docking stations are 1.0 meter (approximately 3.3) feet in overall length.
For reference, the specifications of all Plugable Thunderbolt cables are printed on a small white cable flag attached to the cable itself.
If the original 1.0 meter long Thunderbolt host cable is not sufficient for a specific use case, longer cables of up to 2.0 meters (approximately 6.6 feet) in overall length can be purchased separately from Plugable. An example of such a cable is the Plugable TBT4-40G2M cable
Plugable does NOT support using Thunderbolt host connection cables that are over 2.0 meters in overall length with any Plugable brand product.
Plugable does NOT support the use of any type of Thunderbolt extension cable or any type of signal repeater in conjunction with our products.
Please note, Plugable can only guarantee the performance and compatibility of Plugable brand cables.
All Plugable USB-C docking stations include the appropriate USB-C cable in order to connect the docking station to the host computer. As of this writing, all Plugable USB-C host cables that are included with Plugable USB-C docking stations are 1.0 meter (approximately 3.3) feet in overall length.
For reference, the specifications of all Plugable brand USB-C cables are printed on a small white cable flag attached to the cable itself.
If the original 1.0 meter long USB-C host cable is not sufficient for a specific use case, longer cables of up to 2.0 meters (approximately 6.6 feet) in overall length can be purchased separately from a 3rd-party.
We recommend purchasing a cable that matches or exceeds the specifications of the original Plugable cable and purchasing said cable from both a well known and reliable brand.
Plugable does offer a 1.0 meter long USB-C extension cable (USBC-METER3-1MF) that can be used in conjunction with our USB-C docking stations. This extension cable can be combined with the original 1.0 meter long Plugable USB-C cable included in the box with the docking station to extend the overall cable length to 2.0 meters.
Plugable does NOT support using USB-C host connection cables that are over 2.0 meters in overall length with any Plugable brand product. Additionally, Plugable does NOT support the use of any type of 3rd-party USB-C extension cable or signal repeater in conjunction with our products.
For most modern Windows and Mac systems, Thunderbolt devices are automatically approved and will ‘just work’ once connected.
The main exception is Apple Mac laptops with Apple CPUs running macOS Ventura (13) or newer, where you’ll be prompted to manually approve the device the first time you connect it.
The summary table below provides the specific details at a glance, and the text that follows explains the table in more detail.
To expand further, Thunderbolt 3, 4 and 5 are in essence external connections to the host computer’s internal PCI Express bus. This type of low-level and high speed connection warranted security protocols to prevent unauthorized access to user data.
Windows: From Intel Software to Native OS Support
When Thunderbolt 3 Windows systems were first introduced in late 2015 it was necessary to use Intel Thunderbolt software to manually authenticate and approve external Thunderbolt devices.
With the introduction of Thunderbolt 4 Windows systems in 2020, it was still necessary to have Intel Thunderbolt software installed on the host computer. However, in most cases the authentication and approval process would happen automatically greatly simplifying the process.
Starting with Windows 11 version 21H2 released in October of 2021, Microsoft integrated support for both USB4 and Thunderbolt into the Windows operating system → LINK
This means that with most modern Thunderbolt 4 and Thunderbolt 5 computers running the latest version of Windows 11 it is no longer necessary to install Intel Thunderbolt software on the host computer in order to manage Thunderbolt devices. In most cases, the authentication and approval process will still happen automatically.
macOS: From Intel CPUs to Apple CPUs
When Thunderbolt 3 Mac systems with Intel CPUs were first introduced in 2016, the authentication and approval mechanism was built-in to macOS and was transparent to the end user.
Apple introduced Mac computers based on Apple CPUs in 2020. Macs based on Apple CPUs running macoS 11 Big Sur or macOS 12 Monterey would automatically approve and authenticate Thunderbolt devices when connected.
macOS 13 Ventura was released in 2022 and for portable Macs with Apple CPUs Apple introduced a feature known as ‘Accessory Security’ (also known as ‘Restricted Mode’) → LINK
By default, portable Macs (i.e. laptops) with an Apple CPU running macOS 13 Ventura or newer version of macOS will require the end user to authenticate and approve a Thunderbolt device when initially connected.
Stationary Macs (i.e. desktops) with an Apple CPU running macOS 13 Ventura or newer version of macOS do NOT implement the ‘Accessory Security’ feature. As a result, Thunderbolt devices will be automatically approved and authenticated when initially connected.
Apple Macs with Intel CPUs (both laptop and desktops) running macOS 13 Ventura or newer do NOT implement the ‘Accessory Security’ feature. As a result, Thunderbolt devices will be automatically approved and authenticated when initially connected.