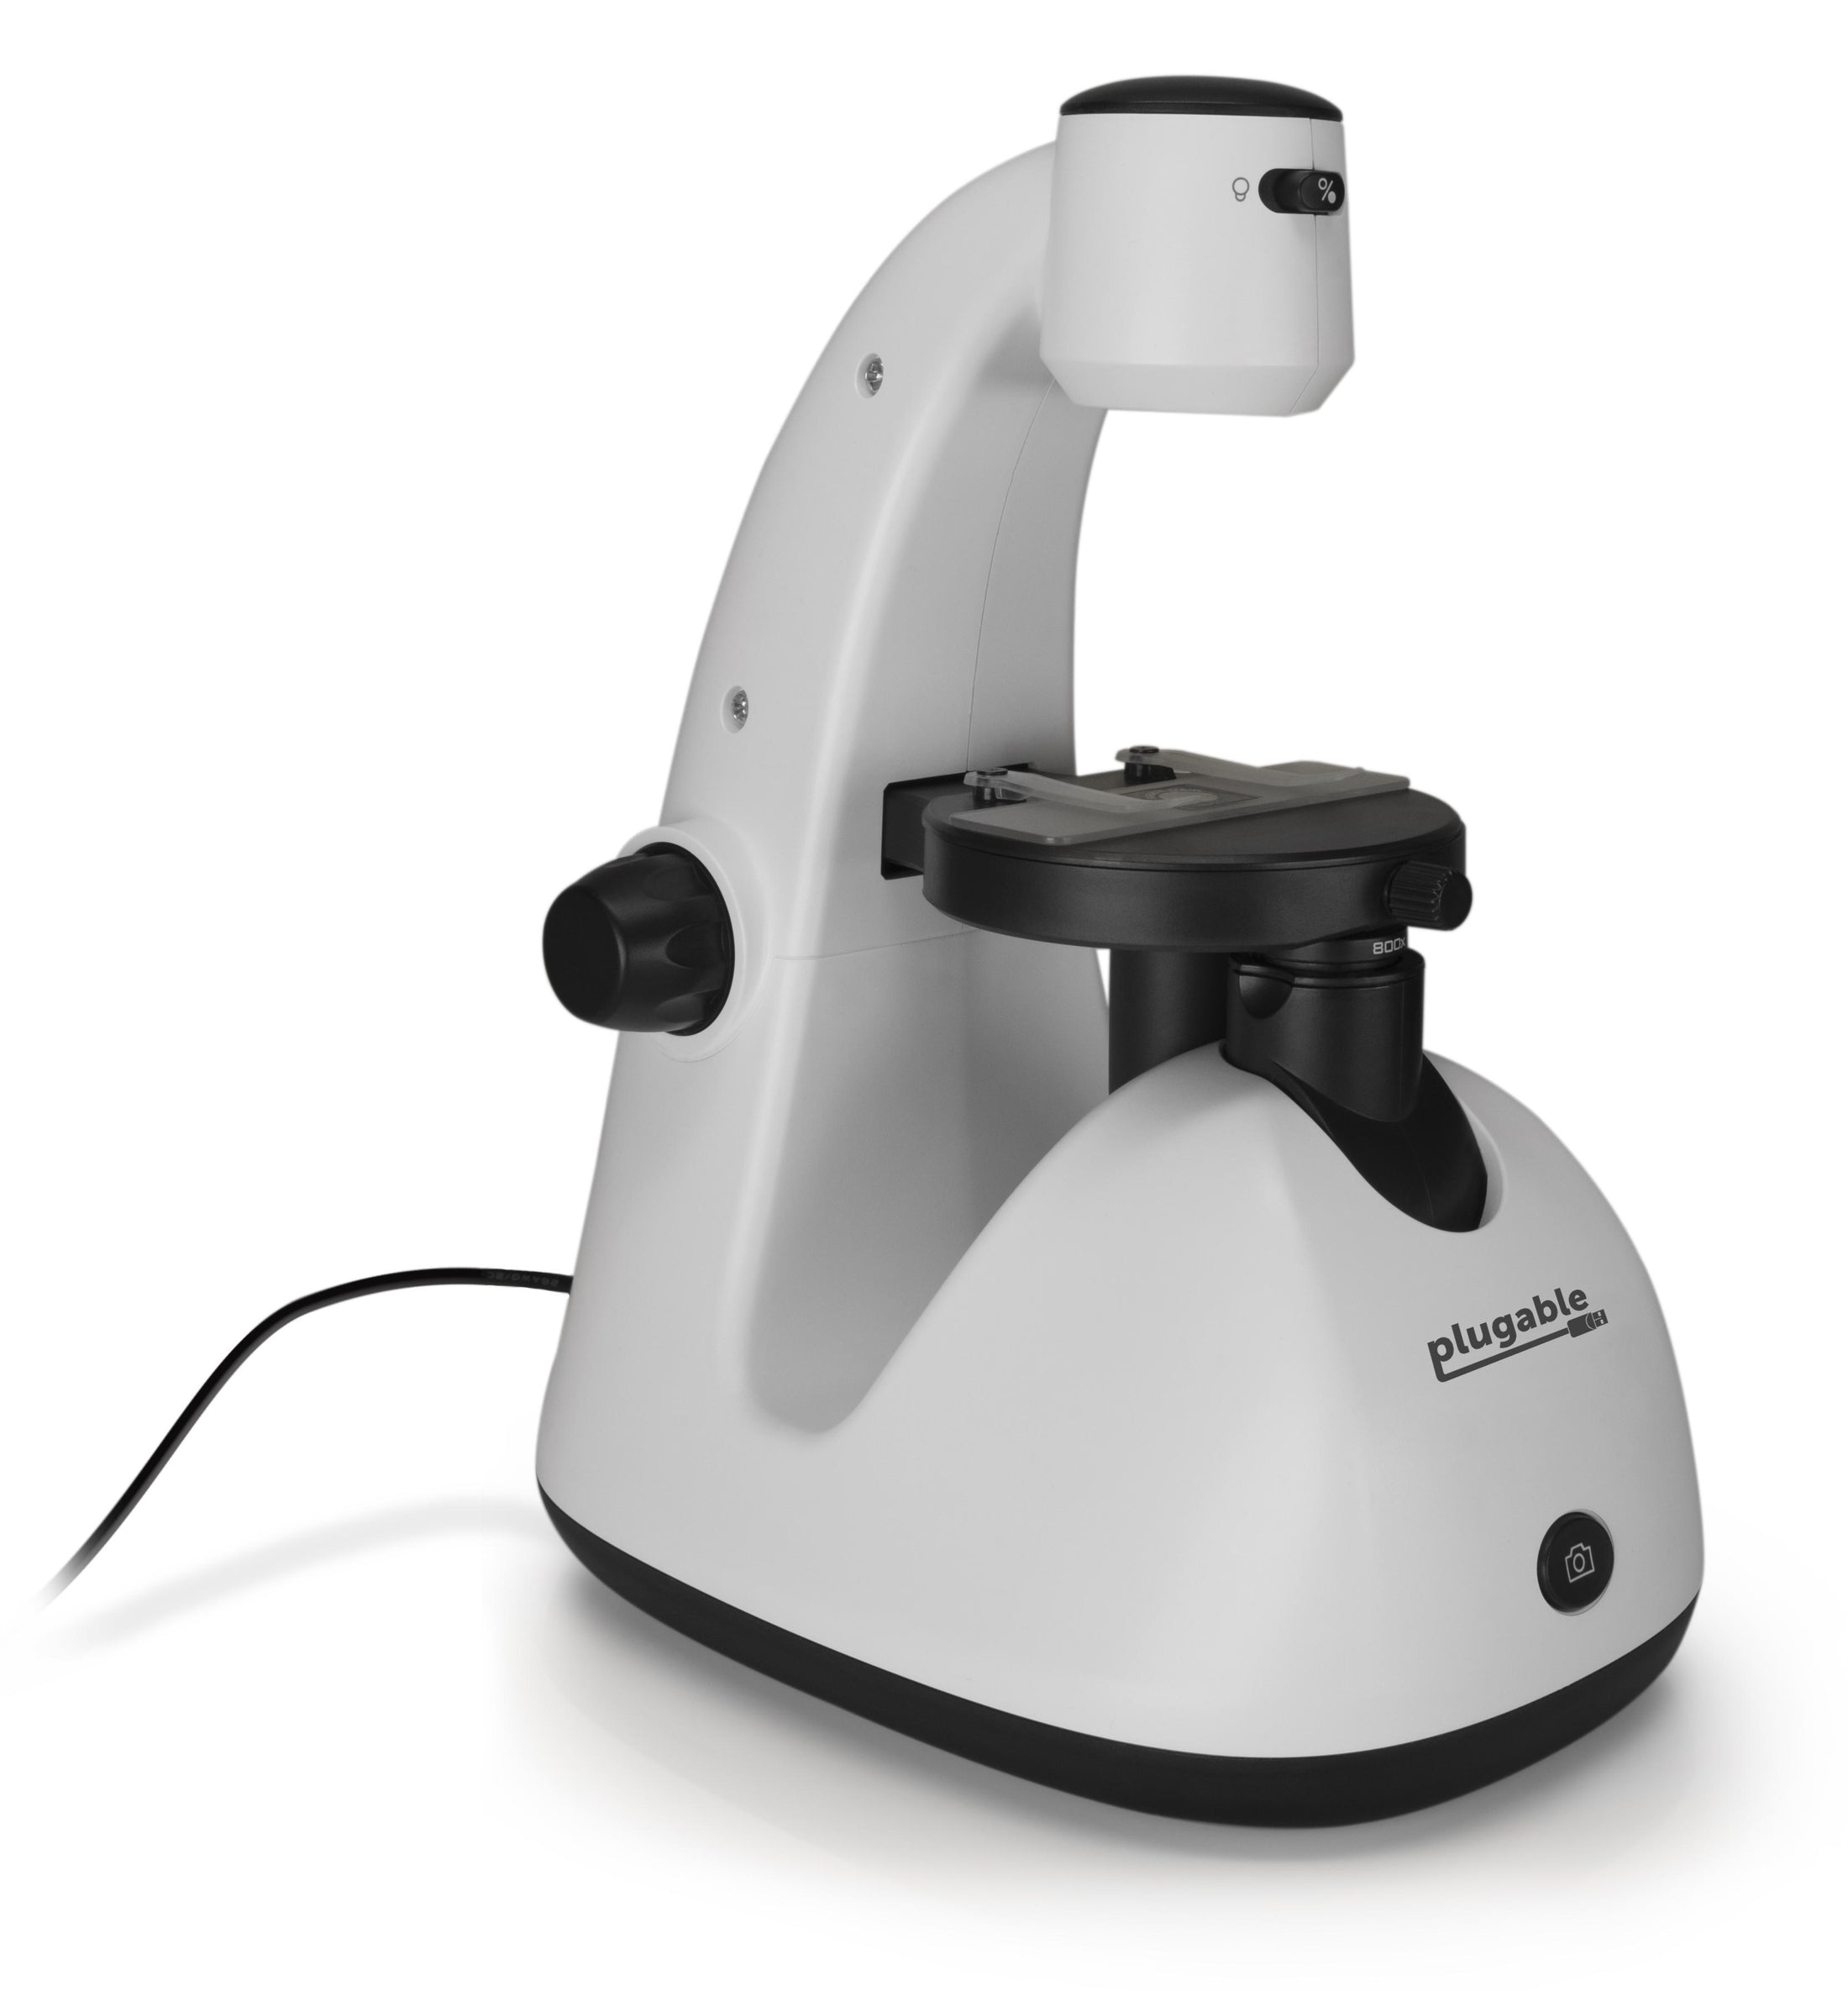

Hobby Focused—
Useful and fun for students, collectors, testers, and anyone interested in exploring the microscopic world
Transmissive and Reflective—
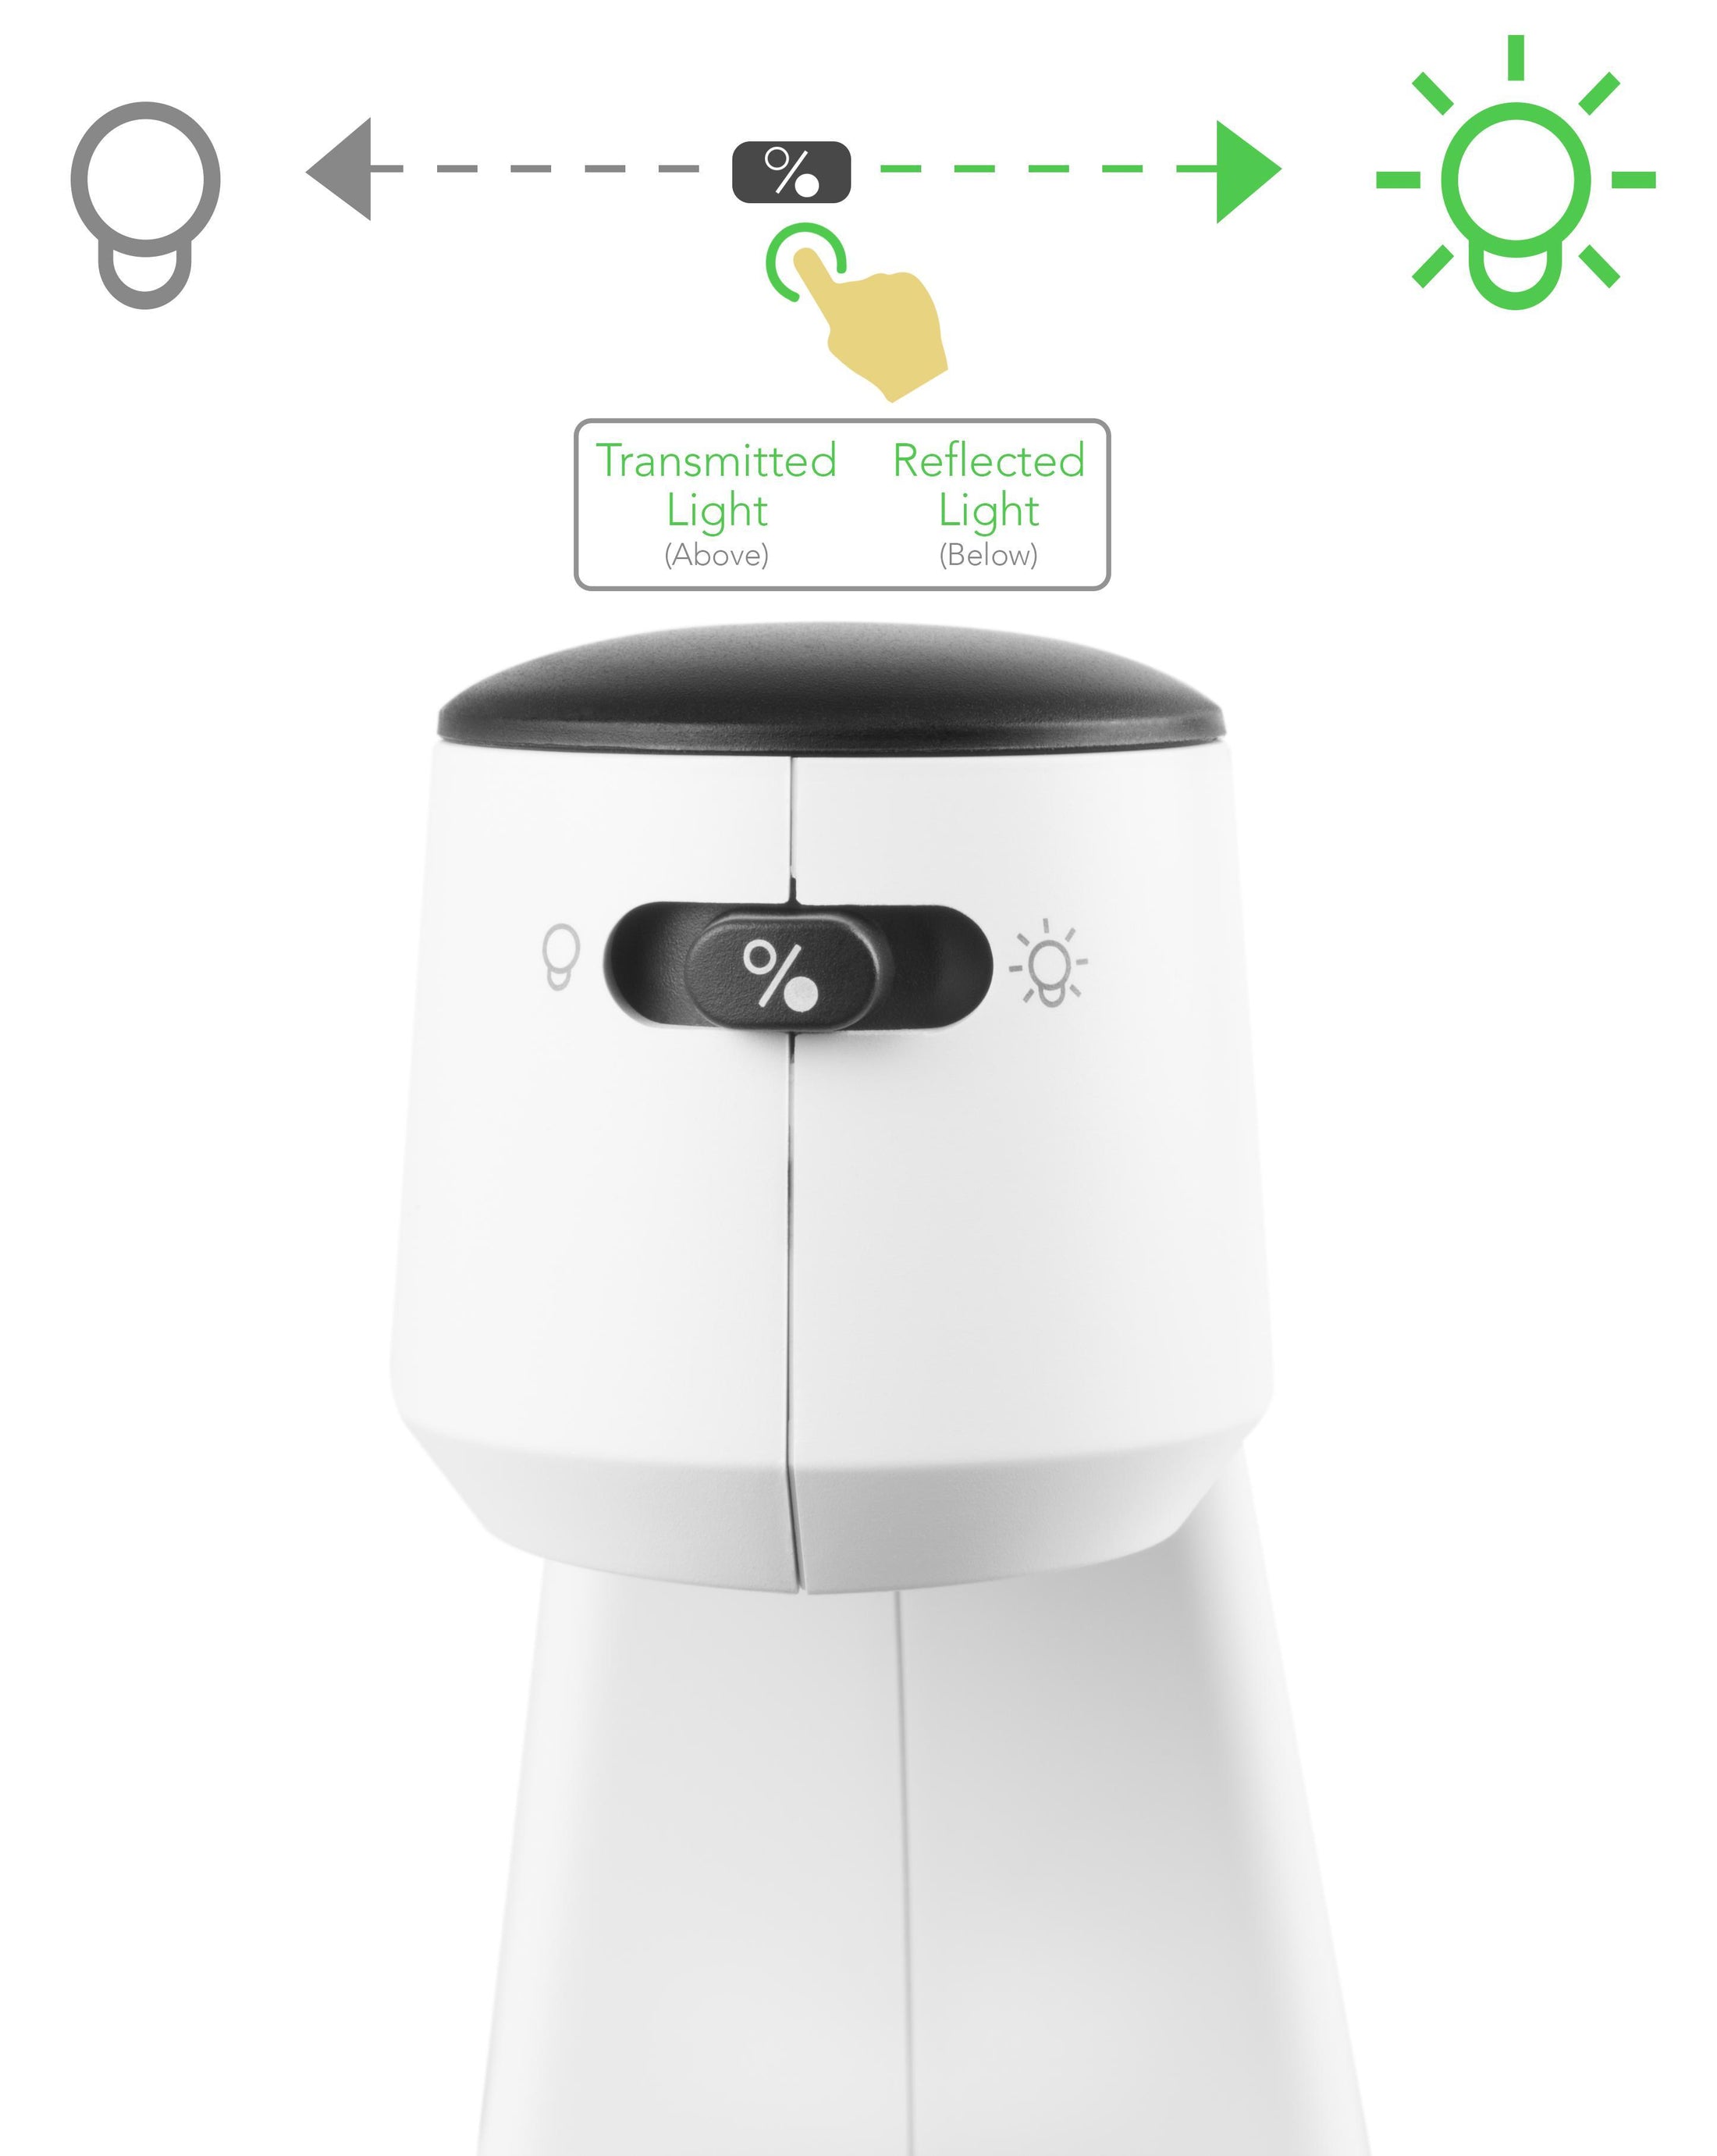
Inverted microscope with allows larger objects such as petri dish cultures or metallurgical samples to be viewed. Built-in dimmable LED illumination above and below the stage for both reflected and transmitted lighting modes.
High Definition - 2.0 Megapixels, up to 800x magnification (Note—
Final magnification corresponds to monitor size)
Broad Compatibility—
Uses a webcam chipset and sensor to support nearly any operating system using standard webcam software. Users with an Oculus Rift may require additional setup
2-Year Coverage, Lifetime Support—
Every Plugable product, including this Inverted Digital Optical USB Microscope, is covered against defects for 2 years and comes with lifetime support. If you ever have questions, contact our North American-based team - even before purchase
Explore the World at the Microscopic Level With Plugable’s Inverted Digital USB Microscope!
Great for kids, hobbyists, and professionals, the Plugable 800x Inverted USB 2.0 Digital Microscope (USB2-MICRO-800X) allows you to work quickly and effectively at the microscopic level. Common uses include classroom exploration, observing plant and animal cells, fiber analysis, surface inspection, and much more.This adaptable tool can be used for either surface inspection or slides with both transmissive and reflective lighting. The rugged plastic body makes it ideal for children, classrooms, or industrial applications.
Features
Built-In Lighting
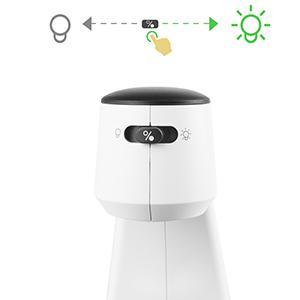
The Microscope includes built-in LEDs both above and below the stage that can be dialed through a range of brightness levels to properly illuminate your subject.
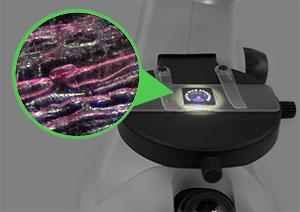
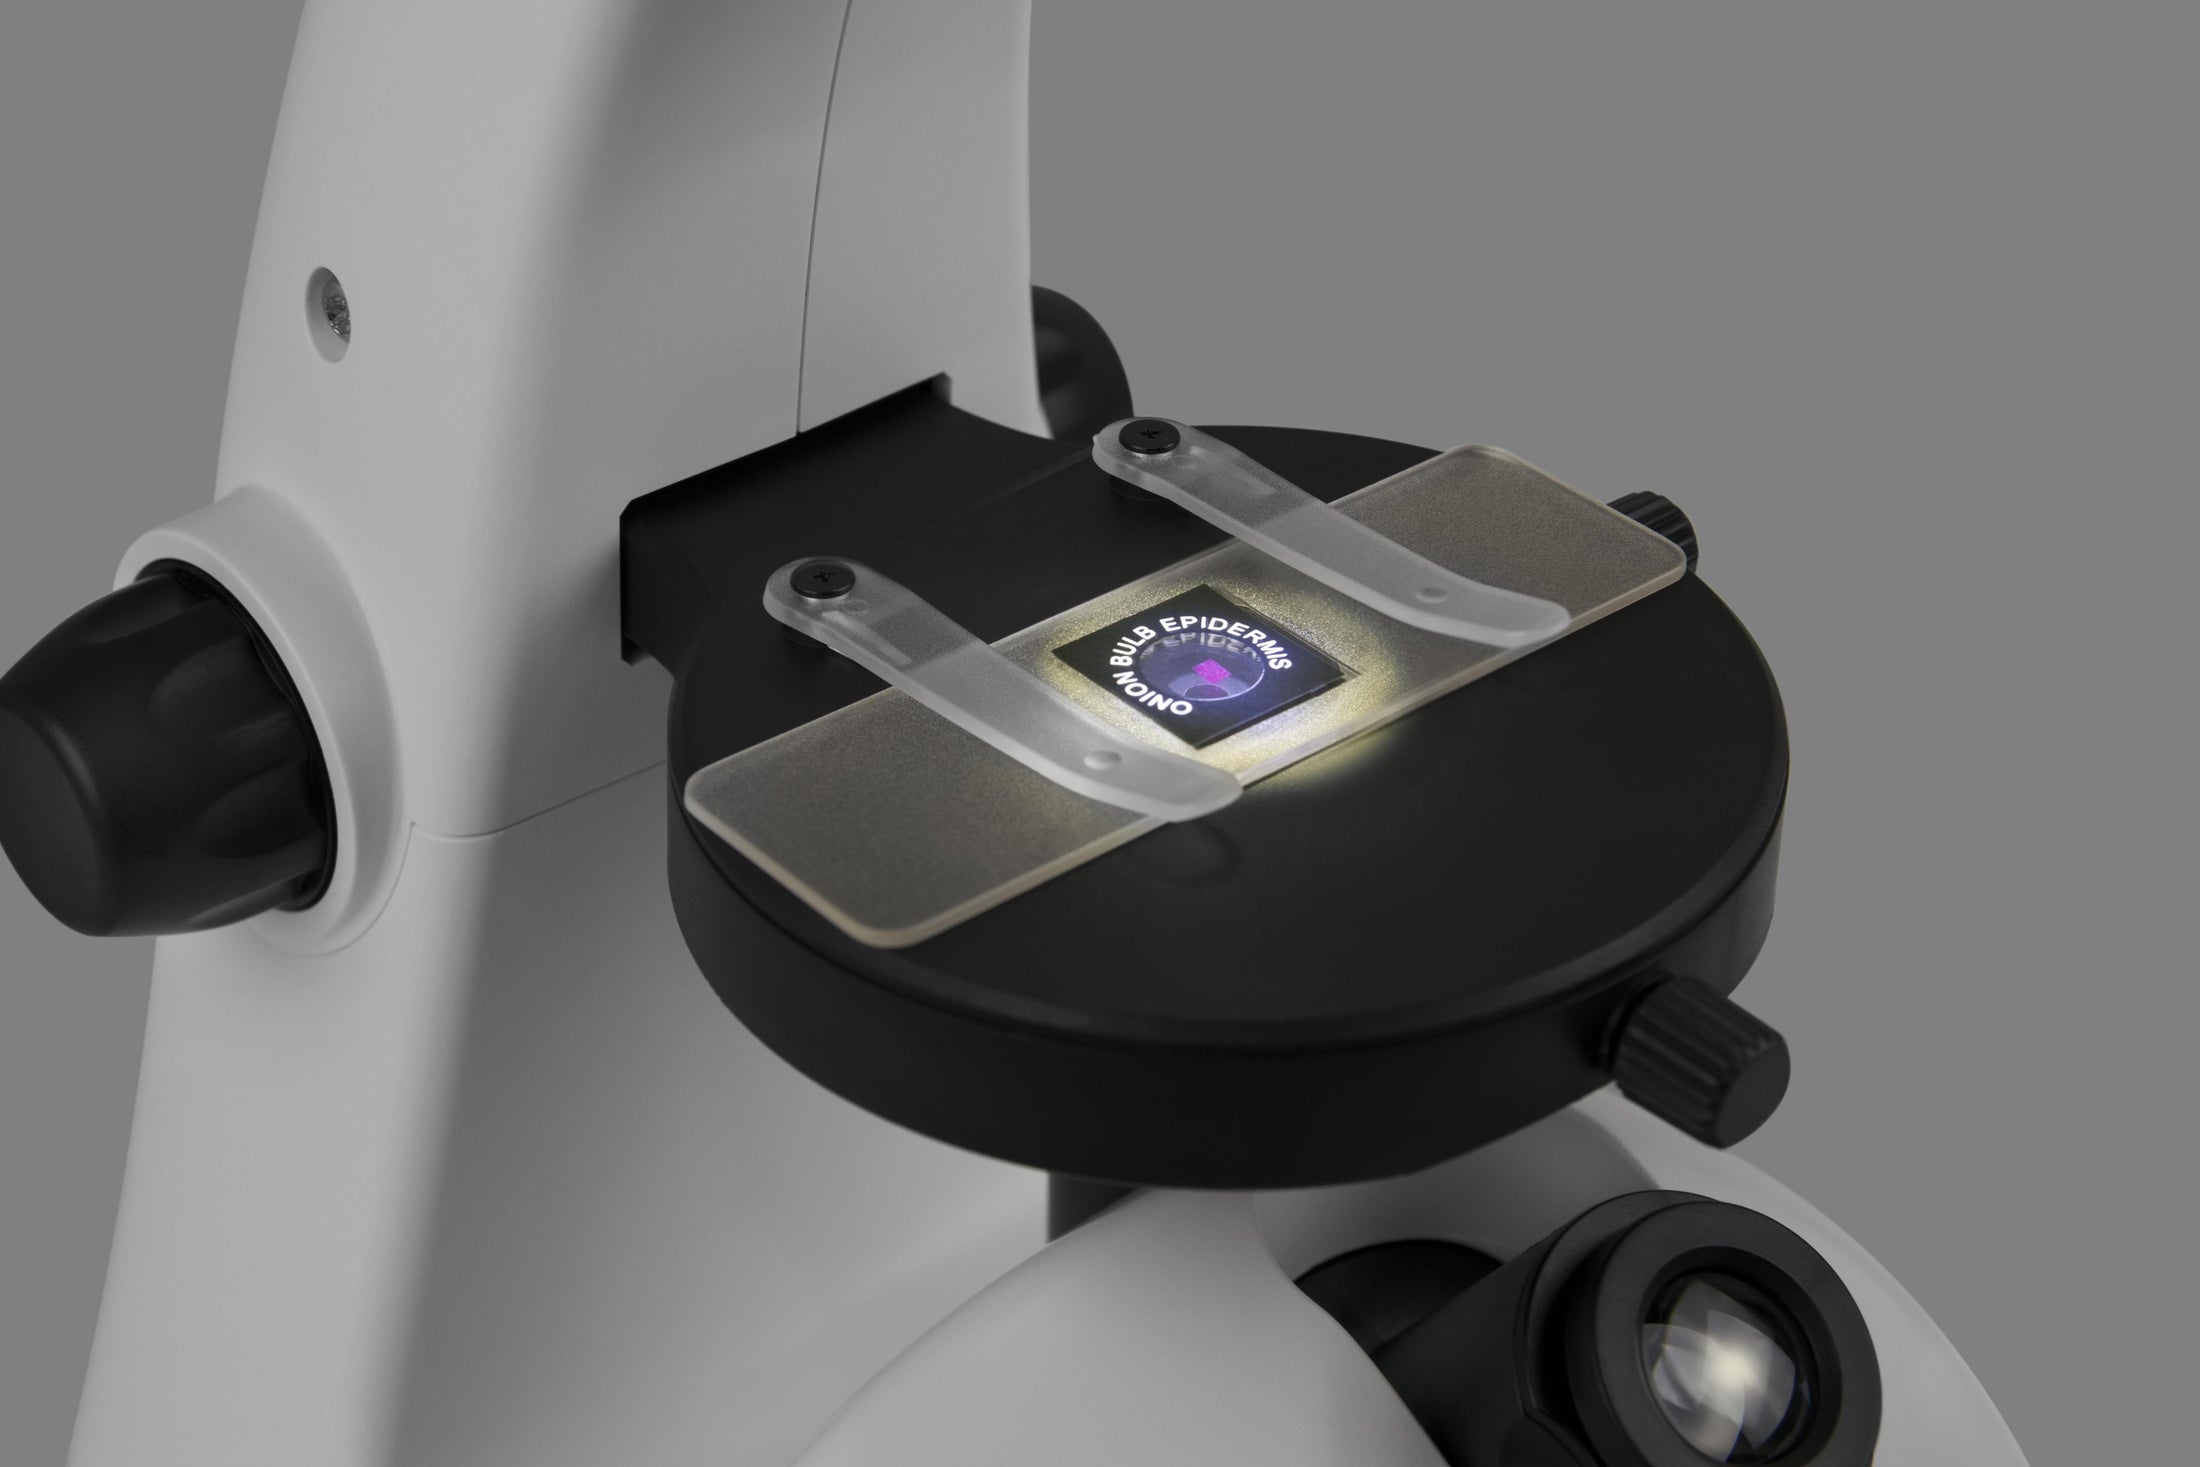
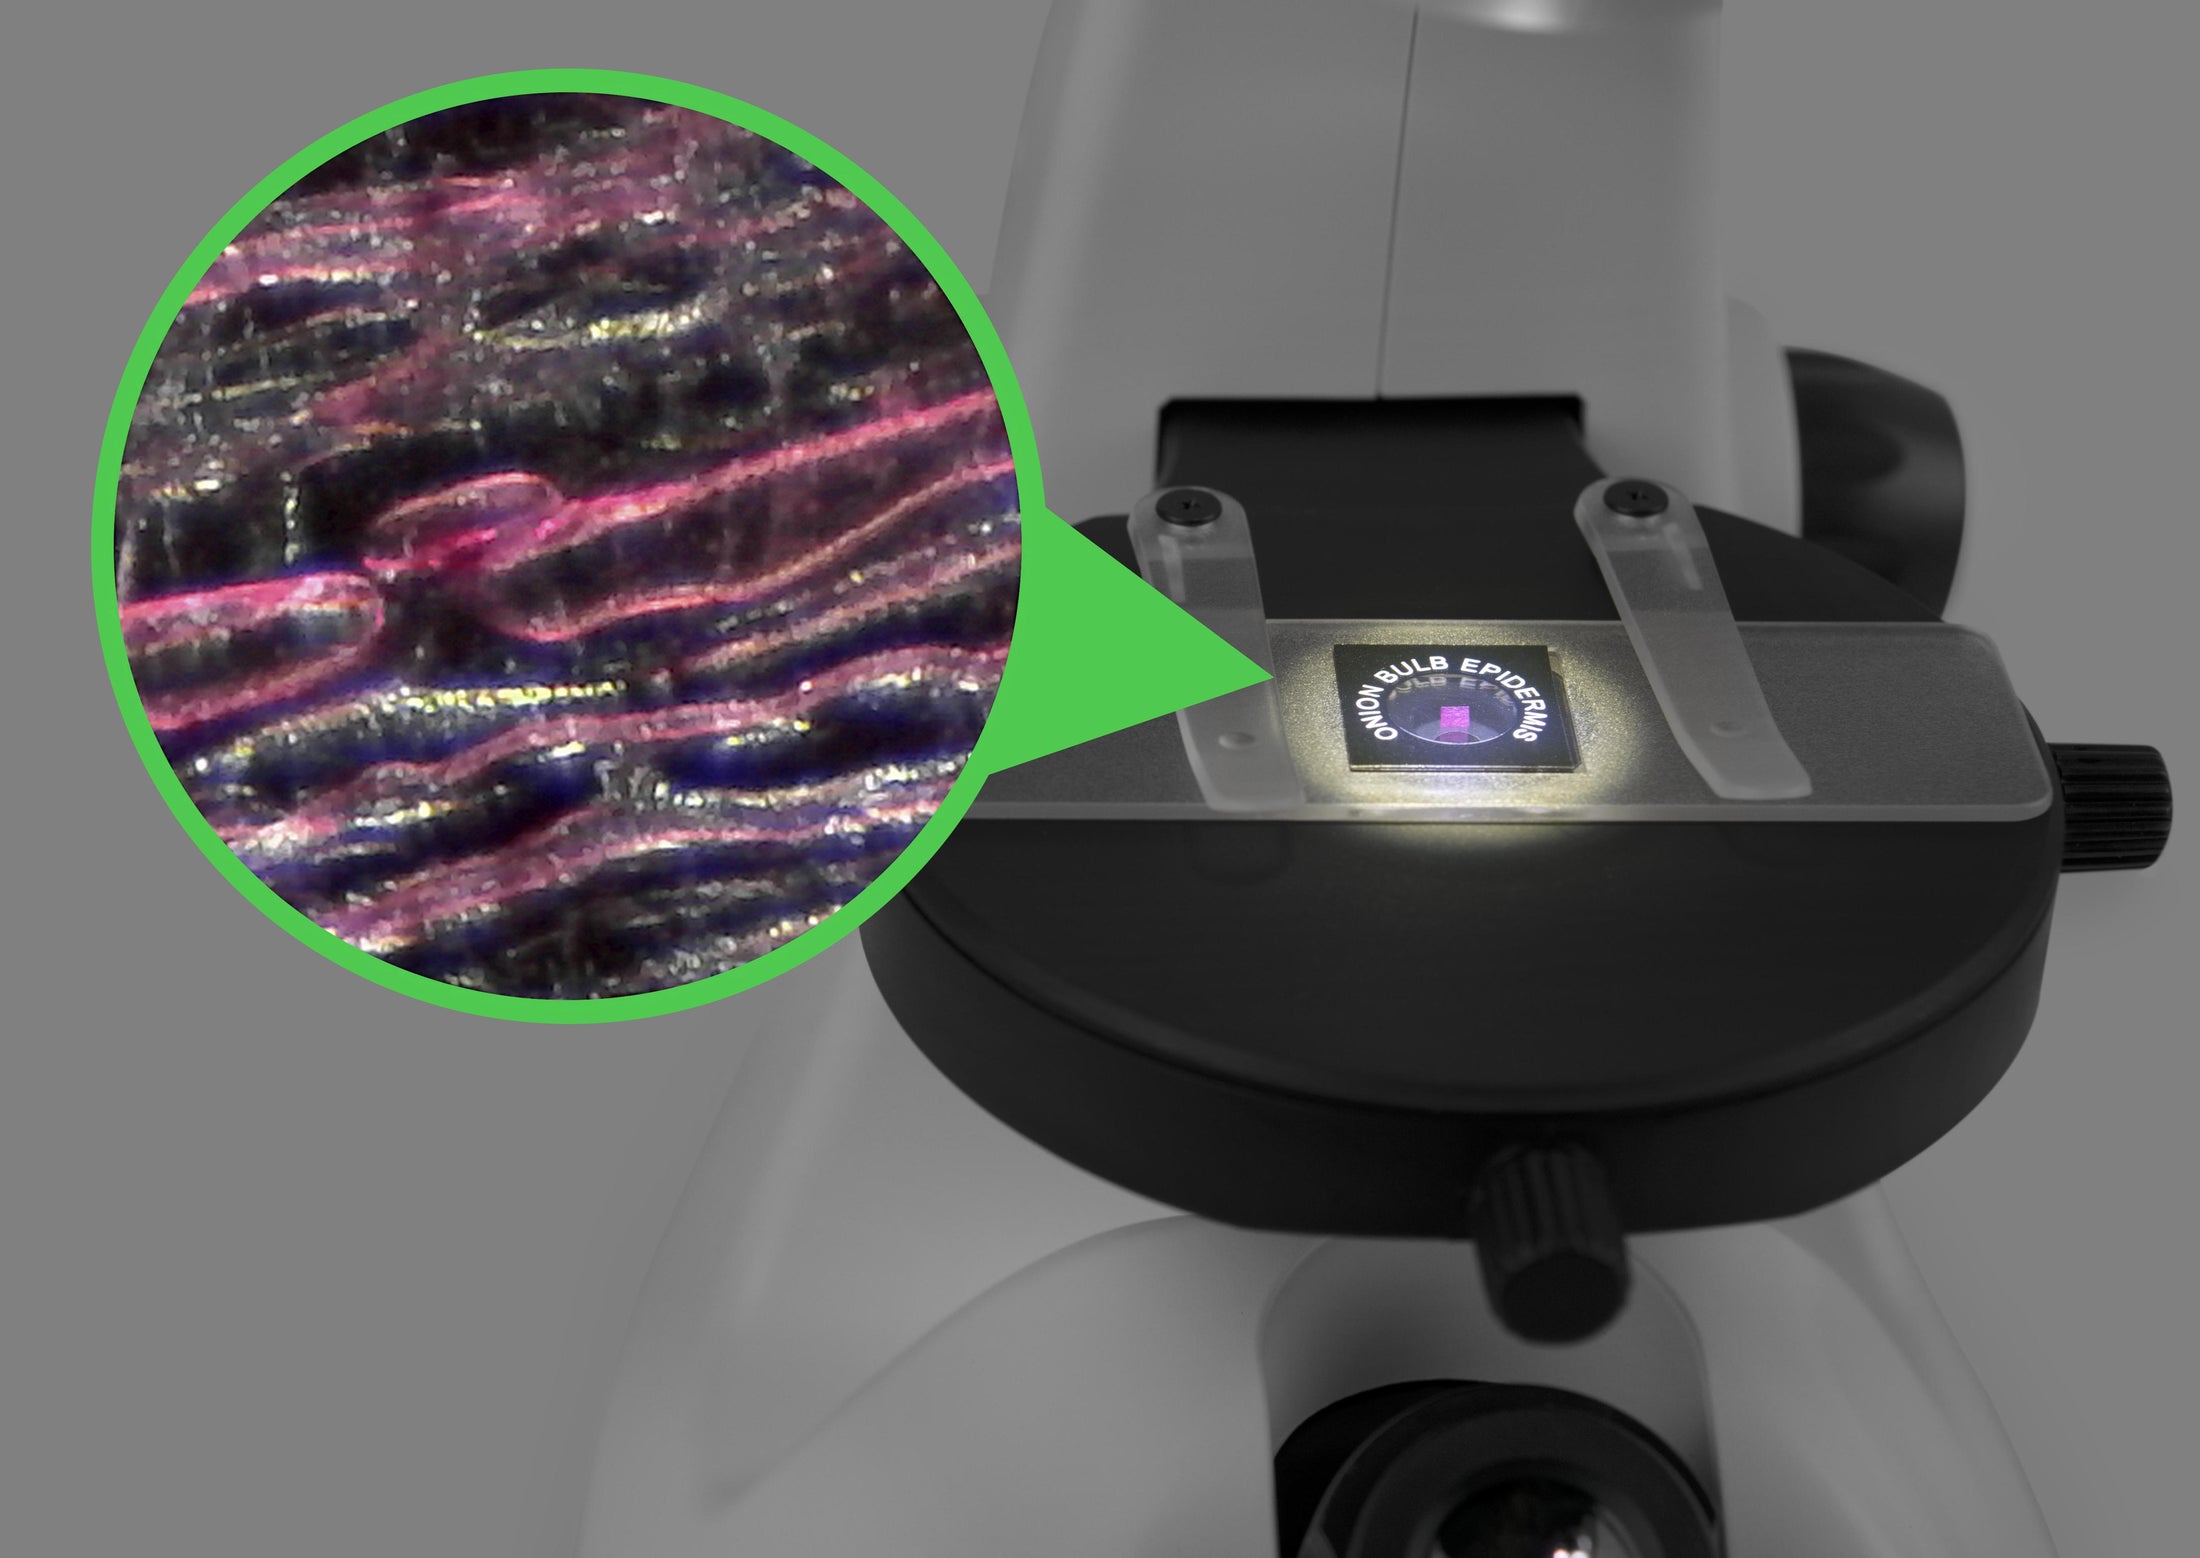
Transmit light through translucent samples using the top LED with single lens condenser, or reflect light off opaque subjects with the bottom LEDs. With this versatility, no discoveries are left in the dark.
Multiple Viewing Options
Unlike a standard compound microscope that can only view thin slides, this inverted microscope design can also accommodate larger subjects like metallurgical samples and petri dish cultures.
Placing microscopic objects in just the right spot can be difficult, but the position adjustment knobs make it easy to set the stage for seeing small things in a big way.
No Host Device Neccessary
Simply extend the built-in 800x optical eyepiece to view samples without the need for software.
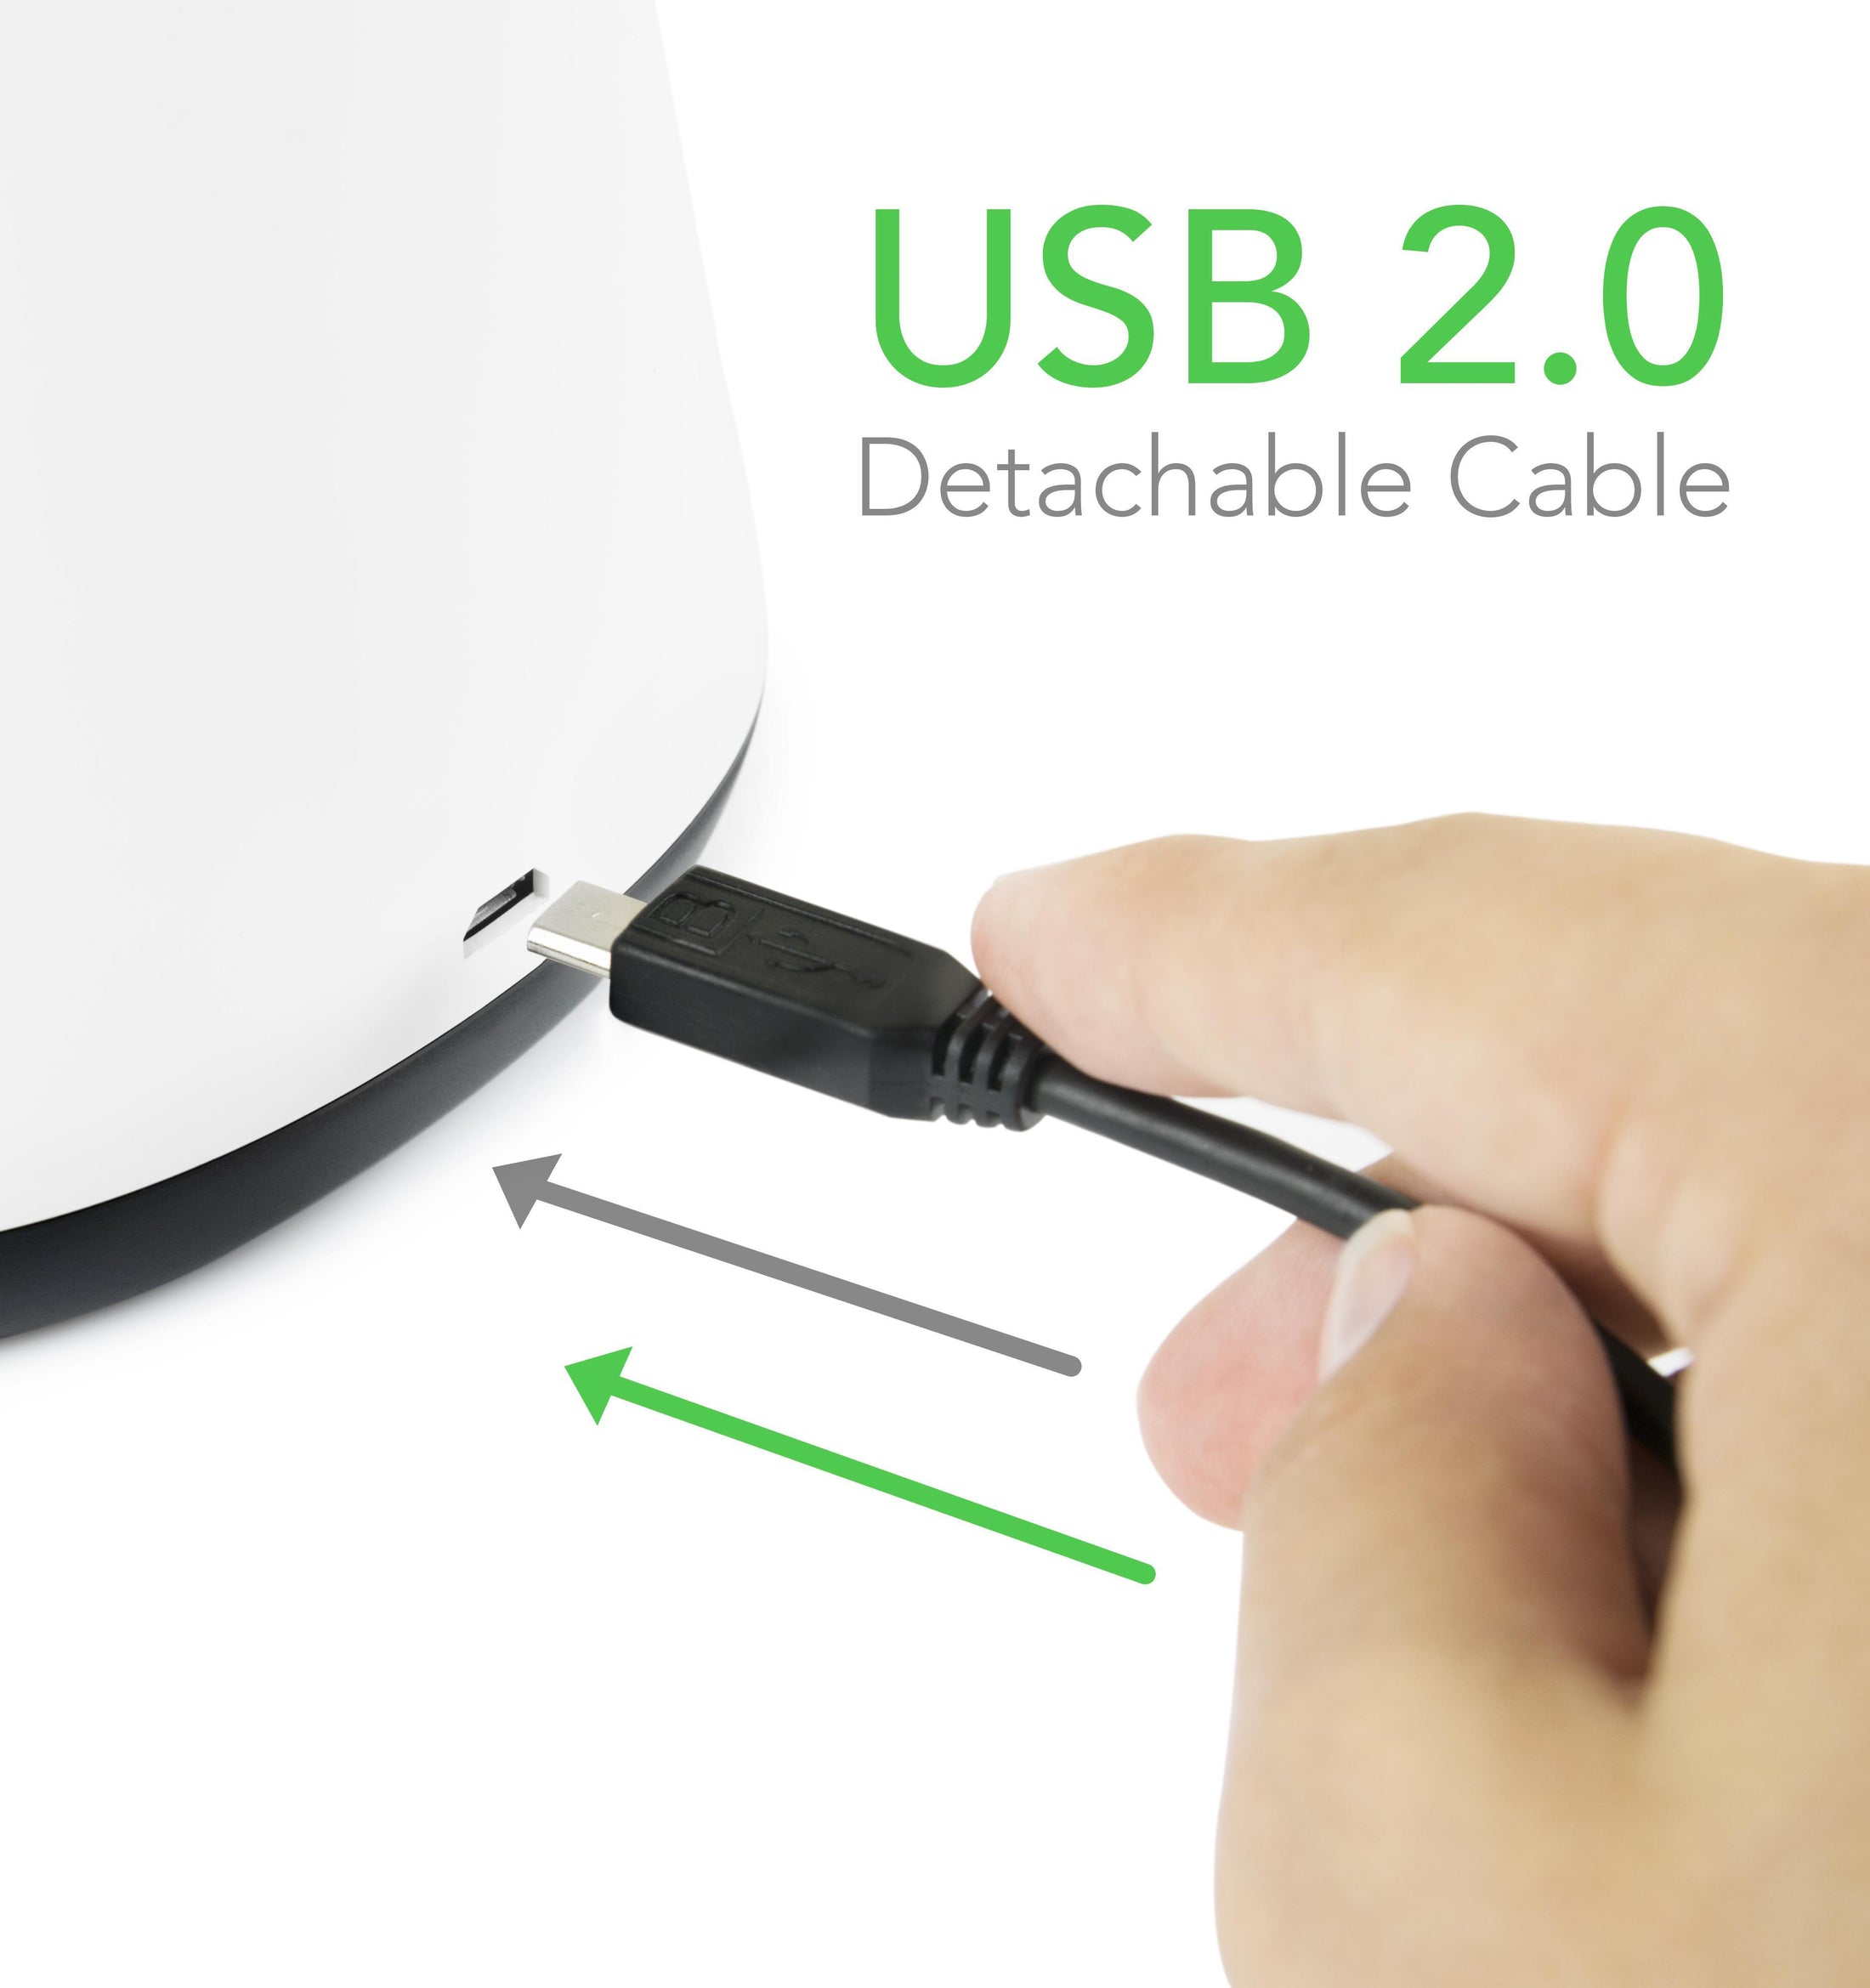
Installing 3 AA batteries (not included) allows you to unplug the detachable USB cable and leave your computer behind.
Compatibility
Windows
USB Video Class (UVC) support is built in to all versions of Windows from XP and above. This includes Windows 10, 8.x, 7, Vista, and XP. Companion software is available on our website that allows finer control of the device, or any other video capture software can be used.
macOS and OS X
Mac computers with OS versions 10.4.2 and above have built-in support for USB Video Class (UVC) devices. Companion software is available on our website that allows finer control of the device, or you can use any video capture software, including Photo Booth (with limitations).
Linux
Linux distributions with kernels 2.6.26 and above have built-in support for USB Video Class (UVC) devices. Works on Raspberry Pi with Raspbian Jessie. We recommend using Cheese or GTK+ UVC Viewer.
Chrome and Android
Works on all Chrome OS devices with the built-in Camera application. Many newer Android devices support the microscope using an OTG cable and a viewing application. Select Android devices many not, and it's up to the device manufacturer to support external cameras.
iOS
iOS devices (iPhones, iPads) are not compatible with external cameras.
Fine Focus
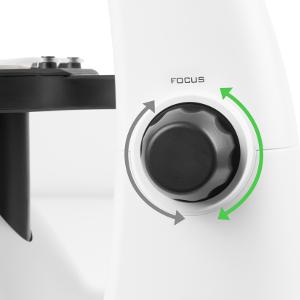
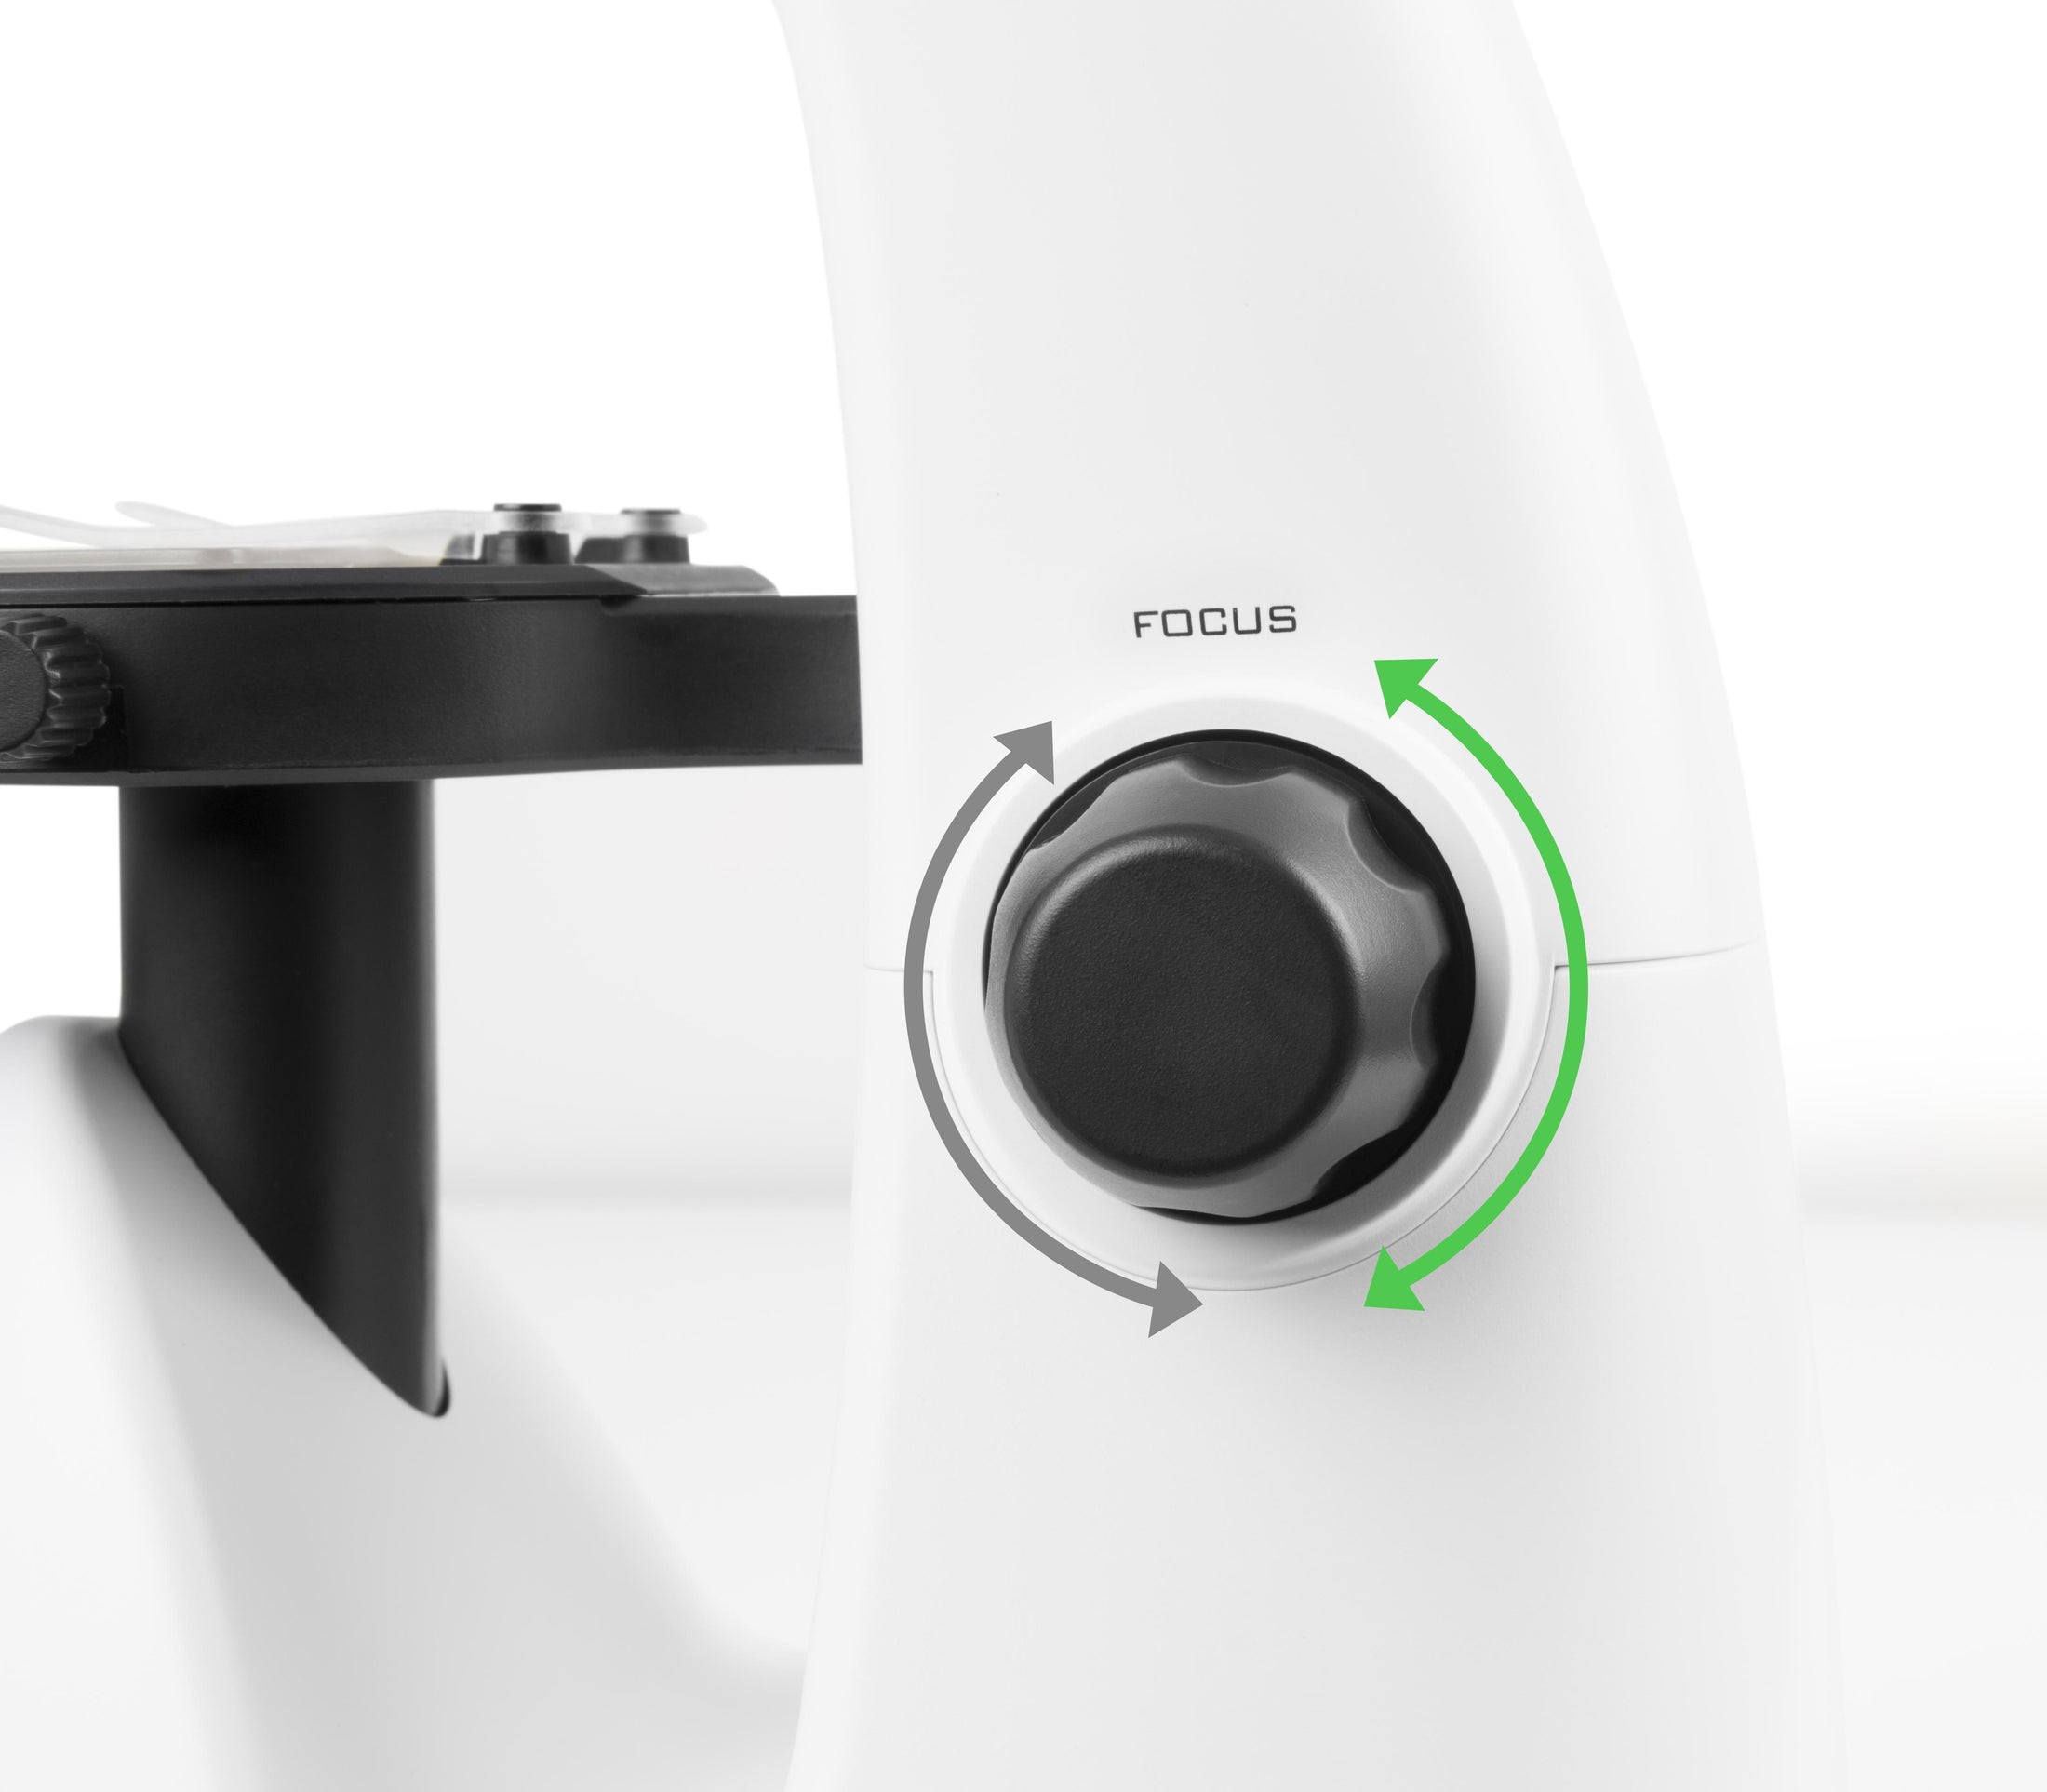
The focus adjustment knobs on either side of the microscope provide precise control over the position of the focal point, allowing a clear view of the individual layers of a sample.
250x Magnification
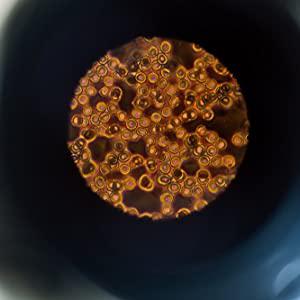
Adjust to 800x magnification to see the microscopic world! See cells and particles not visible to the human eye.
In the Box
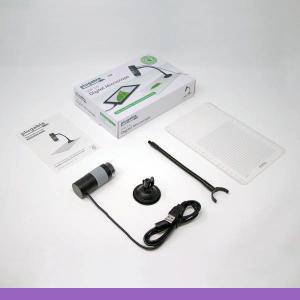
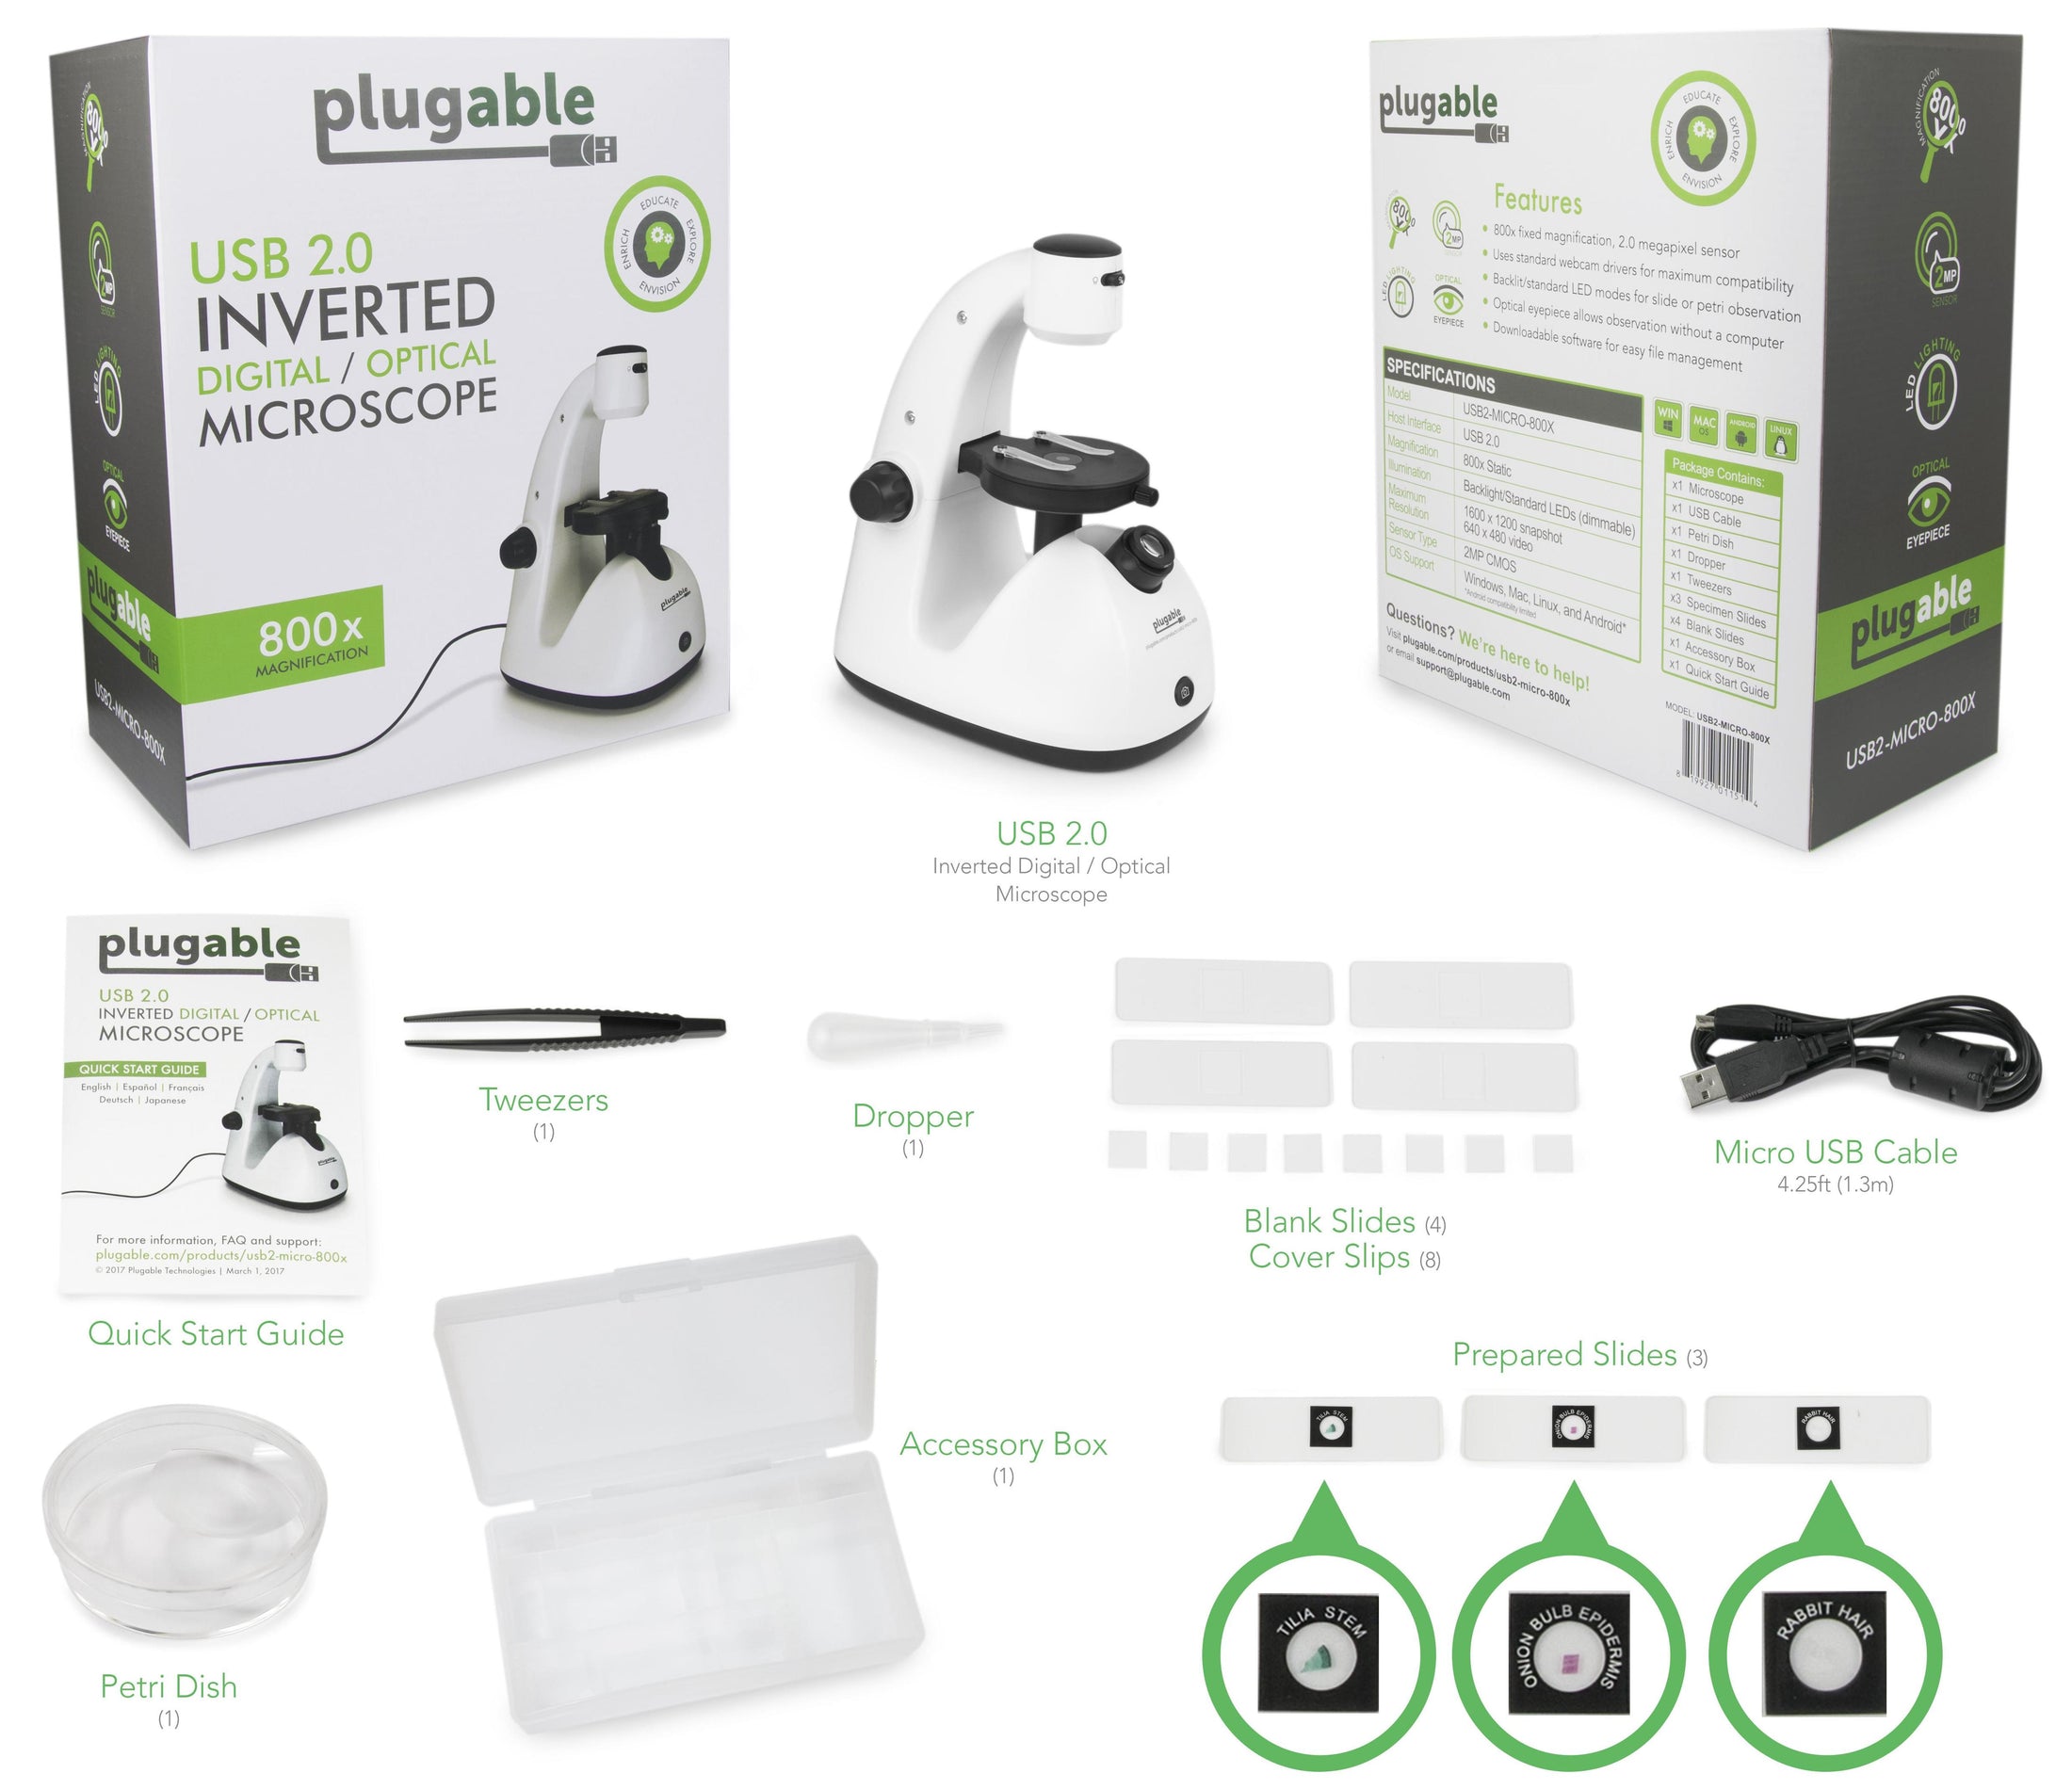
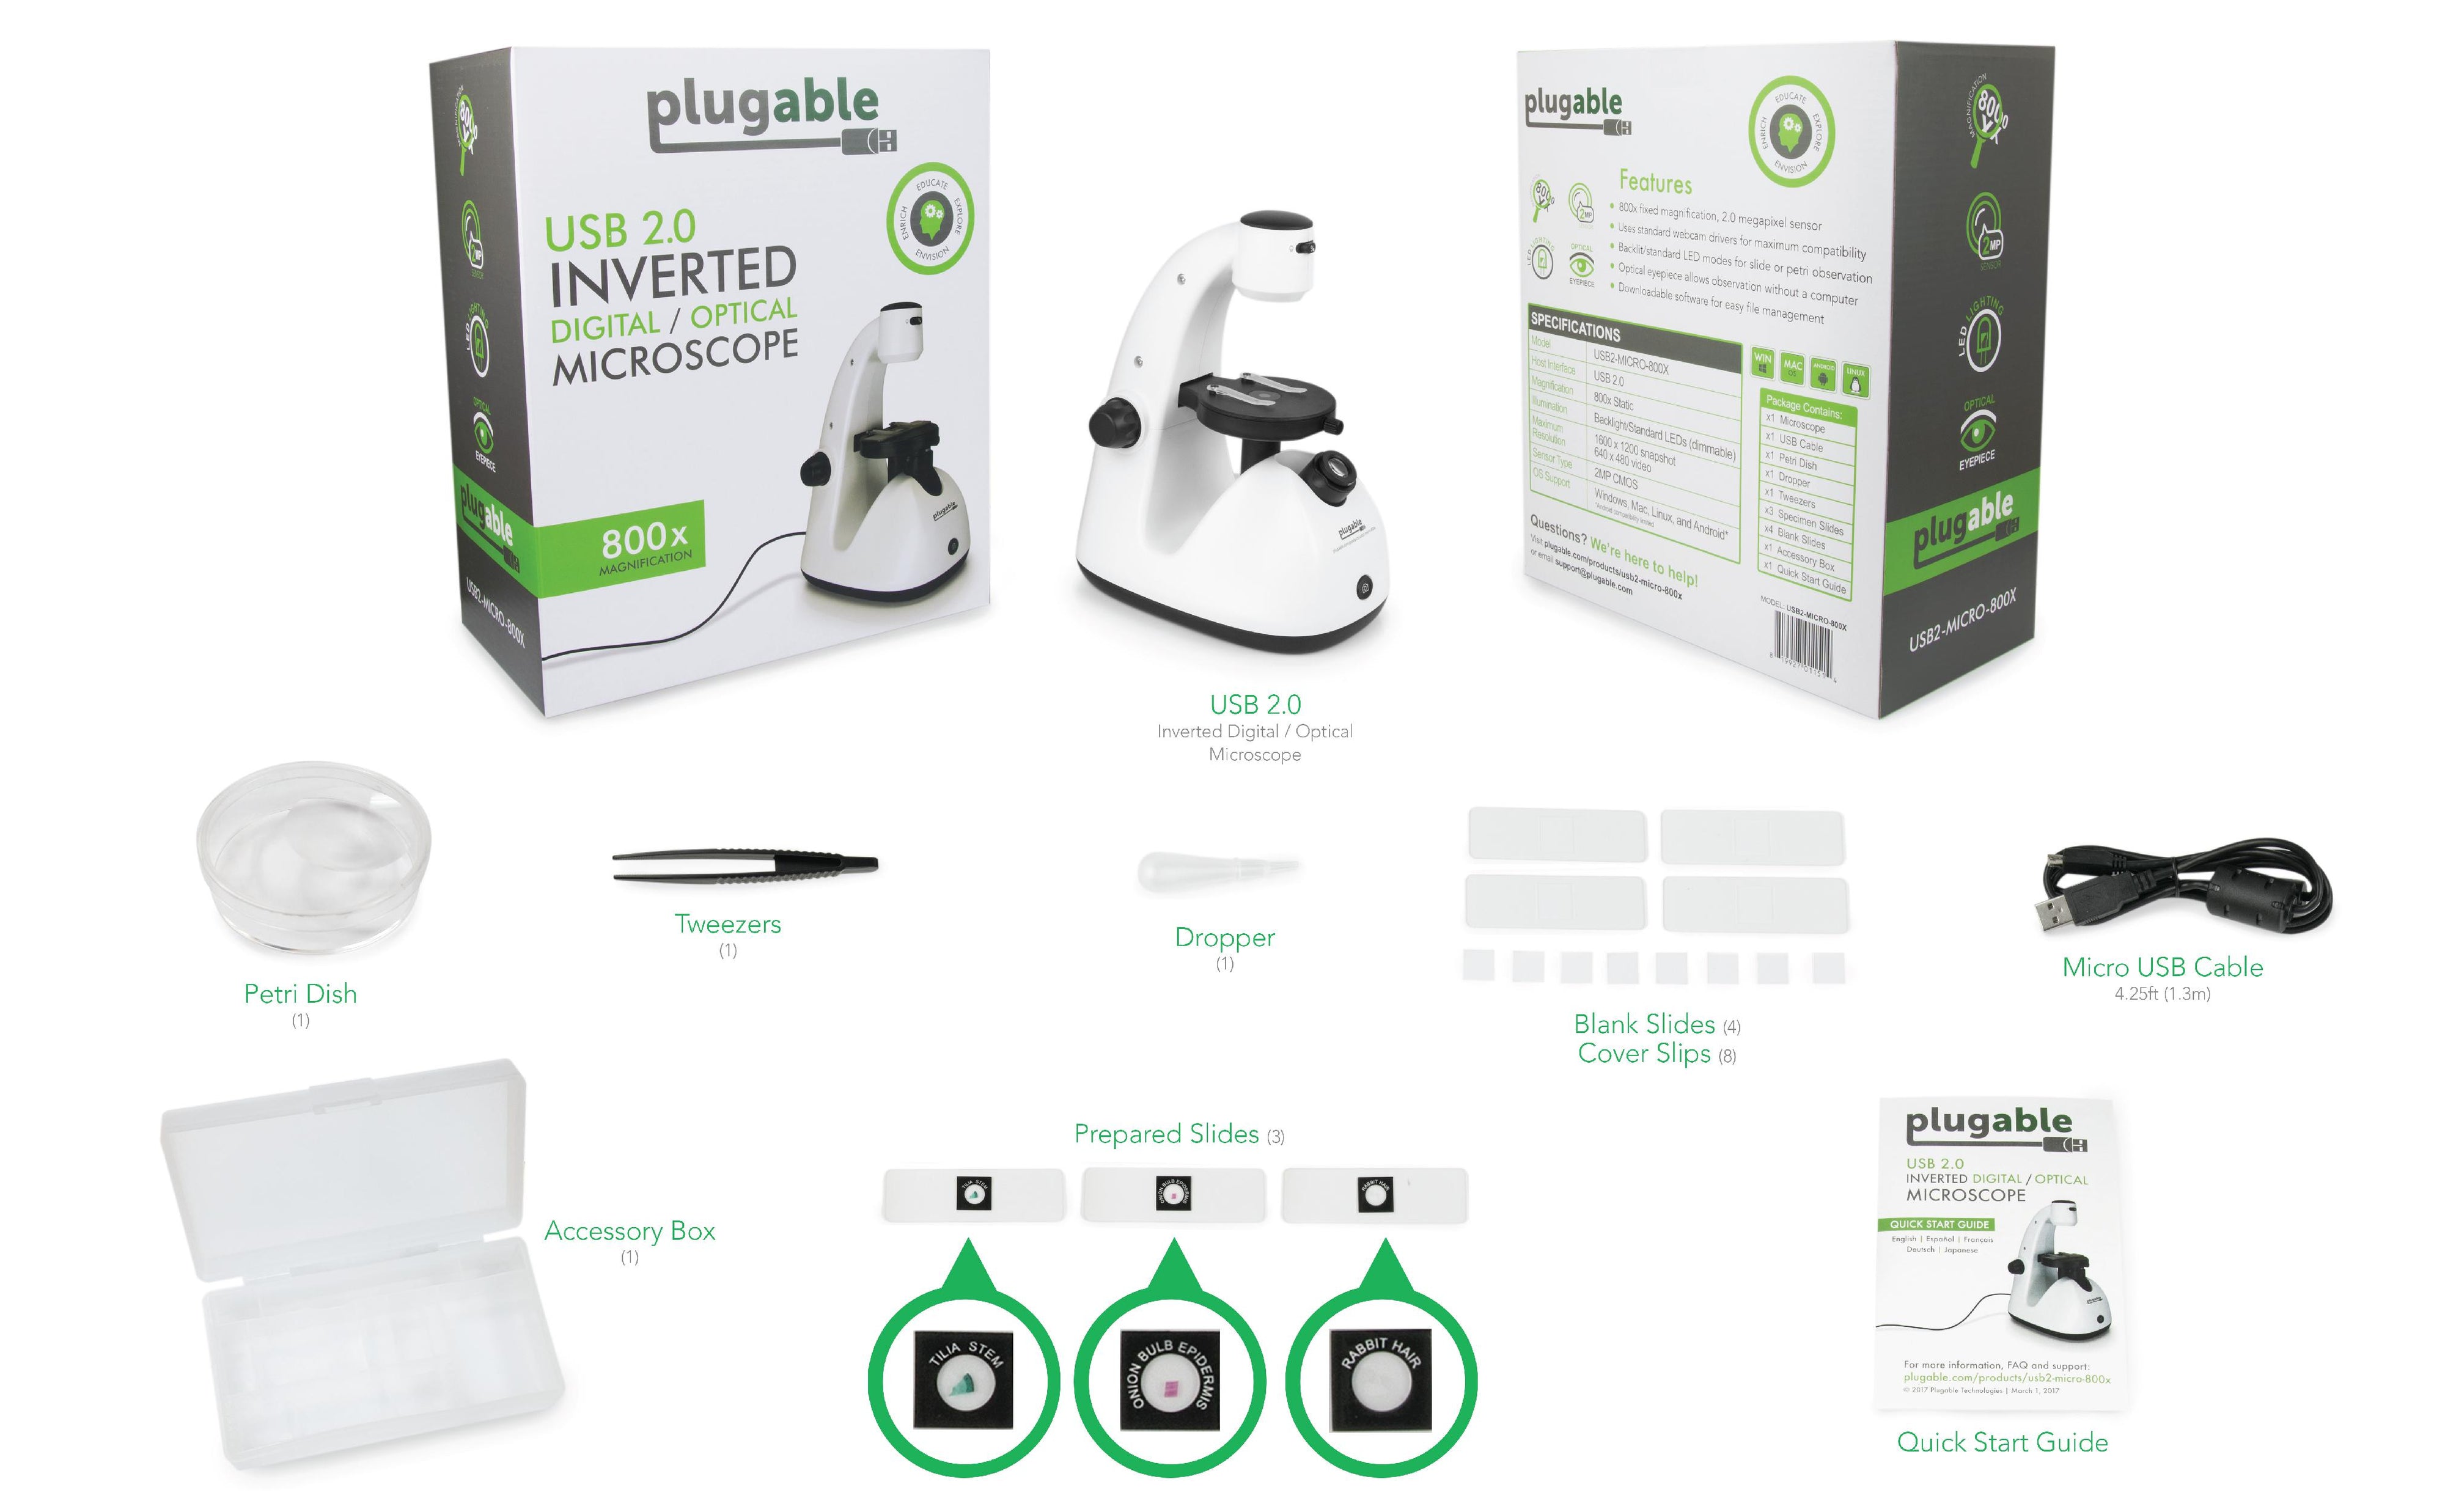
1x Microscope body
1x USB Cable
1x Petri Dish
1x Dropper
1x Tweezers
3x Specimen Slides
4x Blank Slides
1x Accessory Box
1x Quick Start Guide
Specifications
Interface
4ft USB 2.0 Cable
Magnification
800x Fixed
Lighting
Transmissive (above stage) and reflective (below stage) LEDs
Filter Help Articles and Frequent Questions by Category
Choose one or more filters within each category to narrow down the articles. Each selection will result in only displaying articles that include all of your choices.
Selected filters:
Articles
Well how about that, it looks like we don't have any articles matching your filters! Try removing one of your choices or clear the filters to show all articles.
Some specific device classes, such as USB cameras, are handled differently by operating system privacy/security settings. If you aren't seeing an image output from the microscope, or you see a message that your "Camera is being used by another application", you may need to change these privacy/security settings.
Instructions for Windows
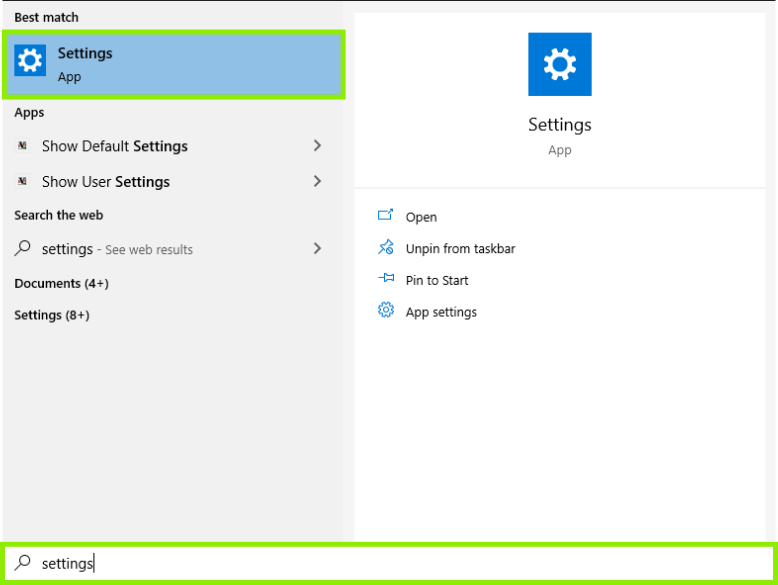
Press the or click on the Windows key to open the Start Menu, and type "Settings" into the search bar.
Then, click the gear-shaped icon to open up the Settings menu.
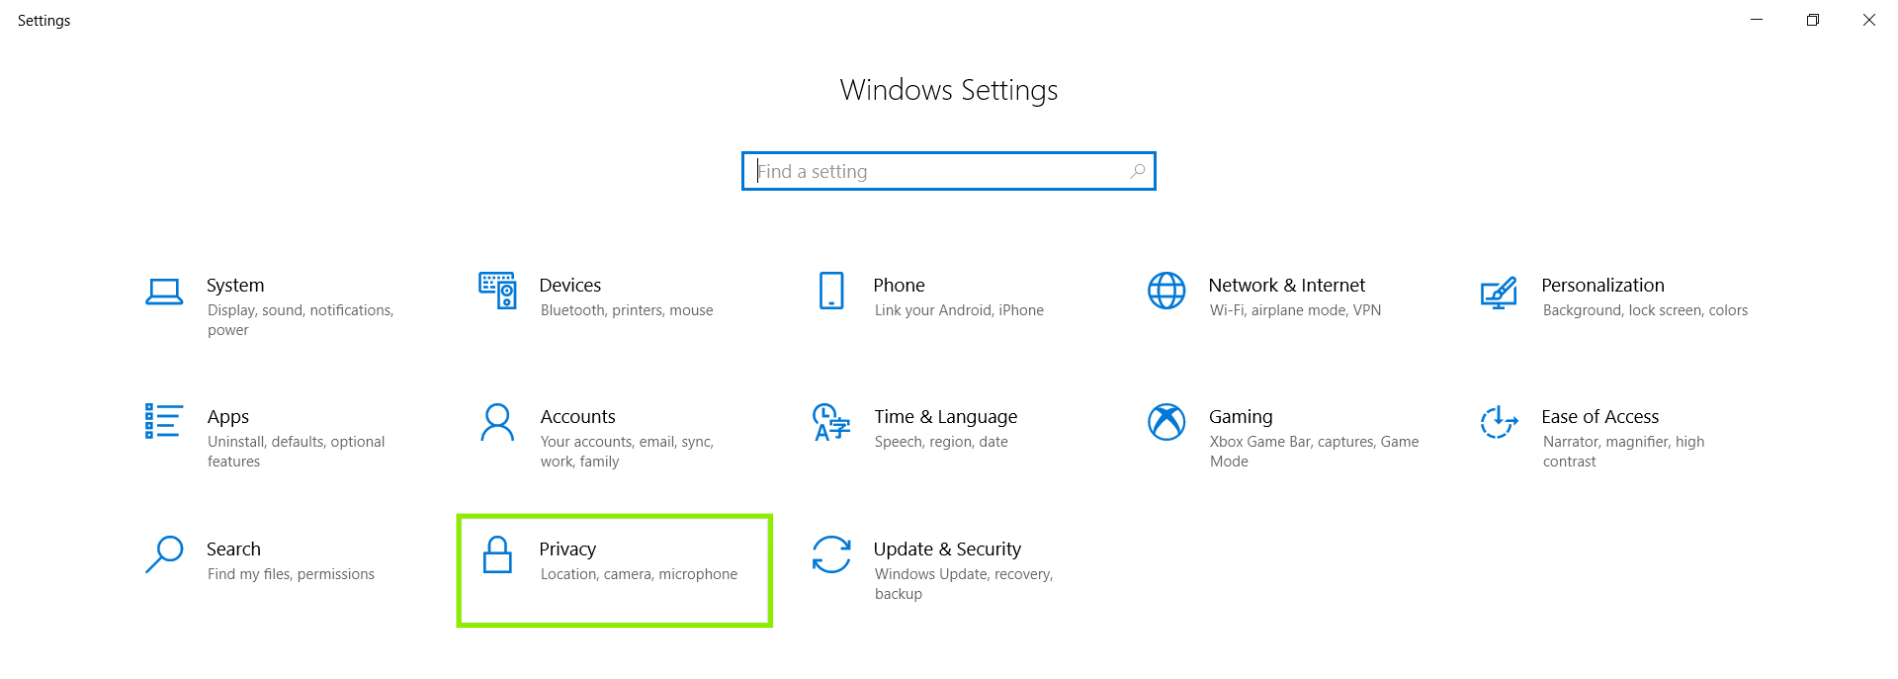
In the settings, click Privacy.
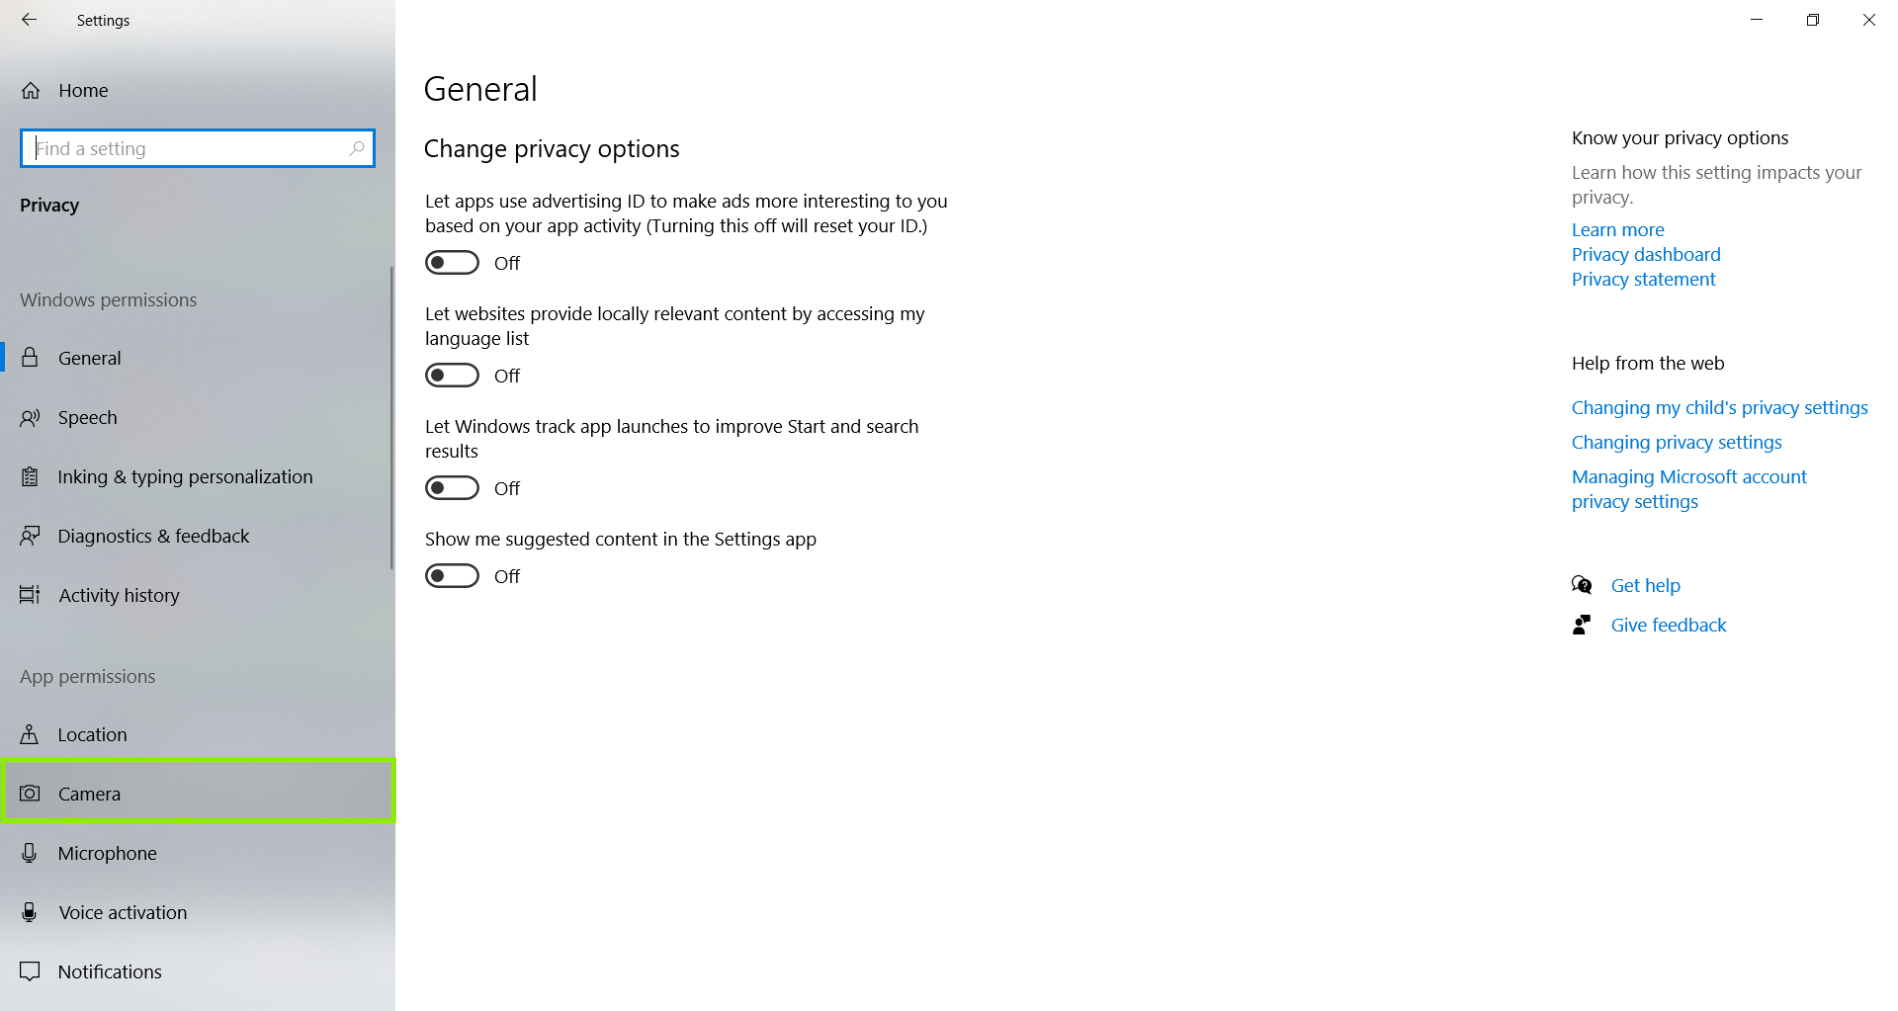
Click Camera, on the left hand side menu.
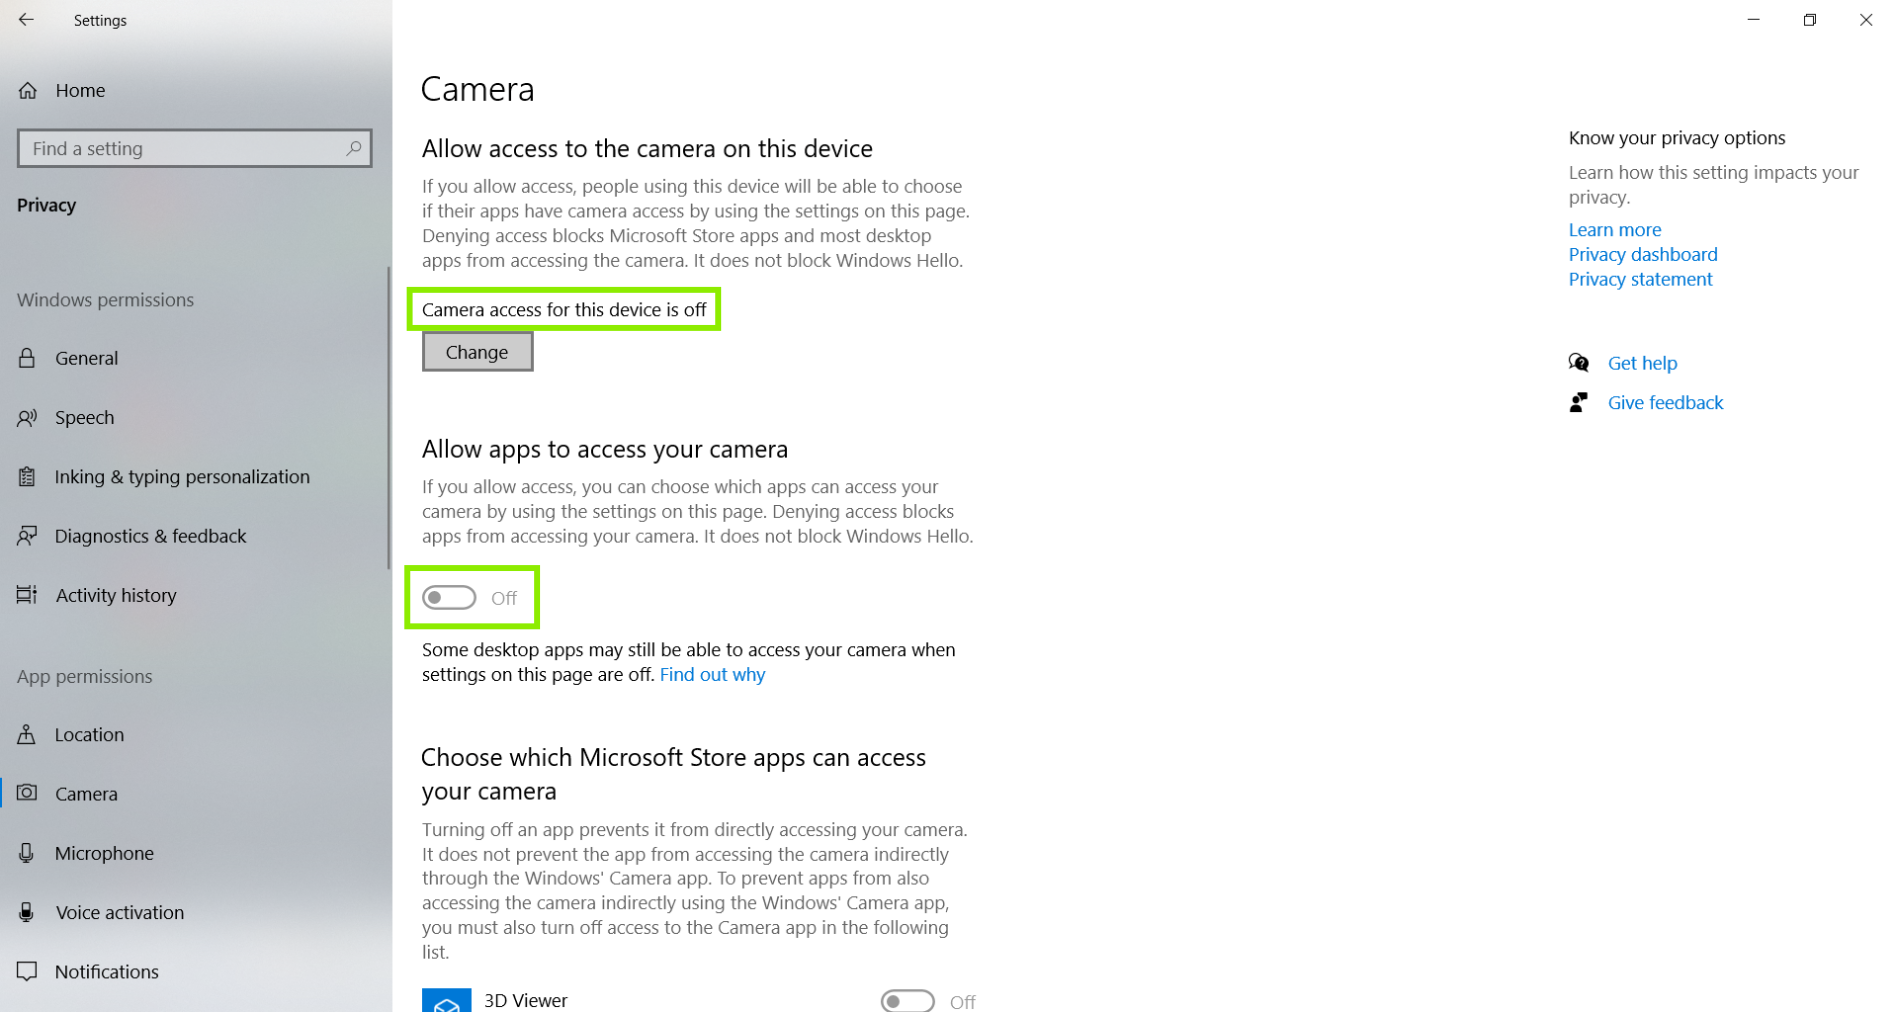
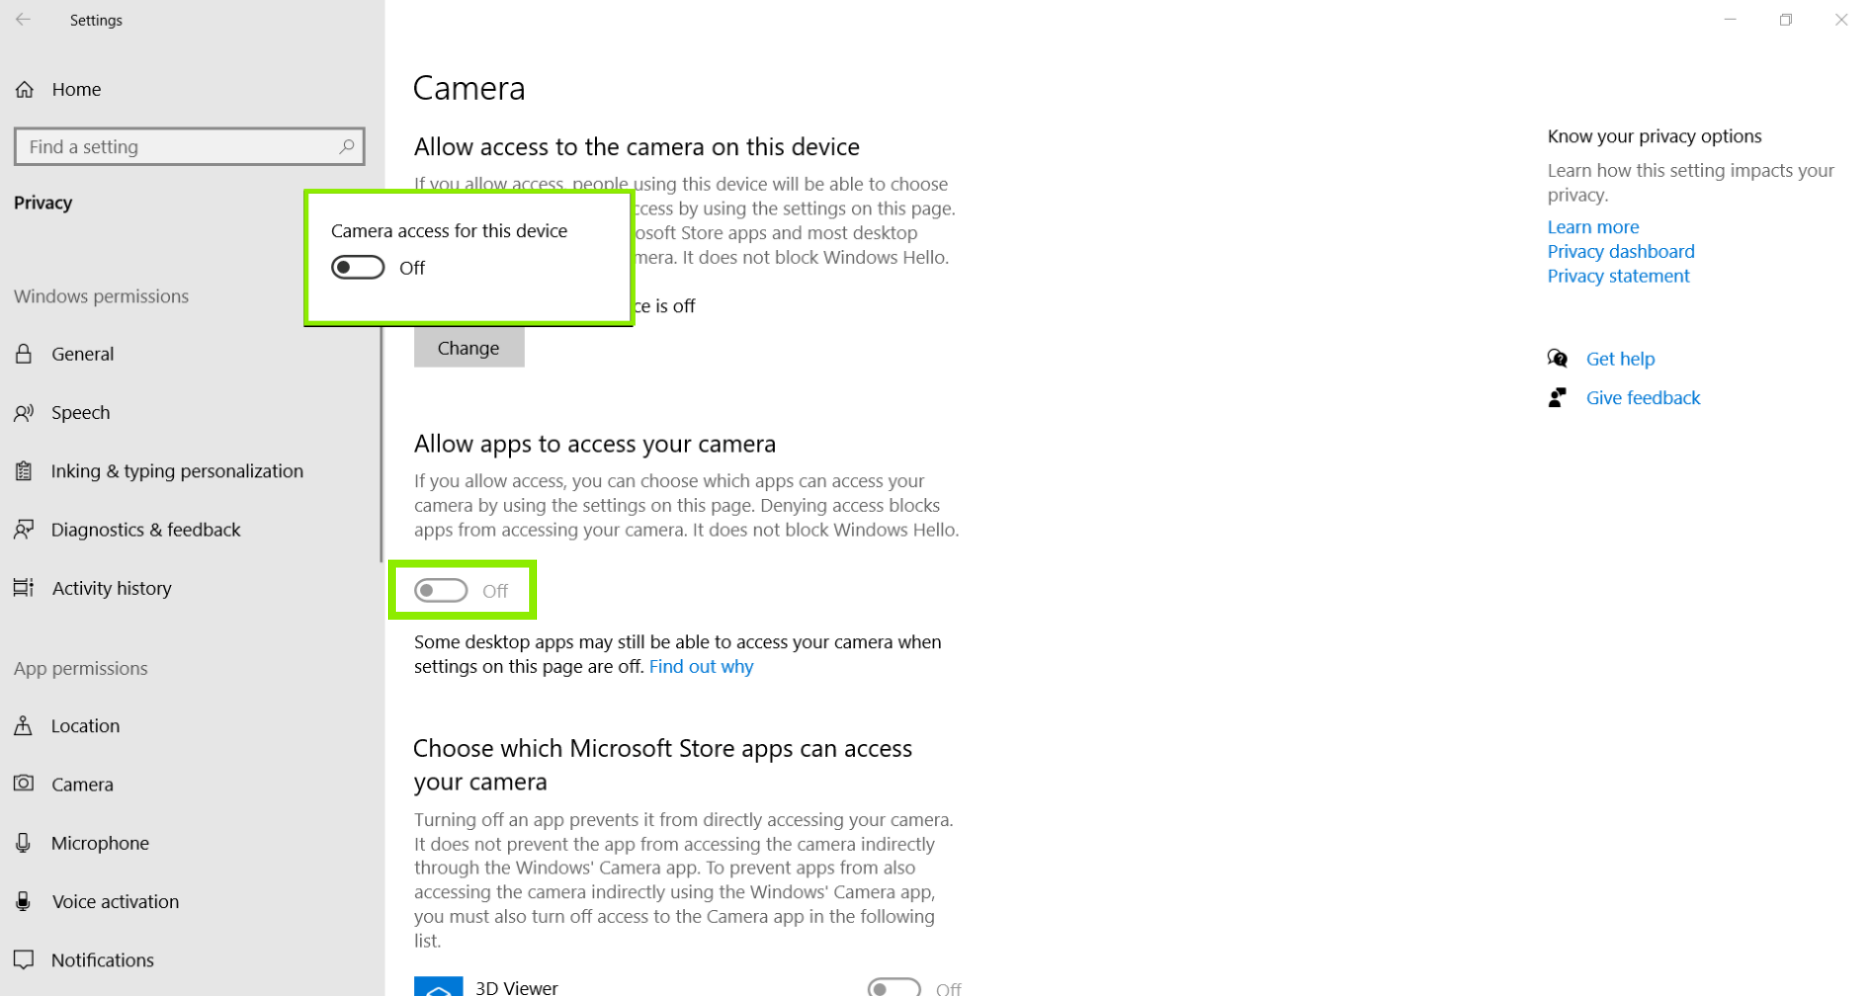
Now, we can see that the ability for the system to Allow access to the camera on this device is off. We also see that the ability for the system to Allow apps access to your camera is off as well. Please note, one or both of these options may be off for you.
Click Change, to turn on the ability for the system for the system to Allow apps access to your camera. Then, click to Allow apps to access your camera, click the little button to toggle it from off to on.
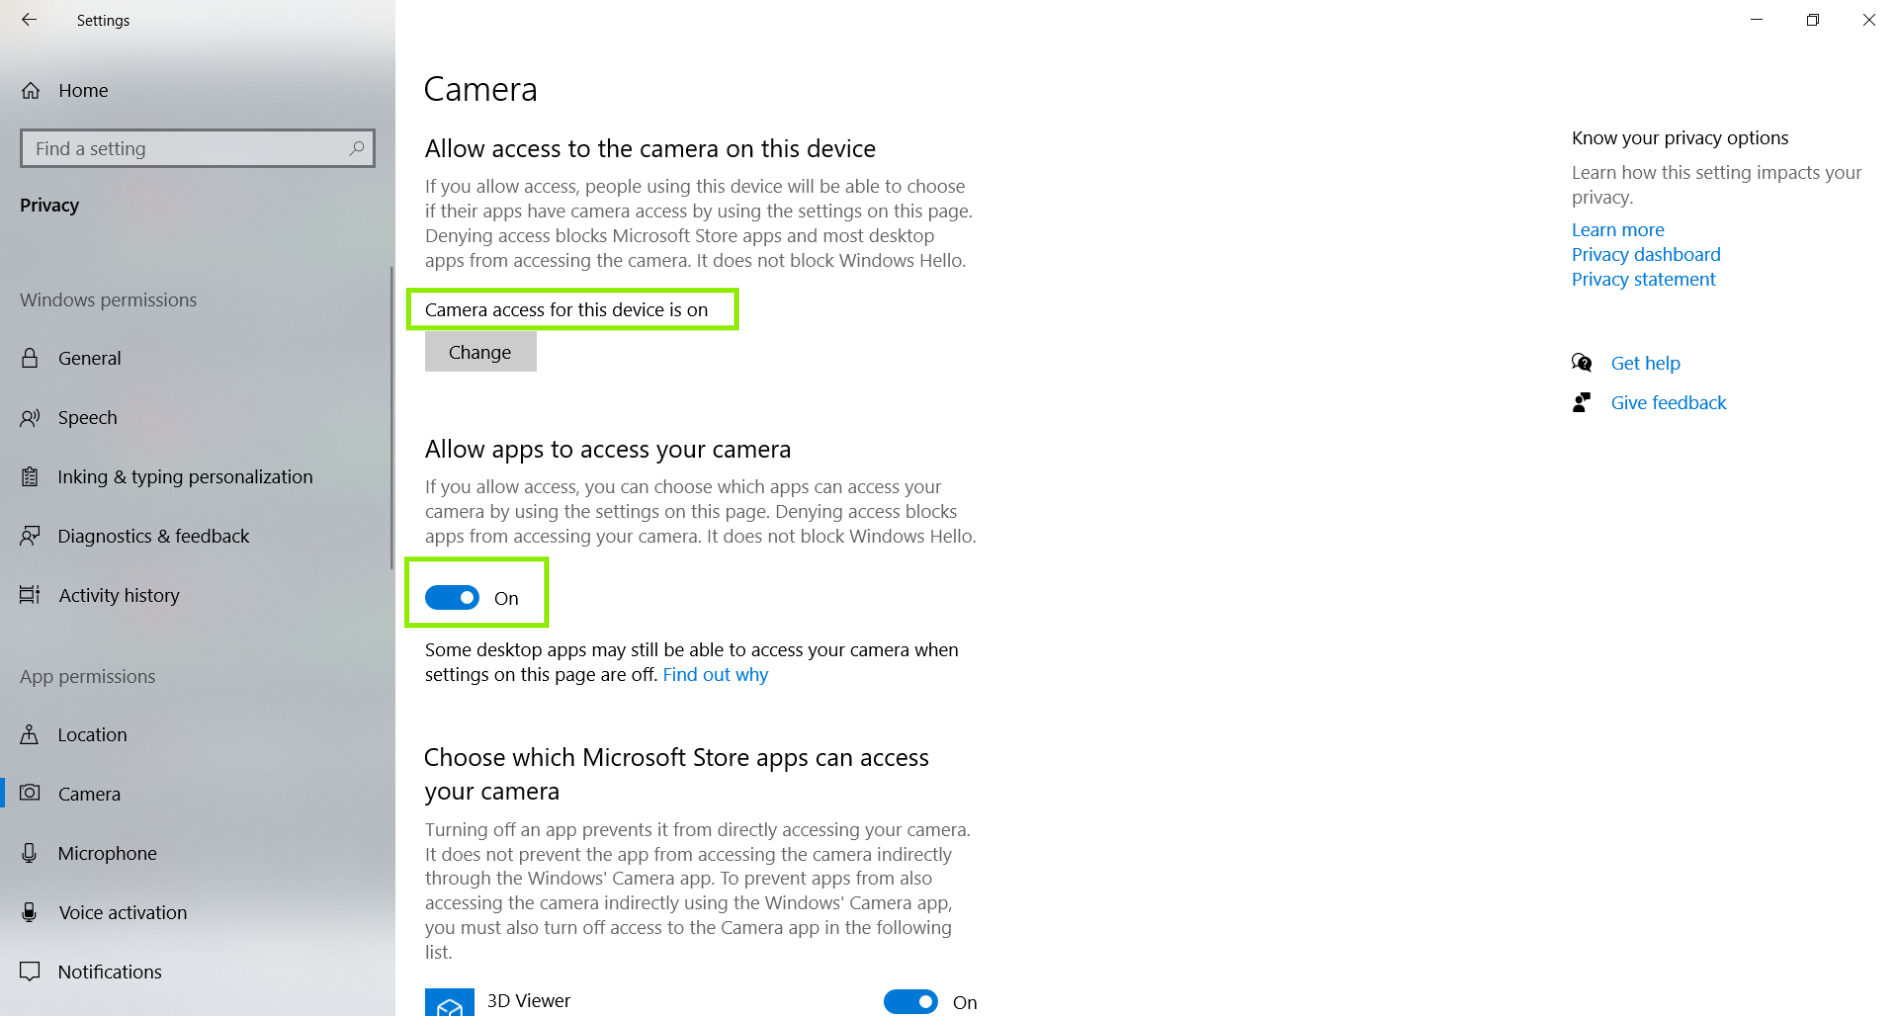
Now, we should see that the Camera access for this device is on, and the ability for Windows to Allow apps to access your camera is on as well.
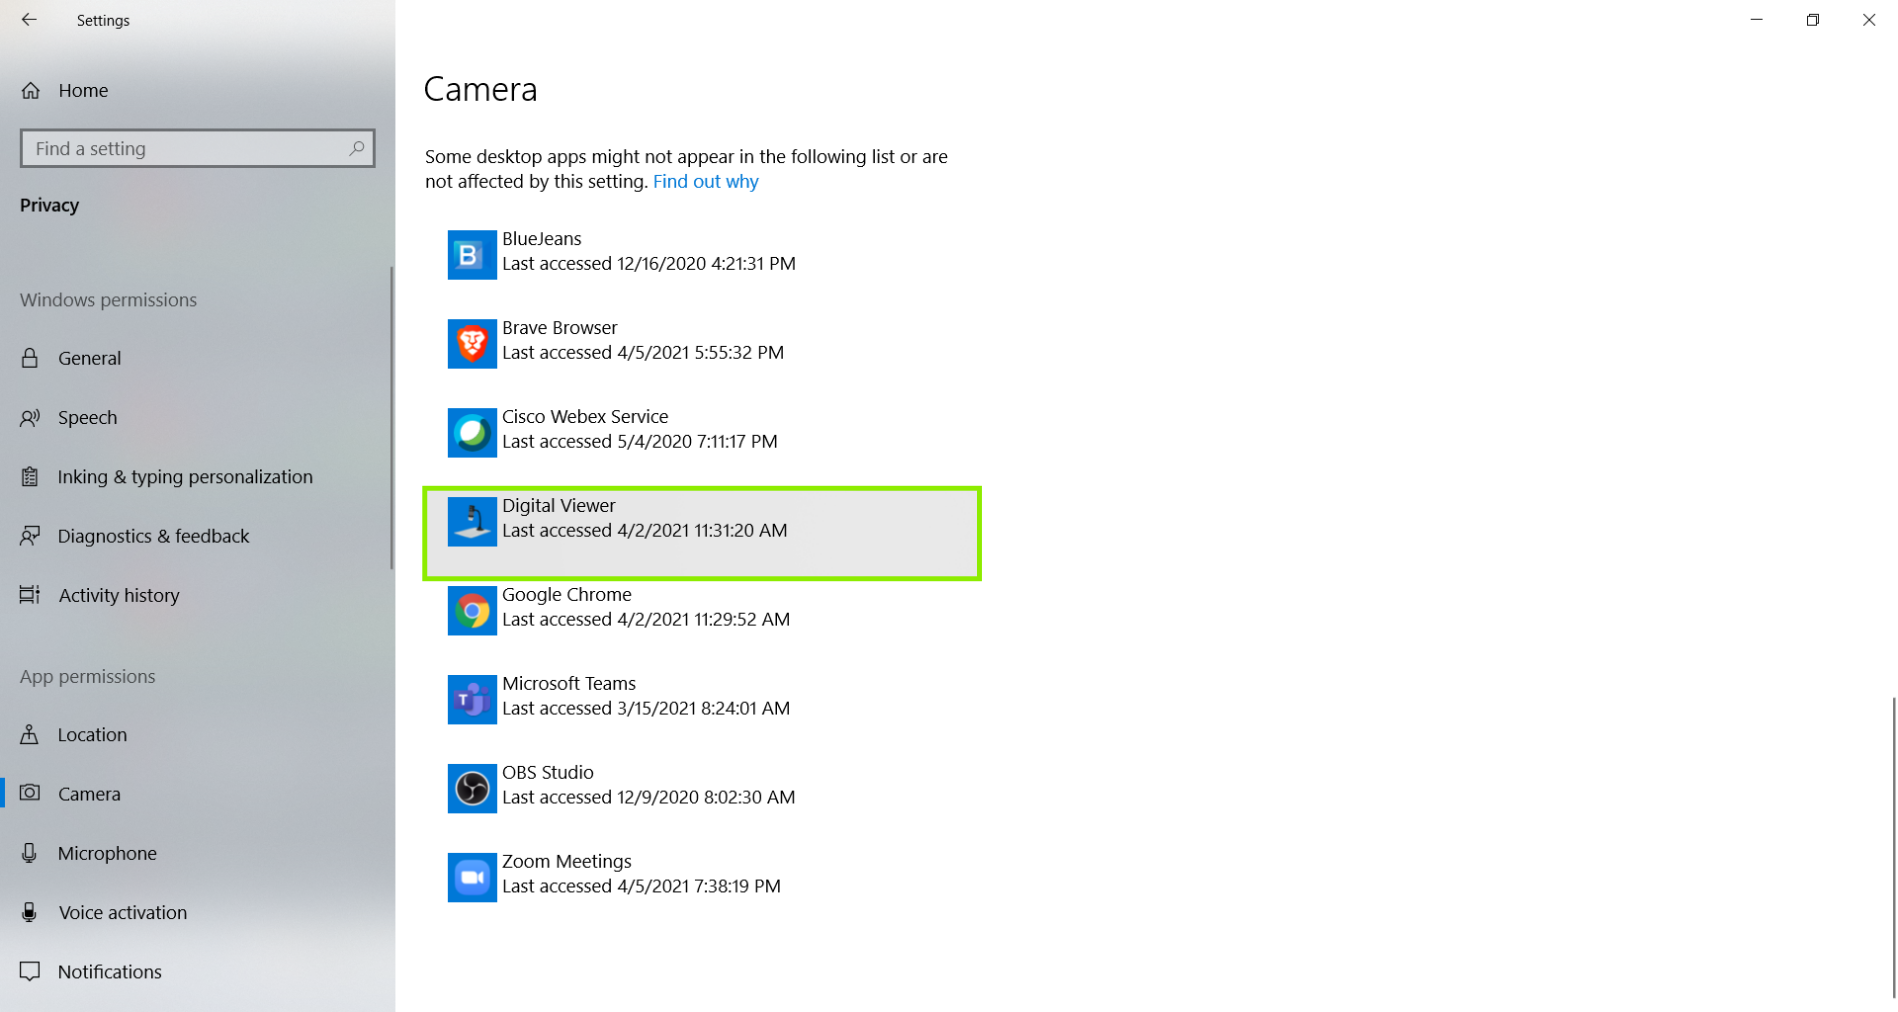
We can double check this by scrolling down on this page to make sure the Digital Viewer software is listed.
Restart the computer after confirming the privacy settings are on. Once the computer reboots, please open the Digital Viewer program only. We want to make sure to leave other programs closed so we have a clean environment to test the microscope.
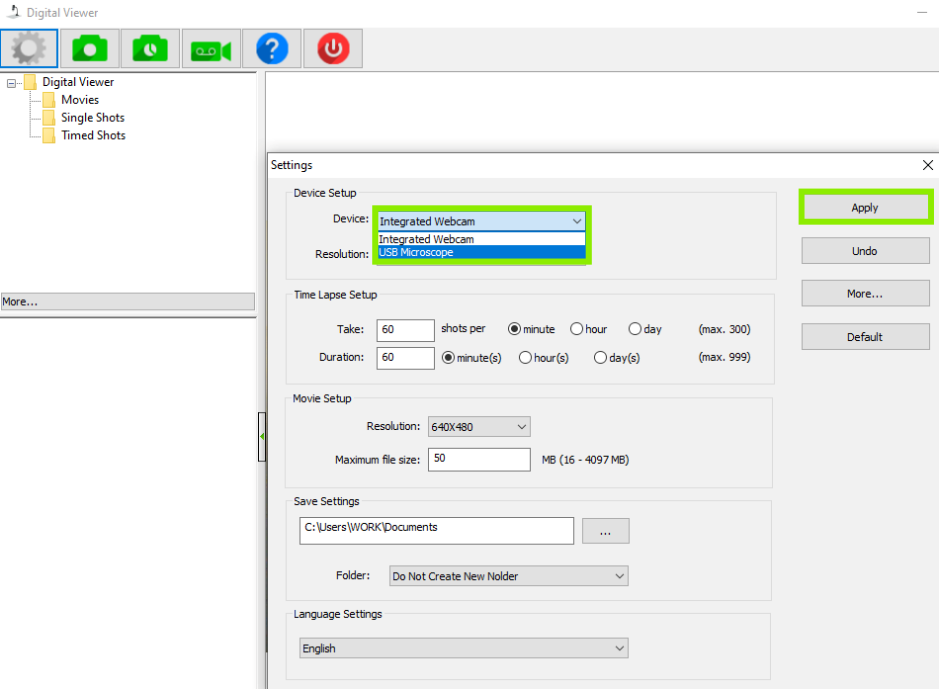
Click on the gear-shaped icon in the in the top left corner of the Digital Viewer window to enter the Settings. Then, click on the drop-down menu for Device, and pick the USB Microscope. Then click Apply to make the change.
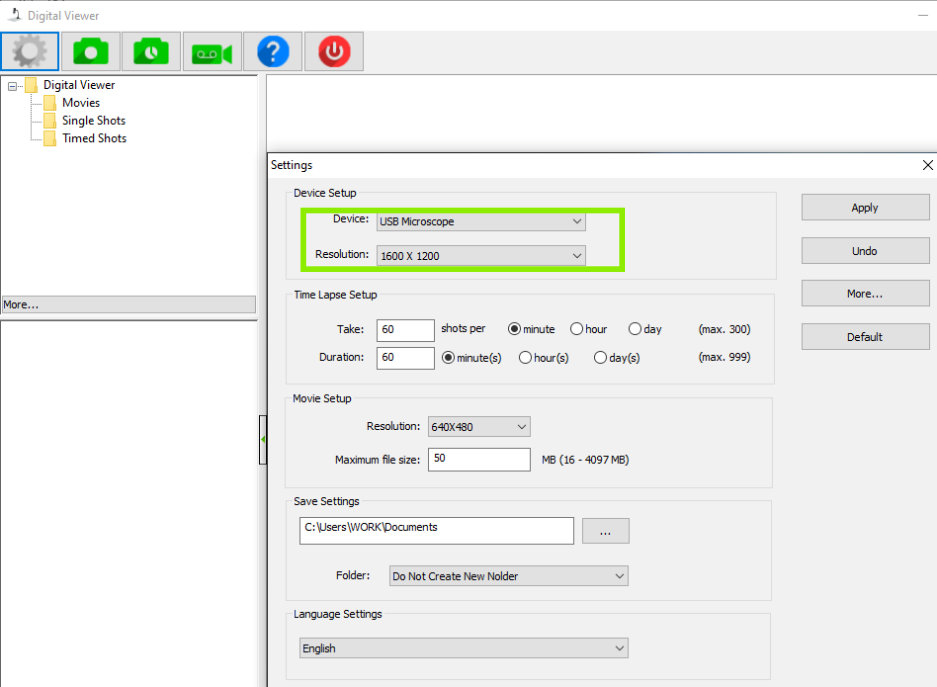
Now, you should see the USB Microscope is set as the default device. Feel free to change the resolution or other settings, and start examining things!
Click Here, to see an official article from Microsoft if you'd like to get further details about privacy and security settings.
Instructions for macOS
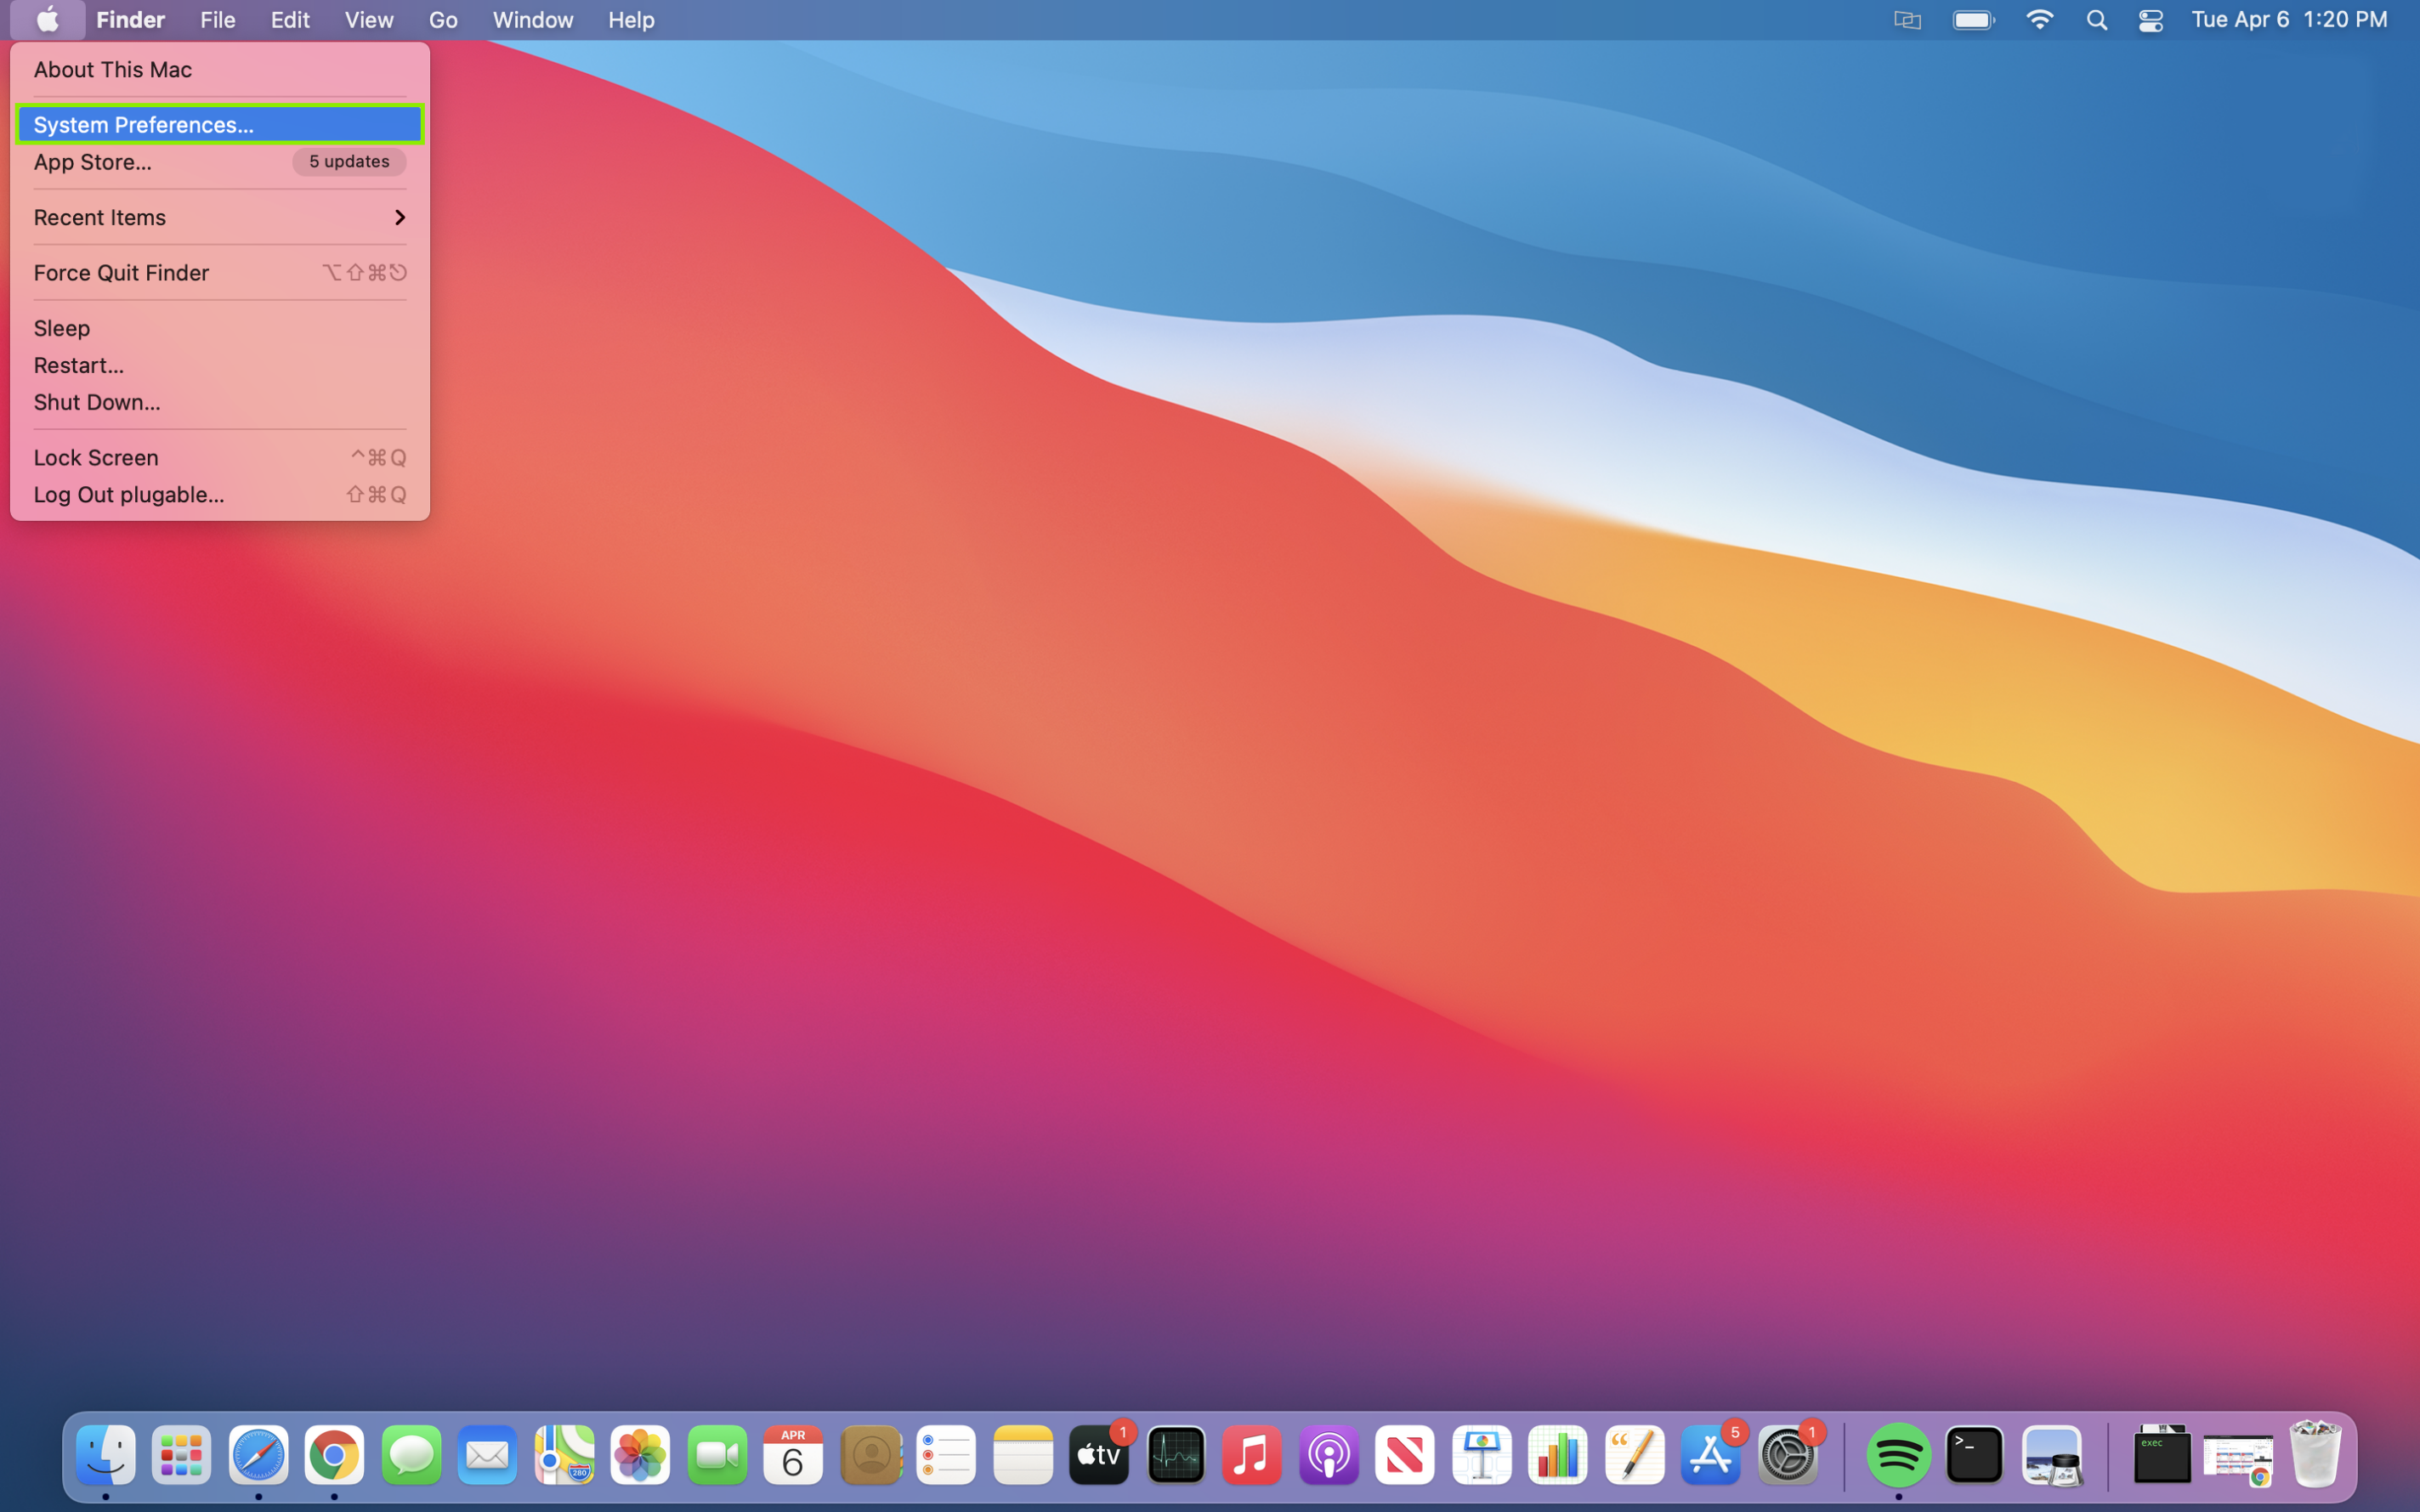
Click on the Apple Menu icon in the top left of your screen, and then click on System Preferences.
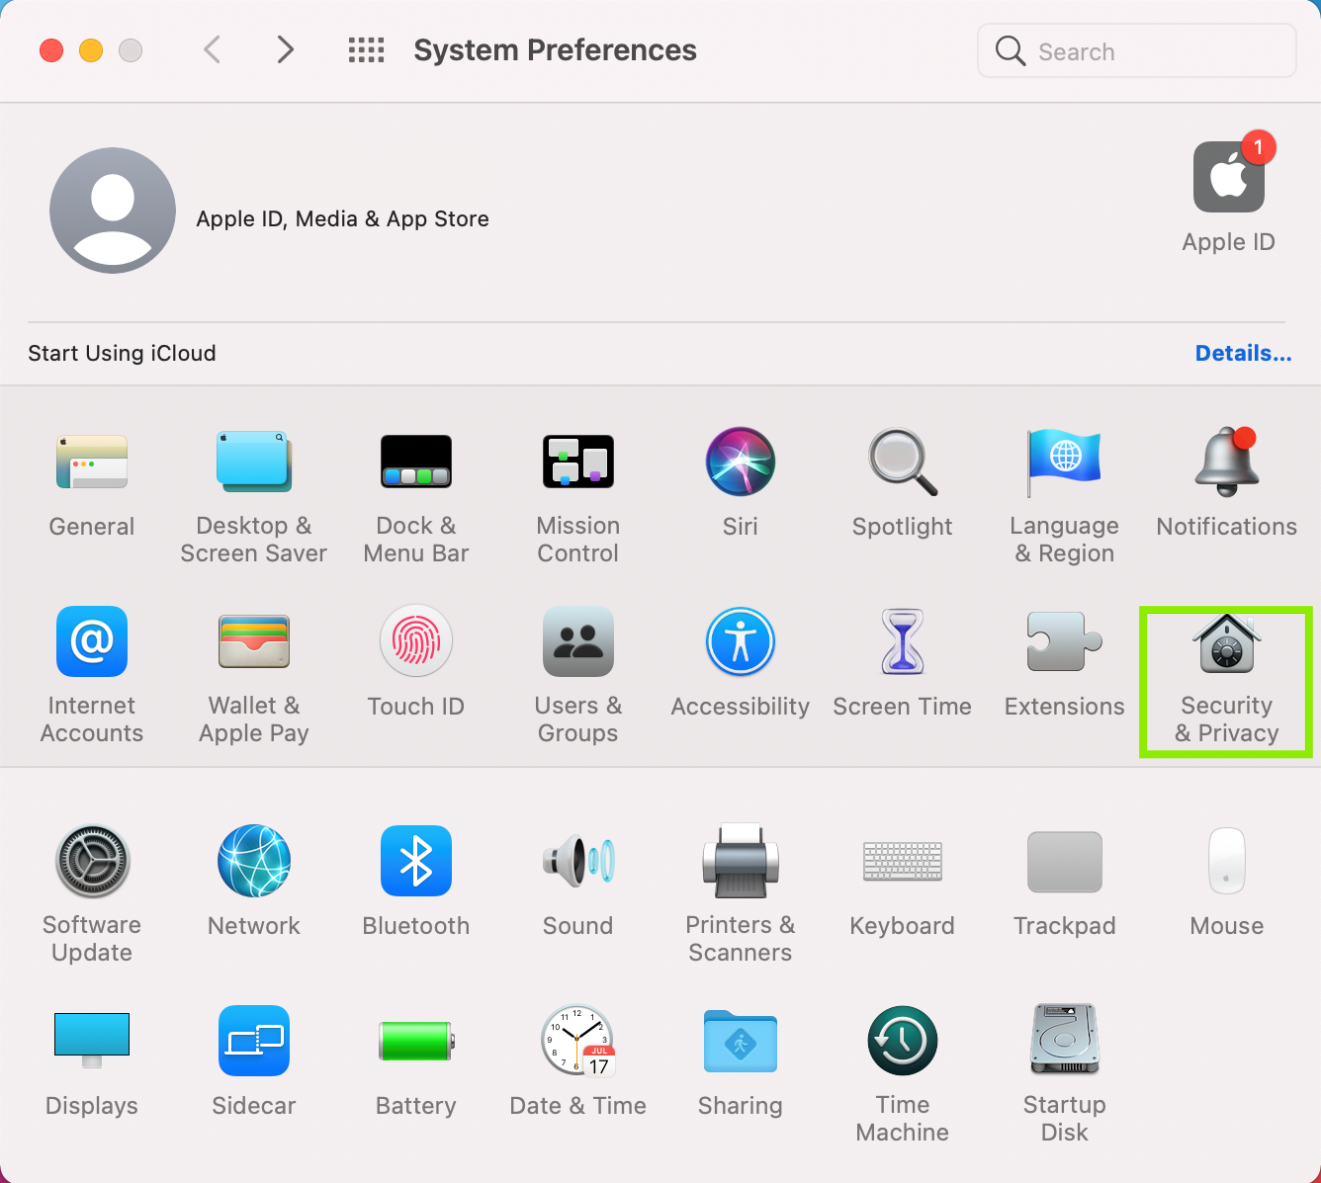
Click on Security & Privacy to open more options.
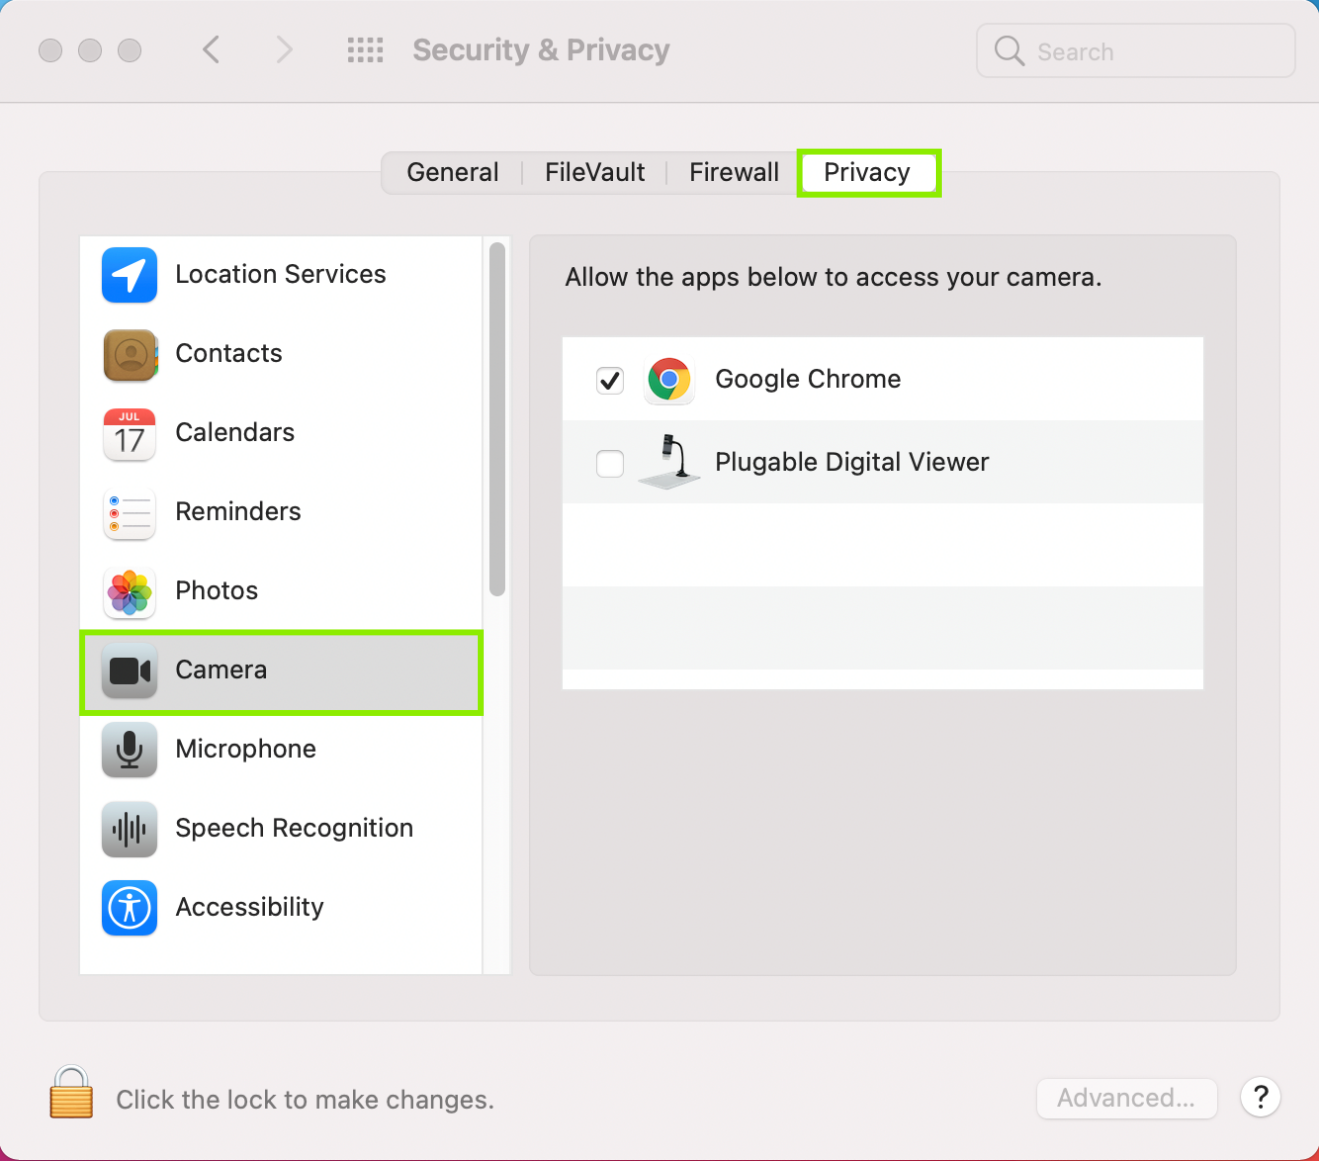
Click on Privacy, and then on Camera. You should see a listing for the Digital Viewer, and may see other other camera programs and capable apps listed as well.
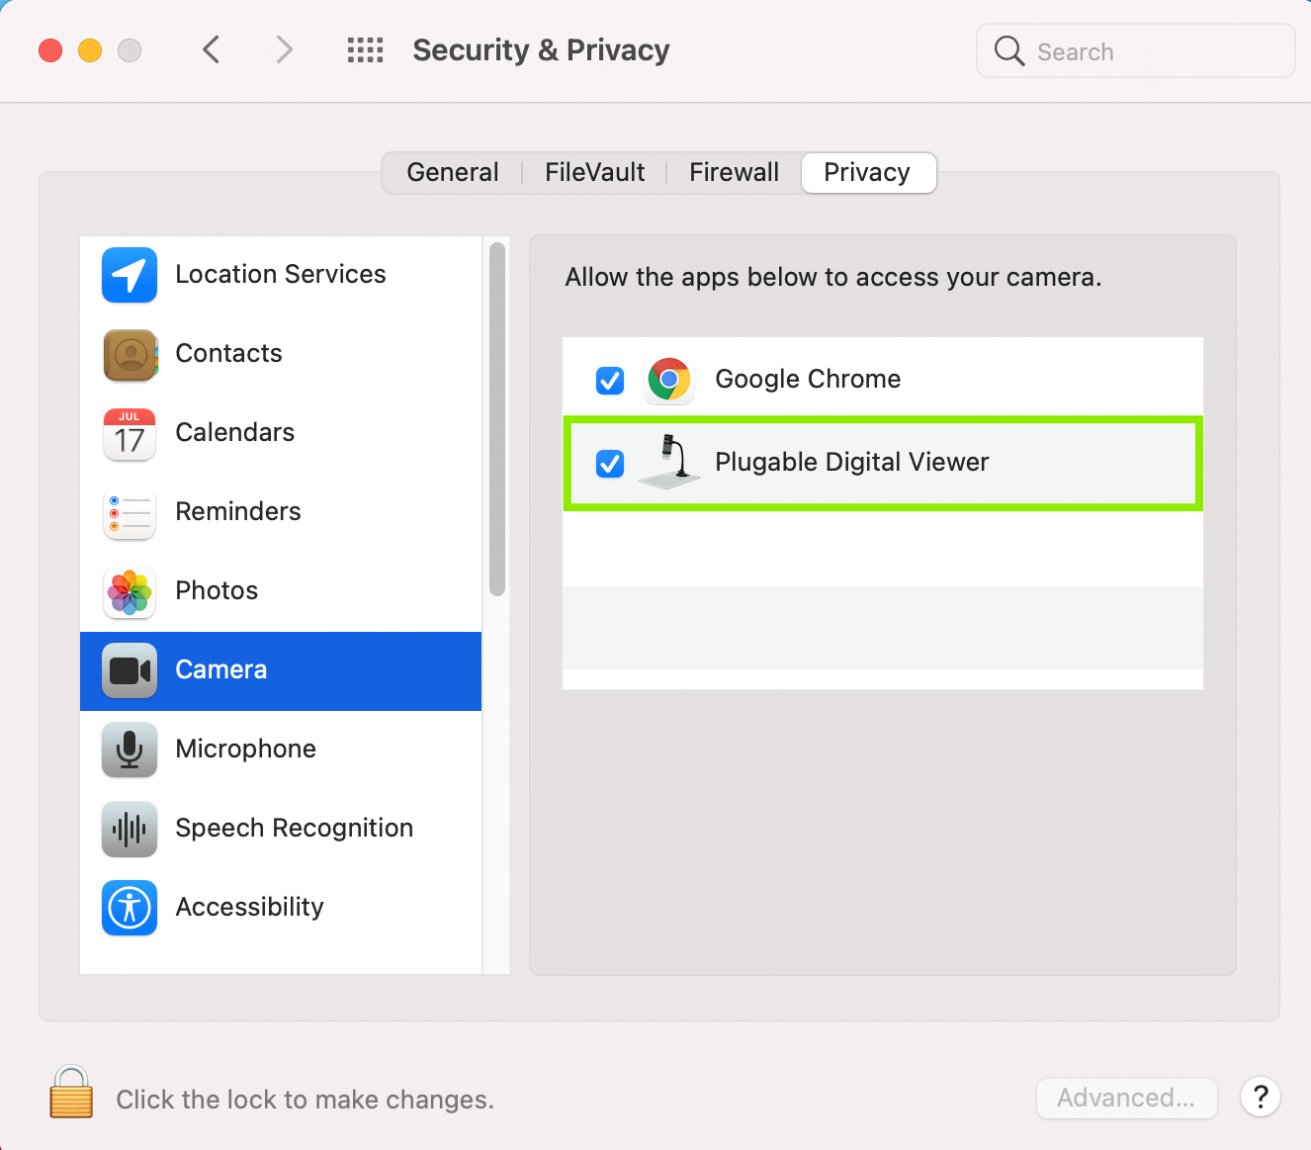
Check the box next to the Digital Viewer listing. Depending on your settings, you may need to click the lock at the bottom of the screen and put your password in to authenticate changes. Restart the computer once the Digital Viewer is checked.
Restart the computer after confirming the privacy settings are on. Once the computer reboots, please open the Digital Viewer program only. We want to make sure to leave other programs closed so we have a clean environment to test the microscope.
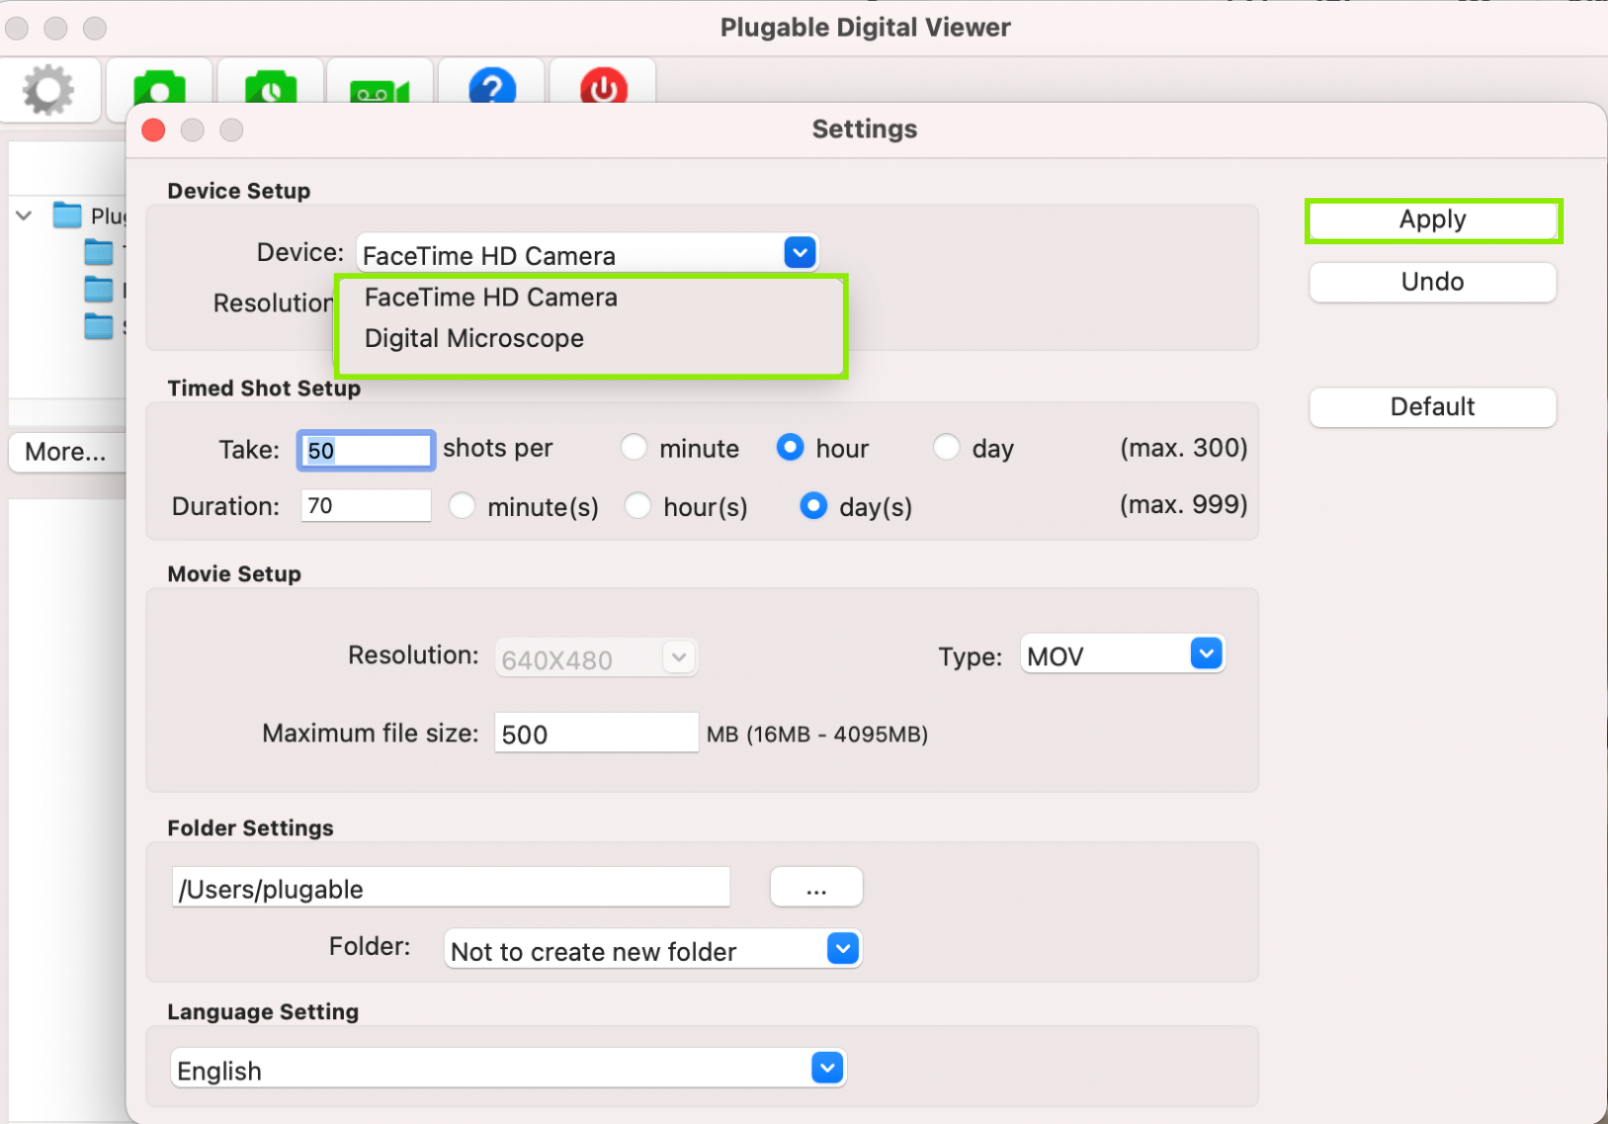
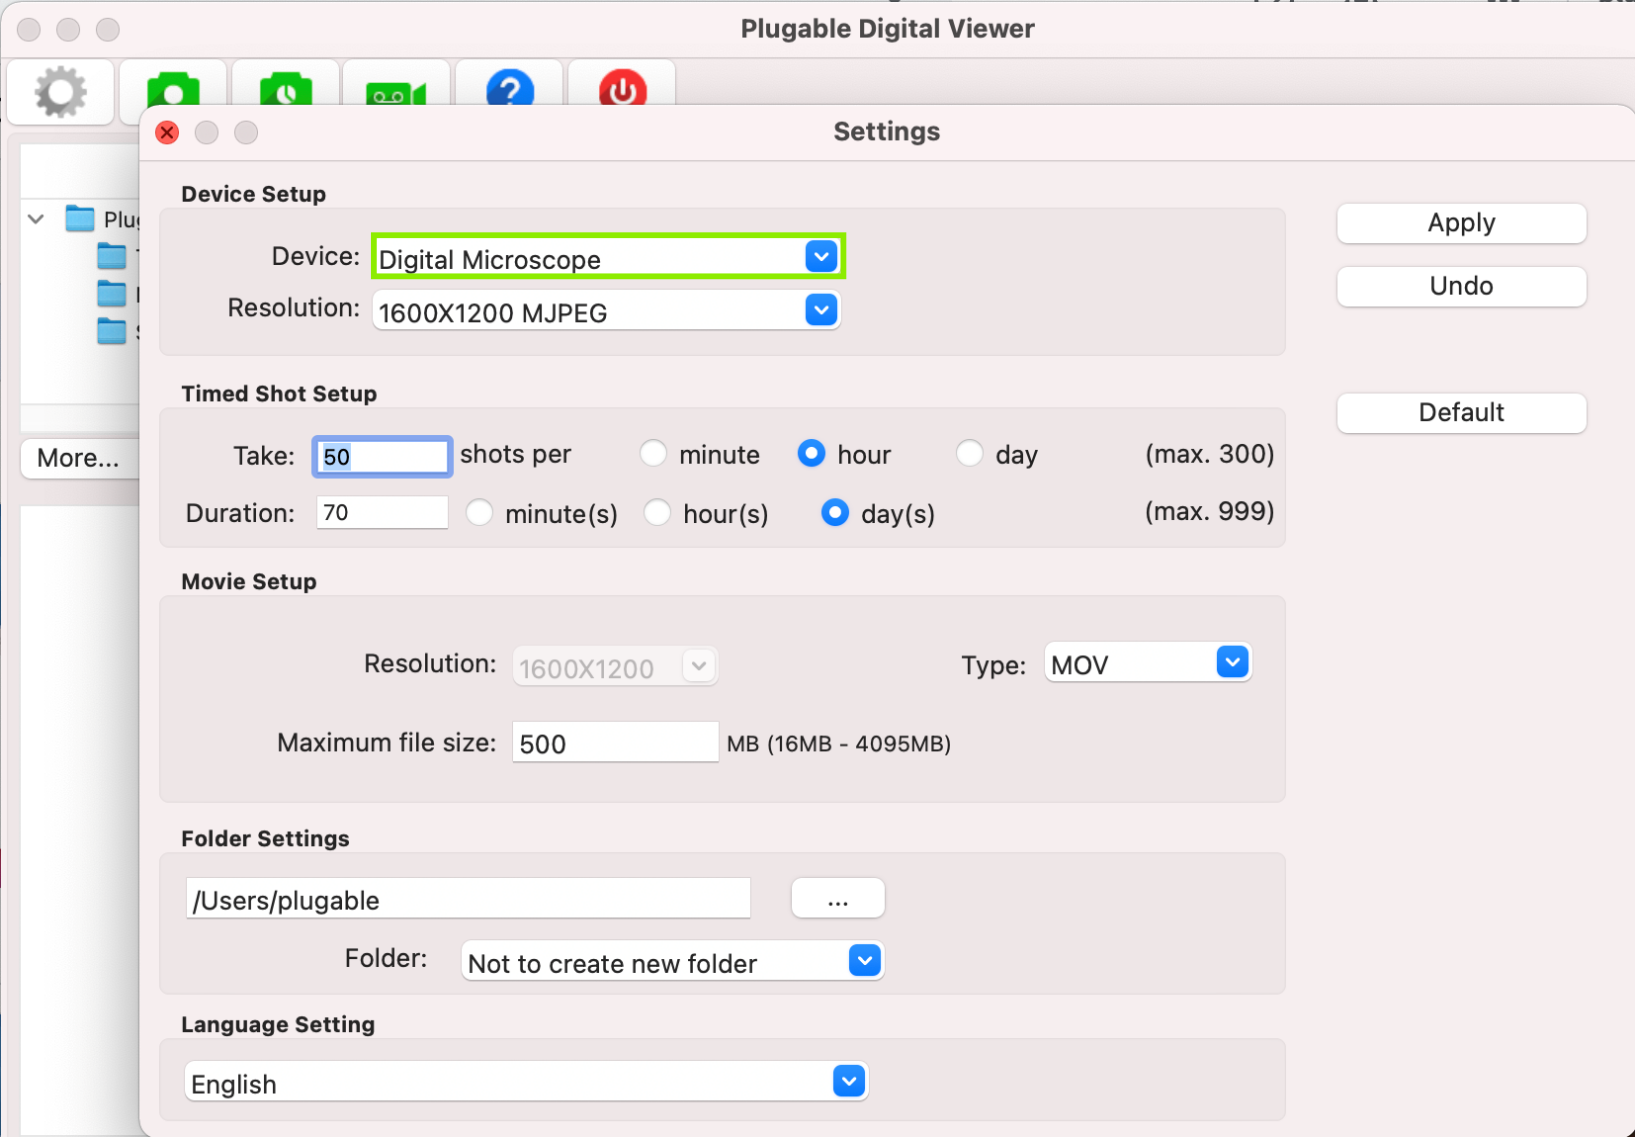
Click on the gear shaped icon in the top left corner of the Digital Viewer window to enter the Settings. Then, click on the drop-down menu for Device, and pick the USB Microscope. Then click Apply to make the change.
Now, you should see the USB Microscope is set as the default device. Feel free to change the resolution or other settings, and start examining things!
Click Here, to see an official article from Apple if you'd like to get further details about privacy settings for your Mac.
We hope this was helpful! Feel free to reach out to us directly at support@plugable.com if you have any questions or concerns, and we'll be here to help you.
Many users assume that USB-C devices can work with older Thunderbolt 2 Macs if they use a Thunderbolt 3 to Thunderbolt 2 adapter, such as the one made by Apple. However, this is not the case. These adapters are specifically designed to support Thunderbolt devices only -not standard USB-C peripherals.
While Thunderbolt 3 and USB-C share the same connector type, they use different underlying data protocols. Non-Thunderbolt USB-C devices, rely on USB standards for data and power. The Thunderbolt 3 to Thunderbolt 2 adapter does not carry USB signals; it only passes Thunderbolt data. Because of this, plugging a USB-C device into a Thunderbolt 2 Mac using this adapter will not work - the computer will not detect or communicate with the device.
If you need to connect peripherals to a Thunderbolt 2 system, we recommend using a USB-A dock or hub (if available on your system). This ensures compatibility without relying on unsupported adapter chains.
In short, even though the connectors may fit, USB-C devices are not compatible with Thunderbolt 2 Macs via Thunderbolt adapters - only Thunderbolt devices will work in that setup.
All Thunderbolt docking stations include the appropriate Thunderbolt cable in order to connect the docking station to the host computer. As of this writing, all Plugable Thunderbolt host cables that are included with Plugable Thunderbolt docking stations are 1.0 meter (approximately 3.3) feet in overall length.
For reference, the specifications of all Plugable Thunderbolt cables are printed on a small white cable flag attached to the cable itself.
If the original 1.0 meter long Thunderbolt host cable is not sufficient for a specific use case, longer cables of up to 2.0 meters (approximately 6.6 feet) in overall length can be purchased separately from Plugable. An example of such a cable is the Plugable TBT4-40G2M cable
Plugable does NOT support using Thunderbolt host connection cables that are over 2.0 meters in overall length with any Plugable brand product.
Plugable does NOT support the use of any type of Thunderbolt extension cable or any type of signal repeater in conjunction with our products.
Please note, Plugable can only guarantee the performance and compatibility of Plugable brand cables.
All Plugable USB-C docking stations include the appropriate USB-C cable in order to connect the docking station to the host computer. As of this writing, all Plugable USB-C host cables that are included with Plugable USB-C docking stations are 1.0 meter (approximately 3.3) feet in overall length.
For reference, the specifications of all Plugable brand USB-C cables are printed on a small white cable flag attached to the cable itself.
If the original 1.0 meter long USB-C host cable is not sufficient for a specific use case, longer cables of up to 2.0 meters (approximately 6.6 feet) in overall length can be purchased separately from a 3rd-party.
We recommend purchasing a cable that matches or exceeds the specifications of the original Plugable cable and purchasing said cable from both a well known and reliable brand.
Plugable does offer a 1.0 meter long USB-C extension cable (USBC-METER3-1MF) that can be used in conjunction with our USB-C docking stations. This extension cable can be combined with the original 1.0 meter long Plugable USB-C cable included in the box with the docking station to extend the overall cable length to 2.0 meters.
Plugable does NOT support using USB-C host connection cables that are over 2.0 meters in overall length with any Plugable brand product. Additionally, Plugable does NOT support the use of any type of 3rd-party USB-C extension cable or signal repeater in conjunction with our products.
For most modern Windows and Mac systems, Thunderbolt devices are automatically approved and will ‘just work’ once connected.
The main exception is Apple Mac laptops with Apple CPUs running macOS Ventura (13) or newer, where you’ll be prompted to manually approve the device the first time you connect it.
The summary table below provides the specific details at a glance, and the text that follows explains the table in more detail.
To expand further, Thunderbolt 3, 4 and 5 are in essence external connections to the host computer’s internal PCI Express bus. This type of low-level and high speed connection warranted security protocols to prevent unauthorized access to user data.
Windows: From Intel Software to Native OS Support
When Thunderbolt 3 Windows systems were first introduced in late 2015 it was necessary to use Intel Thunderbolt software to manually authenticate and approve external Thunderbolt devices.
With the introduction of Thunderbolt 4 Windows systems in 2020, it was still necessary to have Intel Thunderbolt software installed on the host computer. However, in most cases the authentication and approval process would happen automatically greatly simplifying the process.
Starting with Windows 11 version 21H2 released in October of 2021, Microsoft integrated support for both USB4 and Thunderbolt into the Windows operating system → LINK
This means that with most modern Thunderbolt 4 and Thunderbolt 5 computers running the latest version of Windows 11 it is no longer necessary to install Intel Thunderbolt software on the host computer in order to manage Thunderbolt devices. In most cases, the authentication and approval process will still happen automatically.
macOS: From Intel CPUs to Apple CPUs
When Thunderbolt 3 Mac systems with Intel CPUs were first introduced in 2016, the authentication and approval mechanism was built-in to macOS and was transparent to the end user.
Apple introduced Mac computers based on Apple CPUs in 2020. Macs based on Apple CPUs running macoS 11 Big Sur or macOS 12 Monterey would automatically approve and authenticate Thunderbolt devices when connected.
macOS 13 Ventura was released in 2022 and for portable Macs with Apple CPUs Apple introduced a feature known as ‘Accessory Security’ (also known as ‘Restricted Mode’) → LINK
By default, portable Macs (i.e. laptops) with an Apple CPU running macOS 13 Ventura or newer version of macOS will require the end user to authenticate and approve a Thunderbolt device when initially connected.
Stationary Macs (i.e. desktops) with an Apple CPU running macOS 13 Ventura or newer version of macOS do NOT implement the ‘Accessory Security’ feature. As a result, Thunderbolt devices will be automatically approved and authenticated when initially connected.
Apple Macs with Intel CPUs (both laptop and desktops) running macOS 13 Ventura or newer do NOT implement the ‘Accessory Security’ feature. As a result, Thunderbolt devices will be automatically approved and authenticated when initially connected.