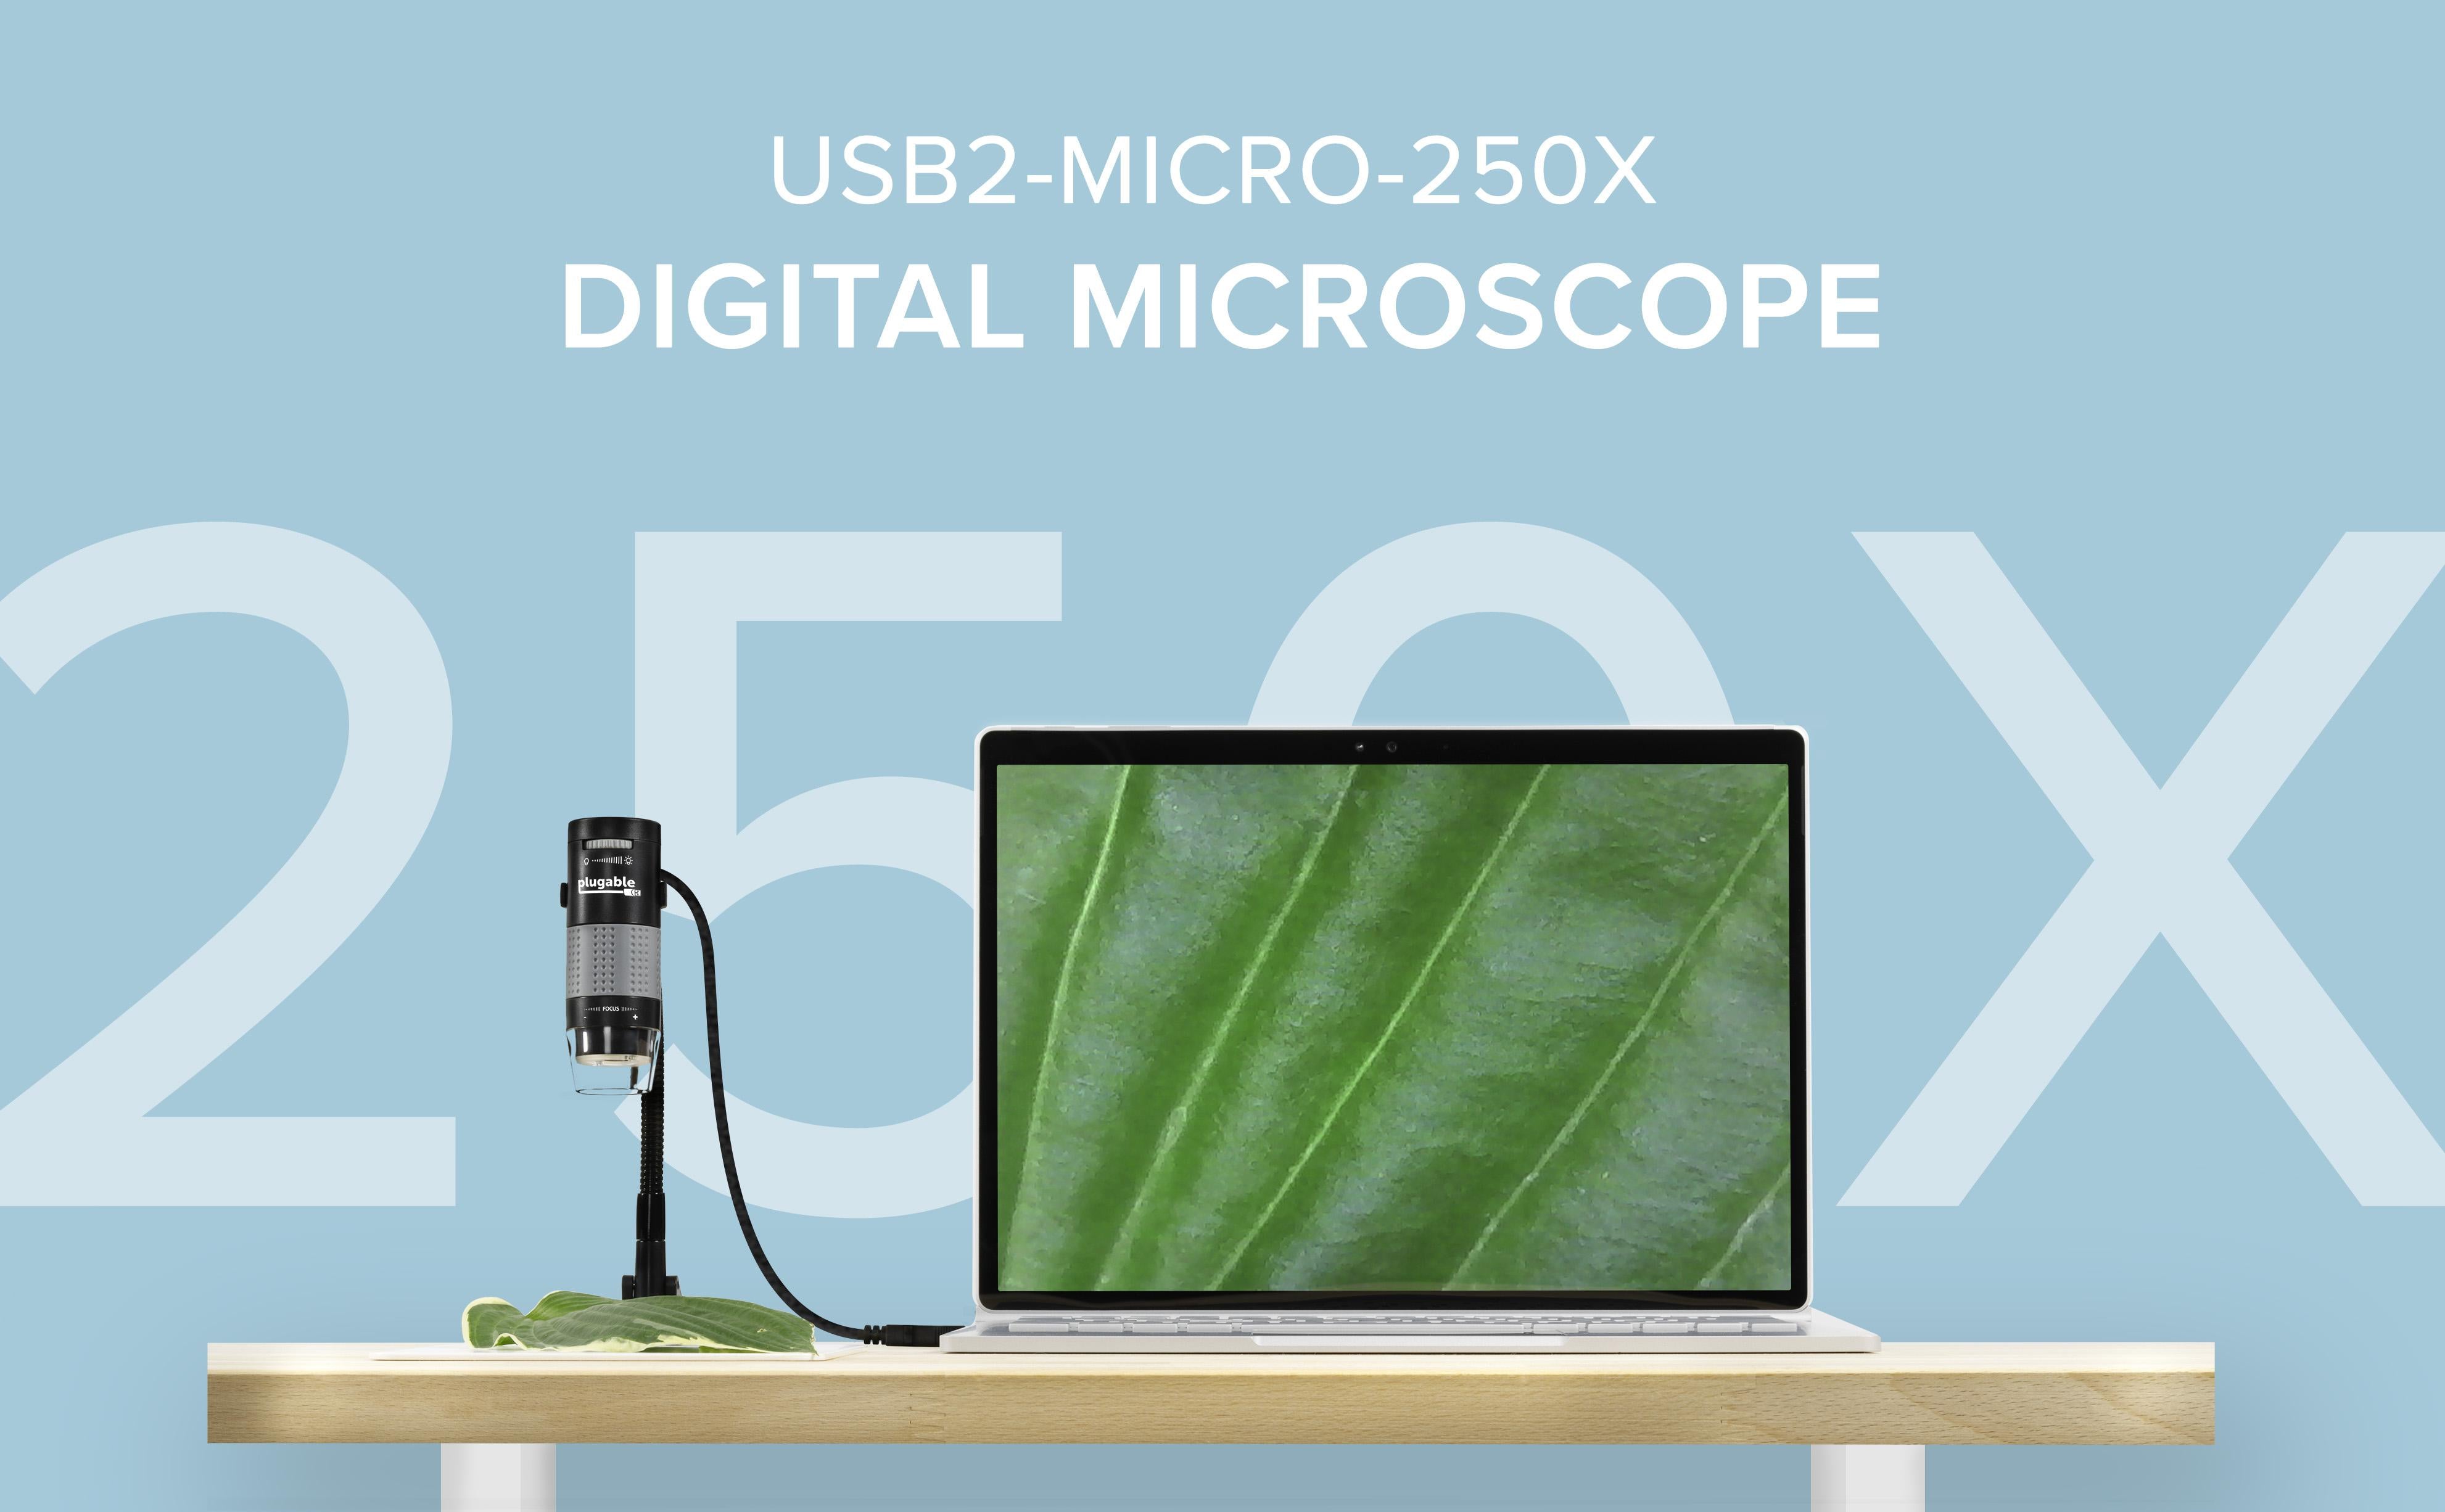
Hobby Focused—
Useful and fun for students, collectors, testers, and anyone interested in exploring the microscopic world. Use as electronics microscope, soldering microscope, USB coin microscope and more. Take single images, time-lapse, and video
Perfect for Grab and Go Examination—
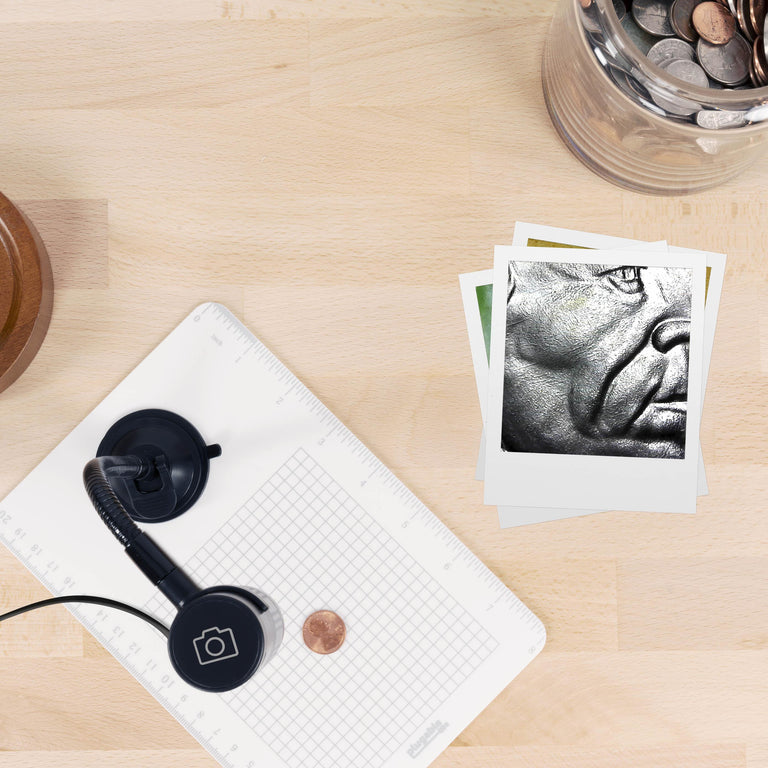
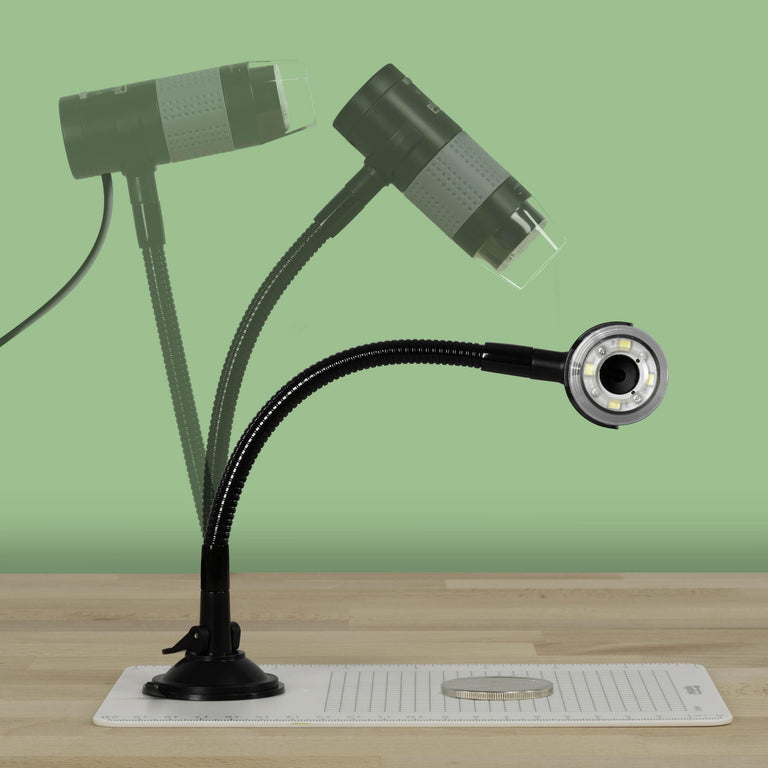
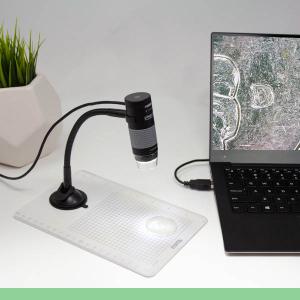
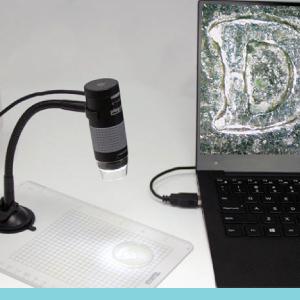
Use with laptop or tablet, or focused sessions with desktop. Included flexible arm stand and observation pad can be used for measurement, or use as handheld microscope
Broad Compatibility—
our USB microscope uses a webcam chipset and sensor to support nearly any operating system using standard webcam software. Includes connectors for USB and USB-C/Thunderbolt ports for seamless connectivity. ChromeOS 108 or above is required.
High Definition Microscope With Built-in Lighting—
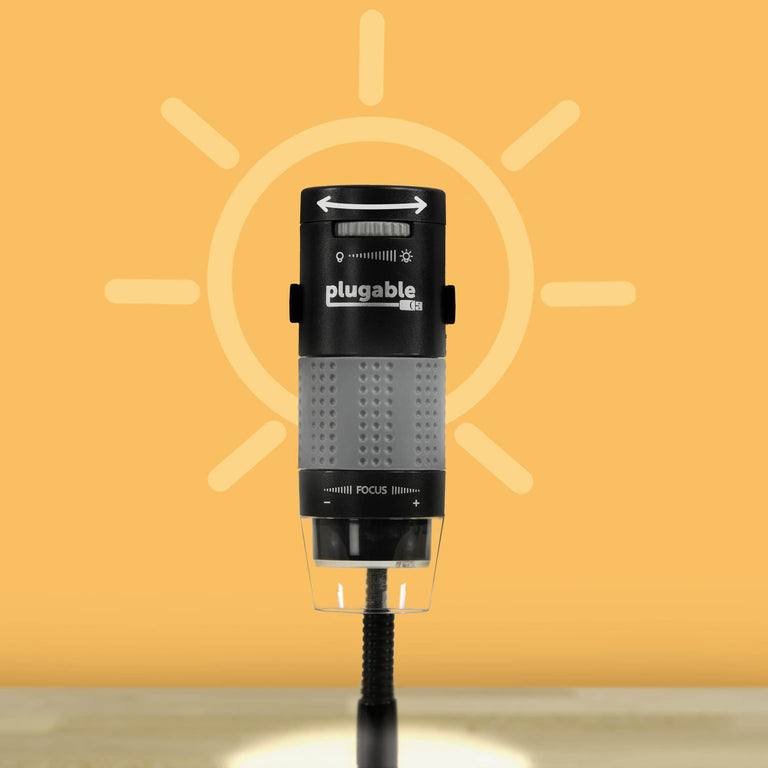
2.0 Megapixels, 60x to 250x magnification. LED halo light with brightness control. Features 7000K color temperature, 0-38lumen for optimal light and clarity
2-Year Coverage, Lifetime Support—
Every Plugable product, including this digital microscope, is covered against defects for 2 years and comes with lifetime support. If you ever have questions, contact our North American-based team - even before purchase
Explore the World at the Microscopic Level With Plugable’s Digital USB Microscope!
Makes a great STEM gift! Great for kids, hobbyists, and anyone with a passion to look closer at the world around them. The Plugable 250x USB 2.0 Digital Microscope (USB2-MICRO-250X) allows you to work quickly and effectively at the microscopic level. Common uses include classroom exploration and homework, stamp or coin analysis, micro-soldering, plant examination, bug collecting and more.
This adaptable tool can be used with the included stand for lower magnifications, handheld for quick point-and-click inspection, or placed directly on subjects for the highest magnifications. The rugged plastic body makes it ideal for children, classrooms, and home use, while also providing durability for outdoor exploration. Its lightweight design ensures easy portability, making scientific discovery possible anywhere.
Toss the microscope in your bag, and use with a compatible portable device on your next hiking trip, or family vacation for an on the go examination station. Whether you're exploring the intricate patterns of a leaf, soft fluffy moss, shiny rocks, or the tough bark of a tree, this portable microscope transforms your normal outdoor time into a journey of discovery, making science fun and accessible for the whole family.
Features
Built-In Lighting
Includes built-in LED's with adjustable brightness and a built-in diffuser to combat glare and properly view your objects.
This is especially useful when viewing reflective objects like coins. Instead of harsh glare, the diffuser gives even light distribution across the object being viewed.
Image Capture
Capture still images, time-lapse photos, and video with incredible microscopic detail.
Captured content is stored on the host device which allows for easy access and sharing of high-resolution visuals.
Use the included user-friendly software, or camera software of your choosing to allow microscopic exploration for users of any skill level.
Versatile Stand
Easily analyze the surface of at any angle by positioning the flexible gooseneck precisely where you want it.
Attach the microscope with the suction cup to the included observation stage.
All fittings have 1/4"-20 TPI threads, which almost all camera mounts and selfie sticks use, and custom riggings can be used.
Magnification Info and Package Contents
60x to 250x Magnification
Start by viewing objects at 60x magnification Continue viewing up to 250x magnification for closer inspection. At this level, cells and particles not visible to the human eye can be seen.
Compatibility
Windows (11, 10, 8.x, 7, Vista, XP)
macOS - 10.5 and above
ChromeOS - All
iPadOS - USB C 17.x (Third Party Application Required)
Android - USB C (Third Party Application Required)
Linux - Kernel 2.6.26 and above
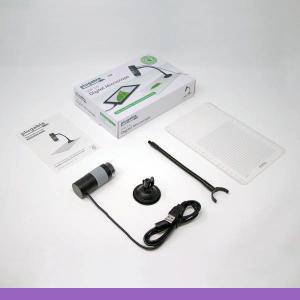
In the Box
1x Microscope body
1x Observation stage
1x Suction cup
1x Gooseneck
1x C-clip
1x USB C Keychain Adapter
1x Quick Start Guide
In The Box
Item and Quantity
Item Notes
1x Plugable USB 2.0 Digital Microscope (2MP, 250x Magnification)
Windows USB Video Class (UVC) support is built in to all versions of Windows from XP and above (11, 10, 8.x, 7, Vista, XP). USB microscope camera software is available on our website that allows finer control microscope, and other video capture software can be used
macOS Mac computers with OS versions 10.5.x and above have built-in support for USB Video Class (UVC) devices. USB microscope camera software is available on our website that allows finer control microscope, and other video capture software can be used
Chrome Works on all Chrome OS devices with the built-in Camera application
iPadOS USB C Equipped iPads running iPadOS 17.x are compatible. Third Party Application Required. Click Here for more details
Android Compatible with well known USB C equipped Android devices. Third Party Application Required. Check with Android manufacturer for official information on support for external cameras
Linux Linux distributions with kernels 2.6.26 and above have built-in support for USB Video Class (UVC) devices. Works on Raspberry Pi OS. We recommend using Cheese, or GTK+ UVC Viewer
Not Compatible: iPhones are not compatible with external cameras and cannot use our USB Microscopes
We have tested our microscope with many Linux distros utilizing either the Cheese app or GTK+ UVC Viewer. These can either be installed by searching by app name through the app store in your Linux distro (if available), or by using the following terminal commands.
GTK+ UVC Viewer sudo apt-get install guvcview
Cheese sudo apt-get install cheese
Chrome OS
No additional software is needed. Please see Google's guide to capturing photos and video, just use the microscope as your source.
Filter Help Articles and Frequent Questions by Category
Choose one or more filters within each category to narrow down the articles. Each selection will result in only displaying articles that include all of your choices.
Selected filters:
Articles
Well how about that, it looks like we don't have any articles matching your filters! Try removing one of your choices or clear the filters to show all articles.
Some specific device classes, such as USB cameras, are handled differently by operating system privacy/security settings. If you aren't seeing an image output from the microscope, or you see a message that your "Camera is being used by another application", you may need to change these privacy/security settings.
Instructions for Windows
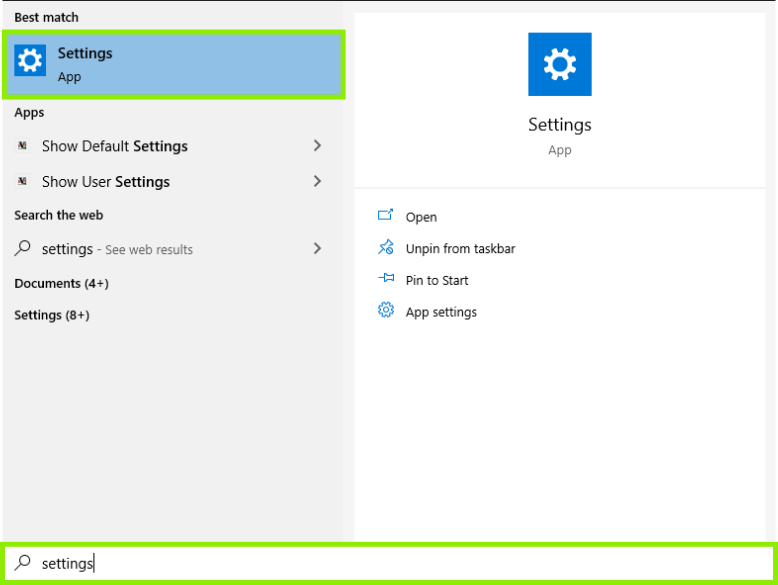
Press the or click on the Windows key to open the Start Menu, and type "Settings" into the search bar.
Then, click the gear-shaped icon to open up the Settings menu.
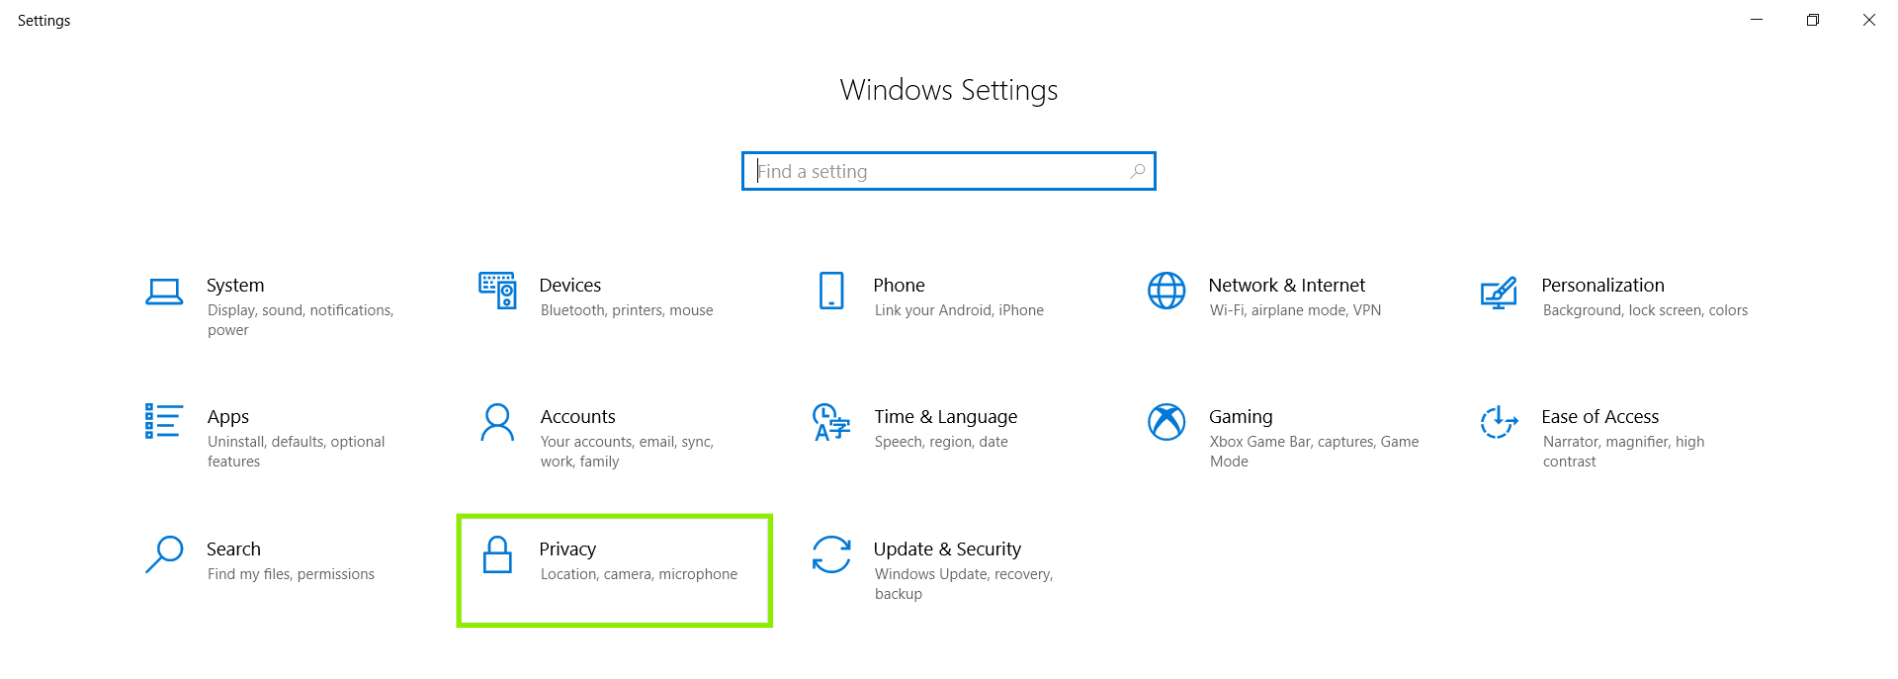
In the settings, click Privacy.
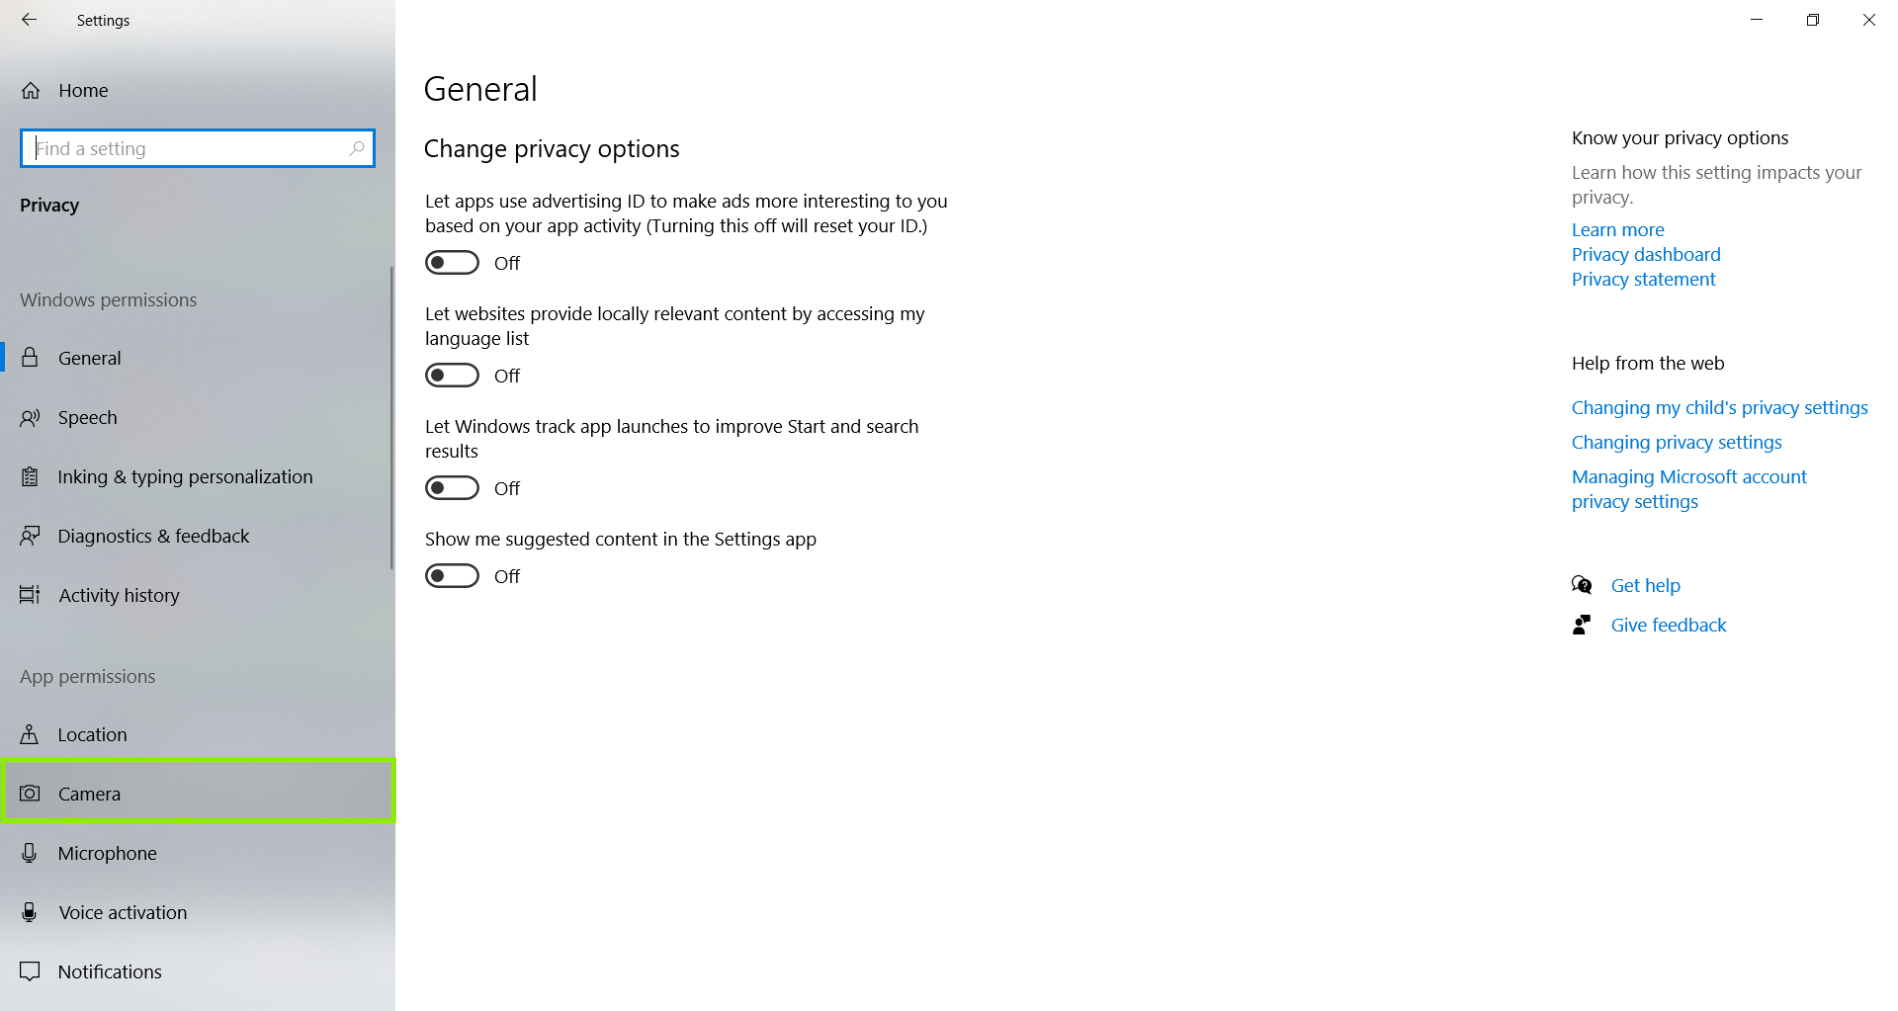
Click Camera, on the left hand side menu.
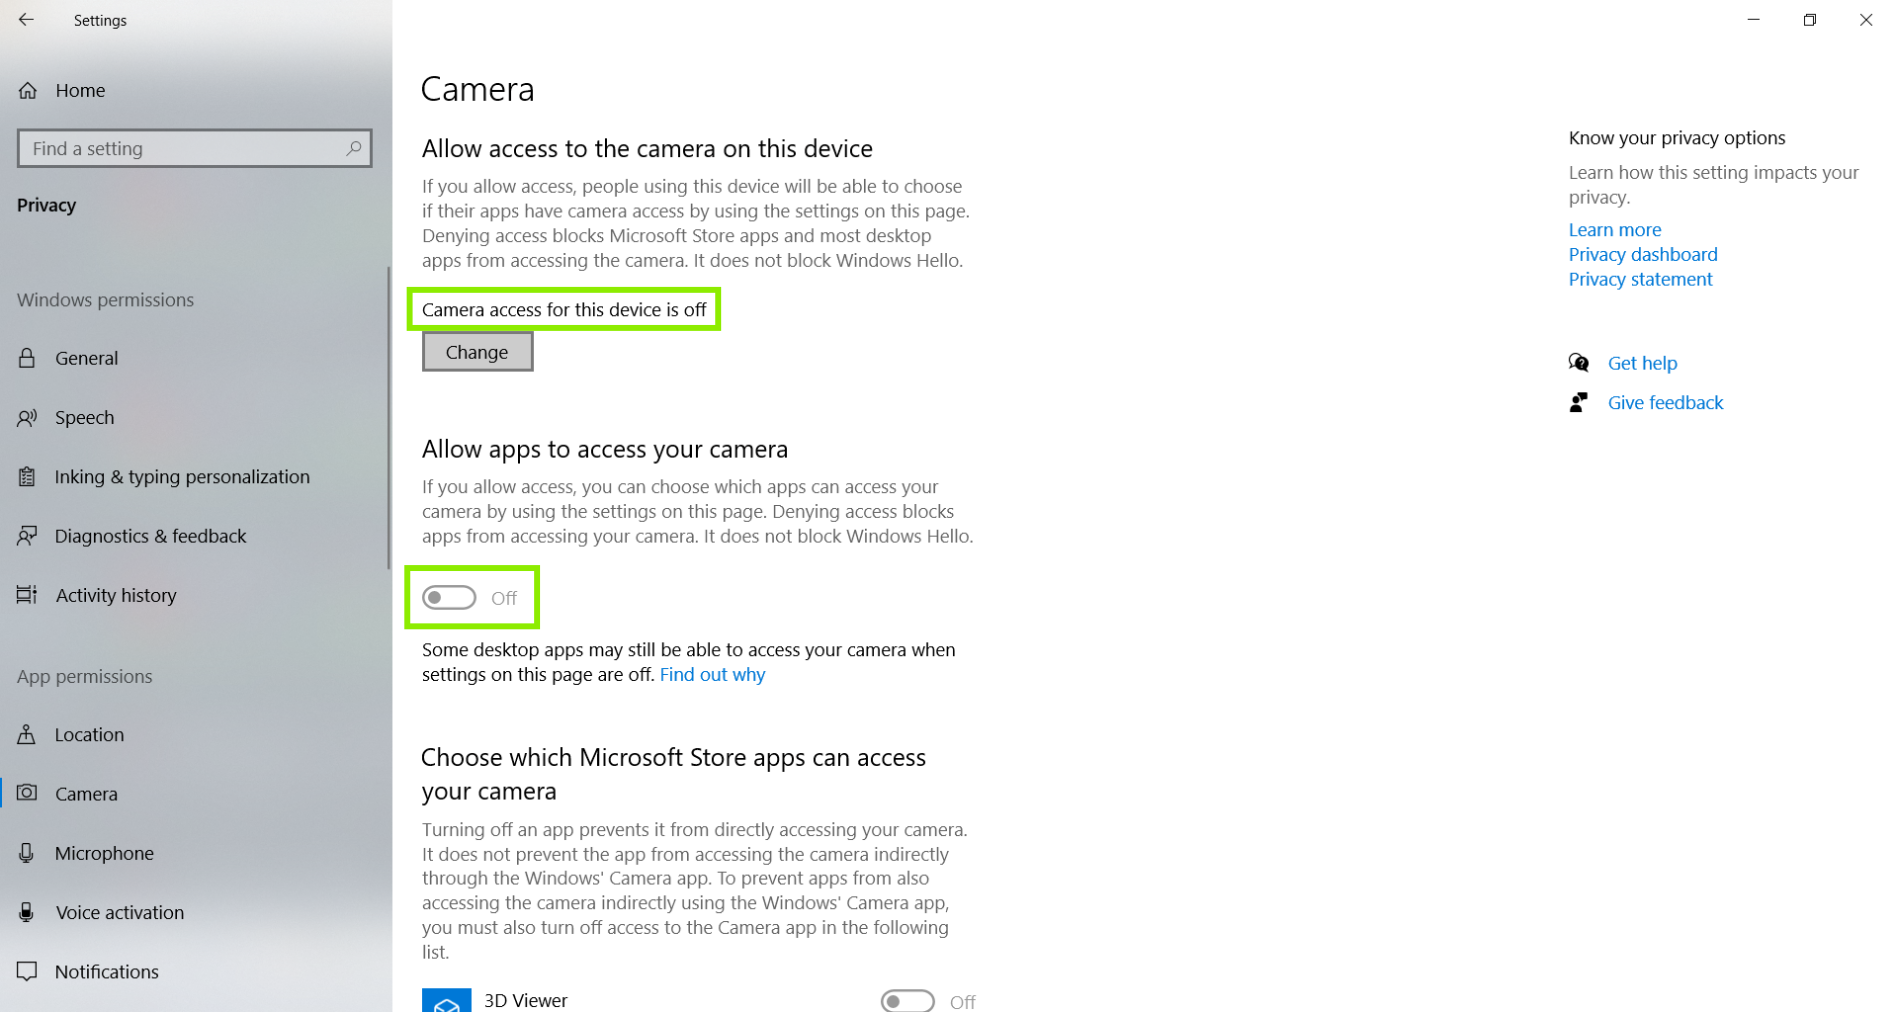
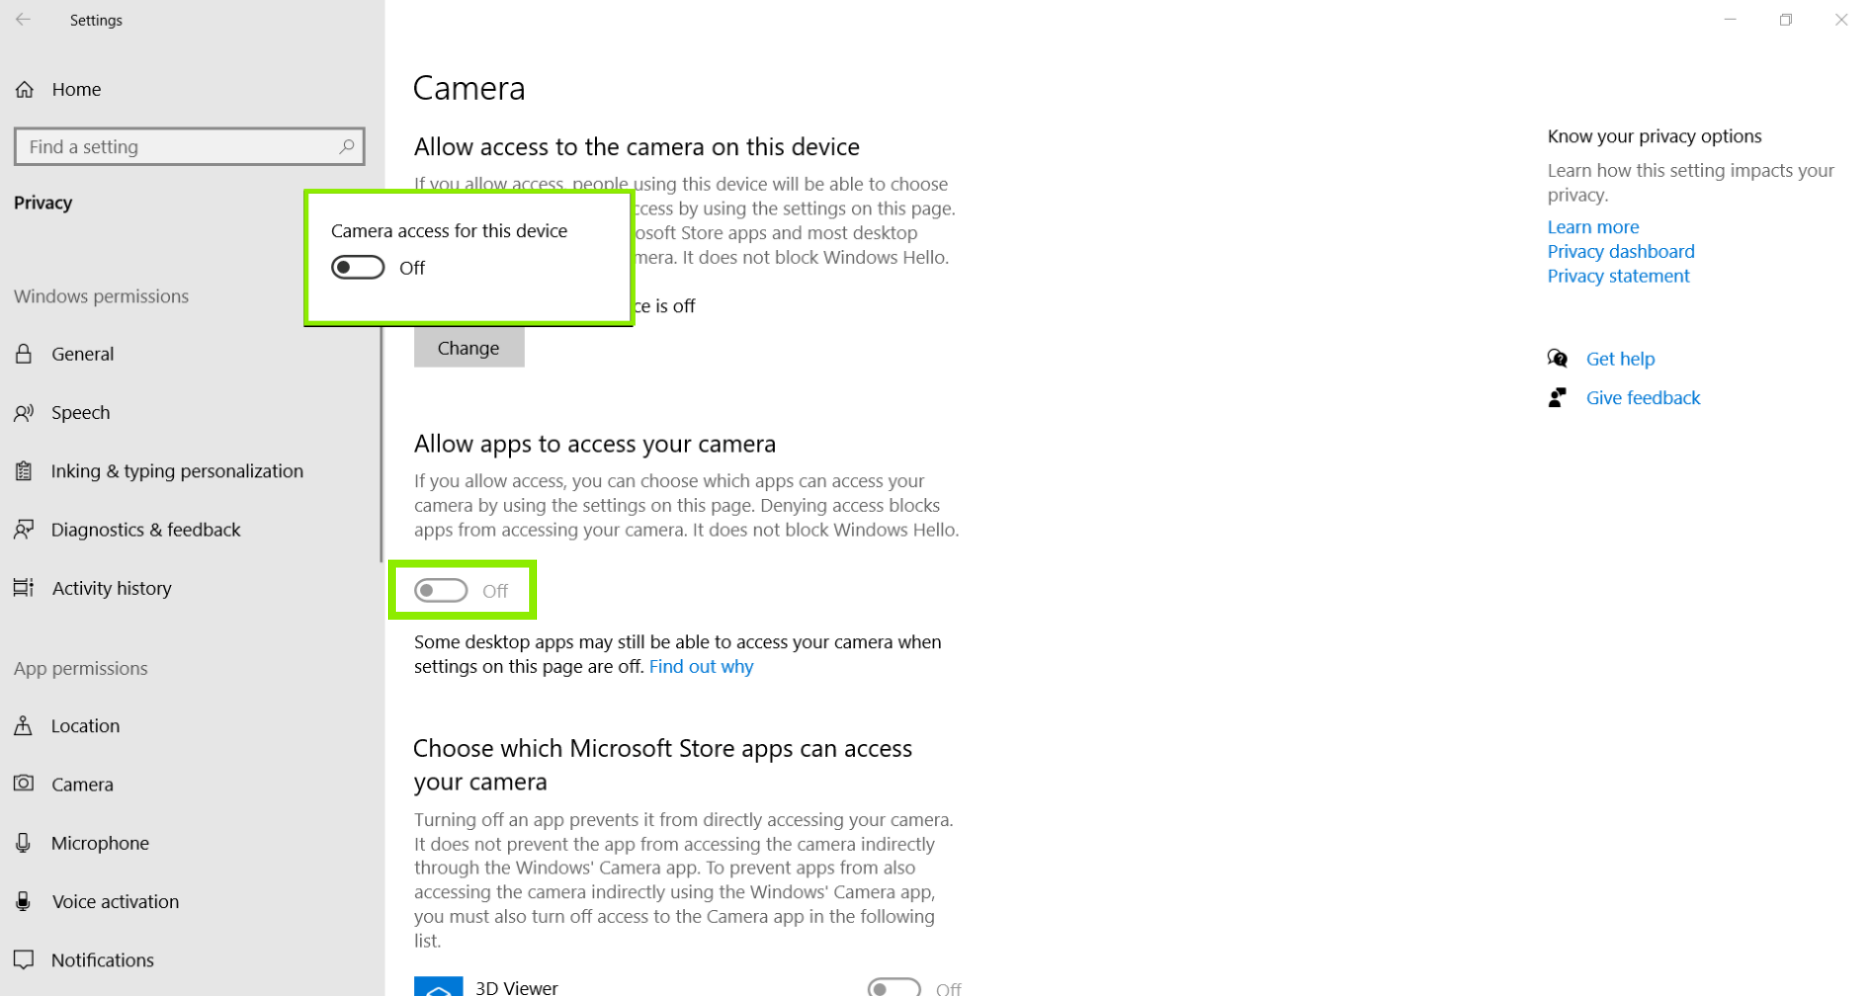
Now, we can see that the ability for the system to Allow access to the camera on this device is off. We also see that the ability for the system to Allow apps access to your camera is off as well. Please note, one or both of these options may be off for you.
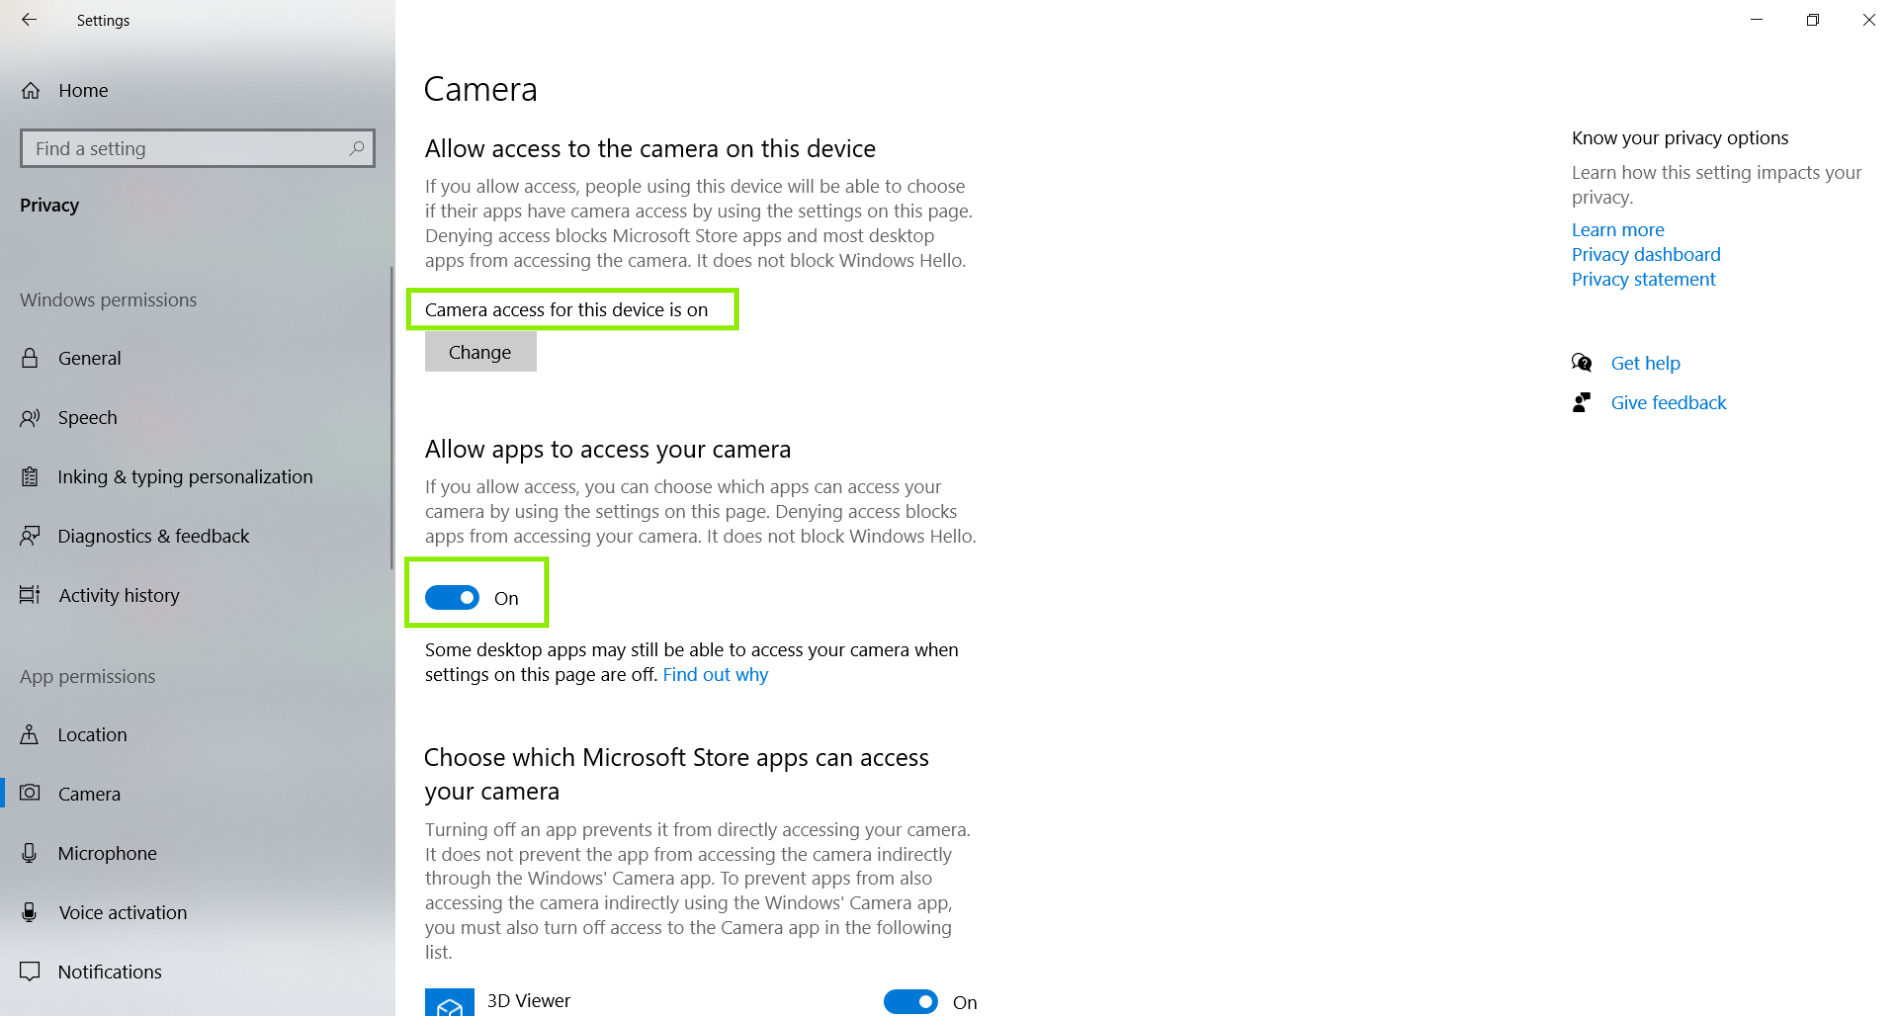
Click Change, to turn on the ability for the system for the system to Allow apps access to your camera. Then, click to Allow apps to access your camera, click the little button to toggle it from off to on.
Now, we should see that the Camera access for this device is on, and the ability for Windows to Allow apps to access your camera is on as well.
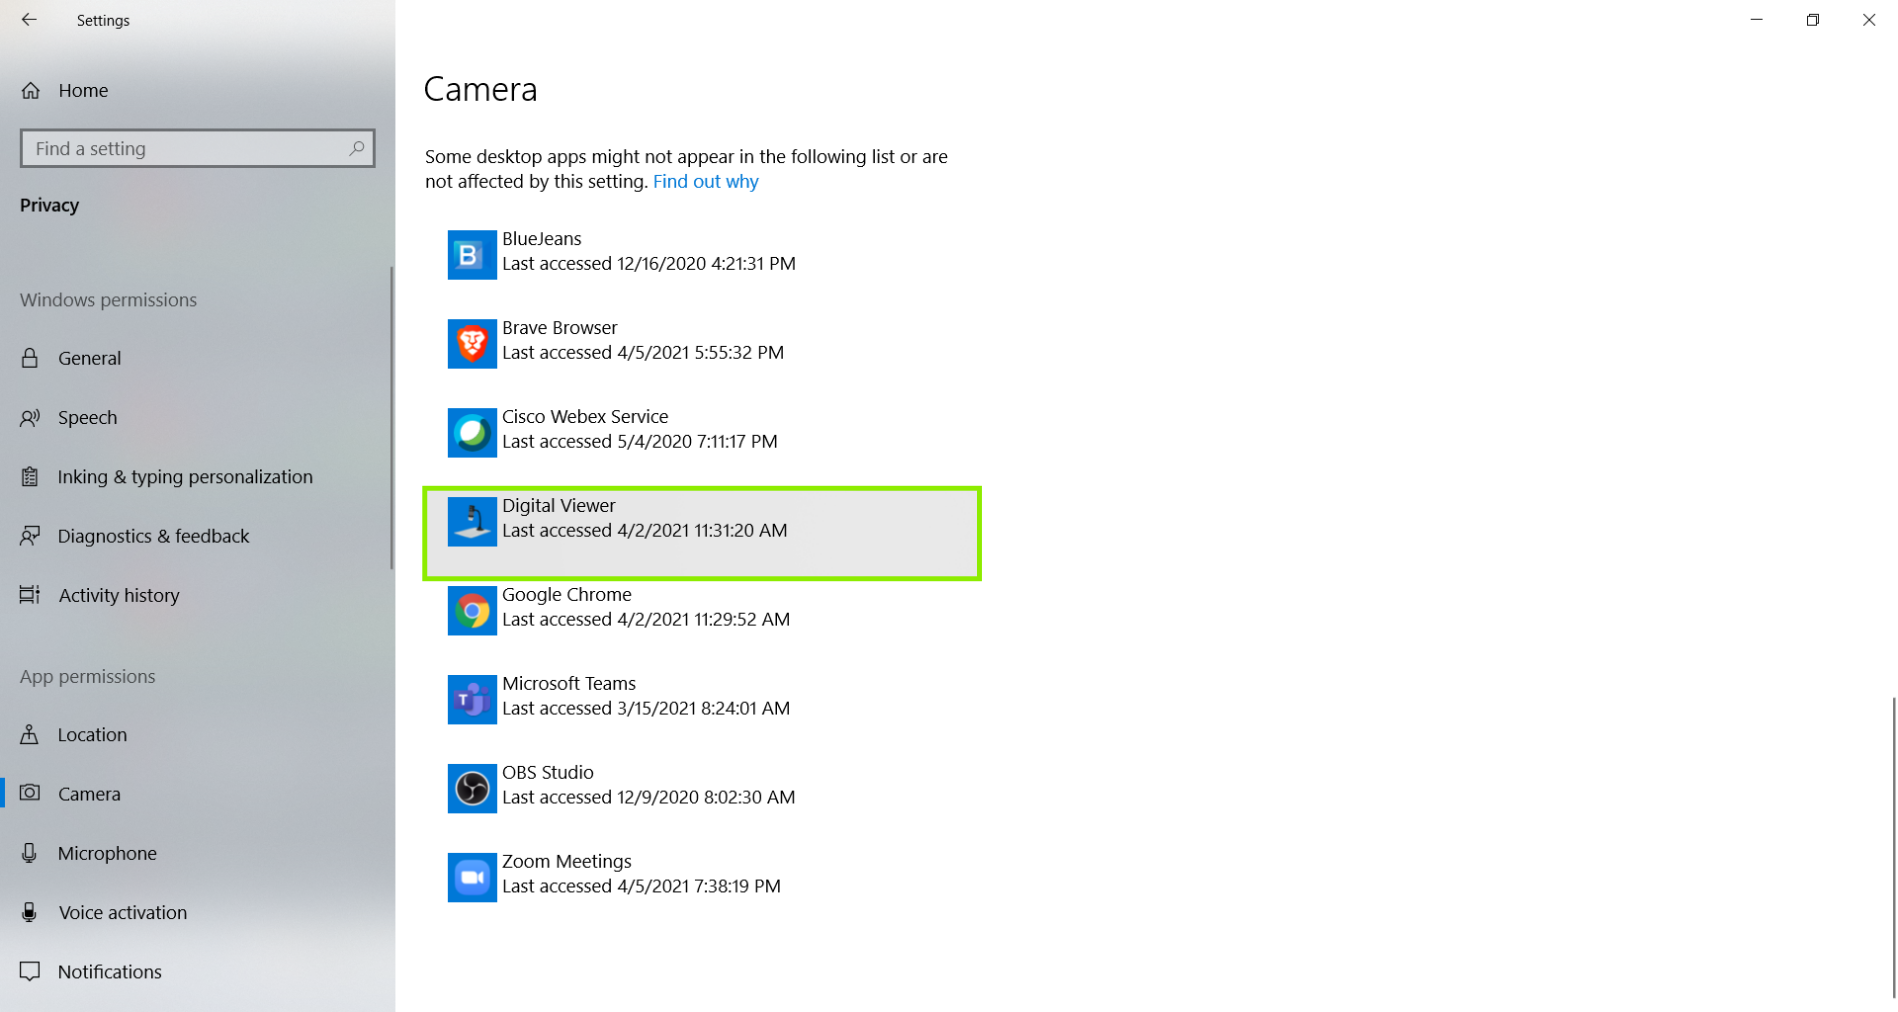
We can double check this by scrolling down on this page to make sure the Digital Viewer software is listed.
Restart the computer after confirming the privacy settings are on. Once the computer reboots, please open the Digital Viewer program only. We want to make sure to leave other programs closed so we have a clean environment to test the microscope.
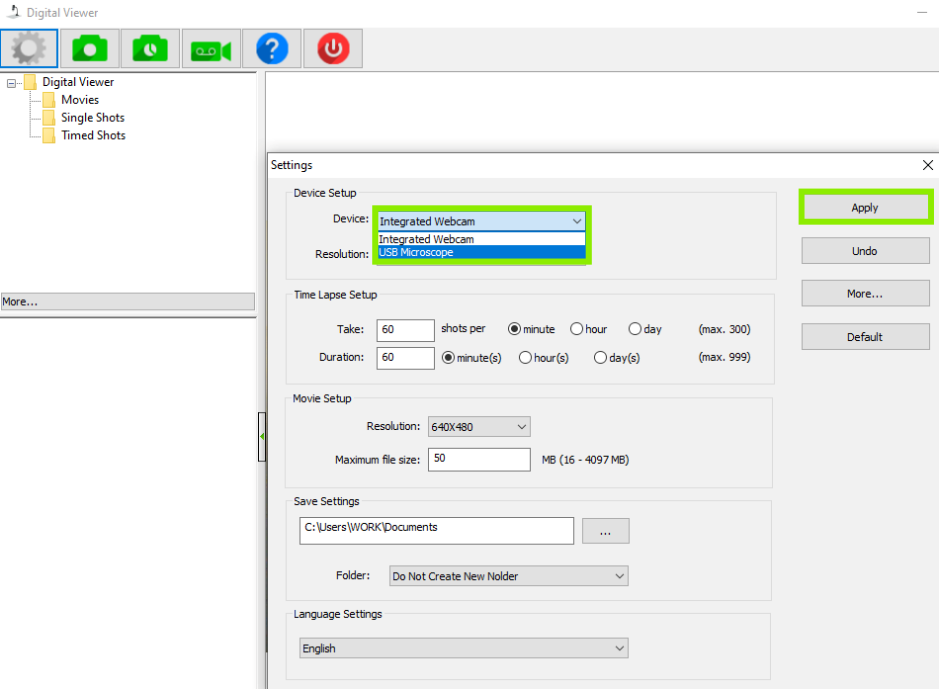
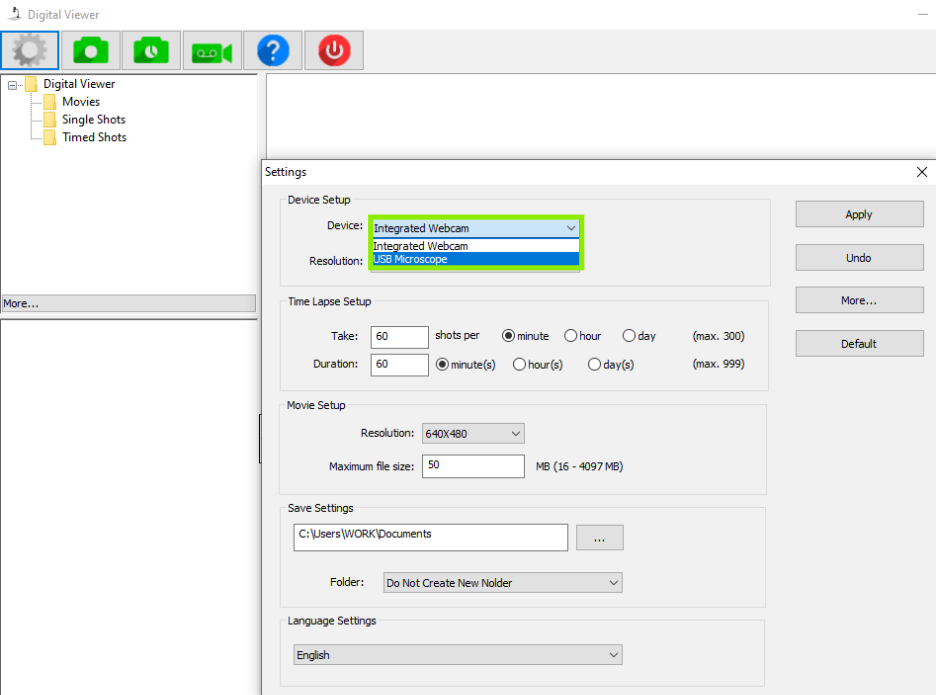
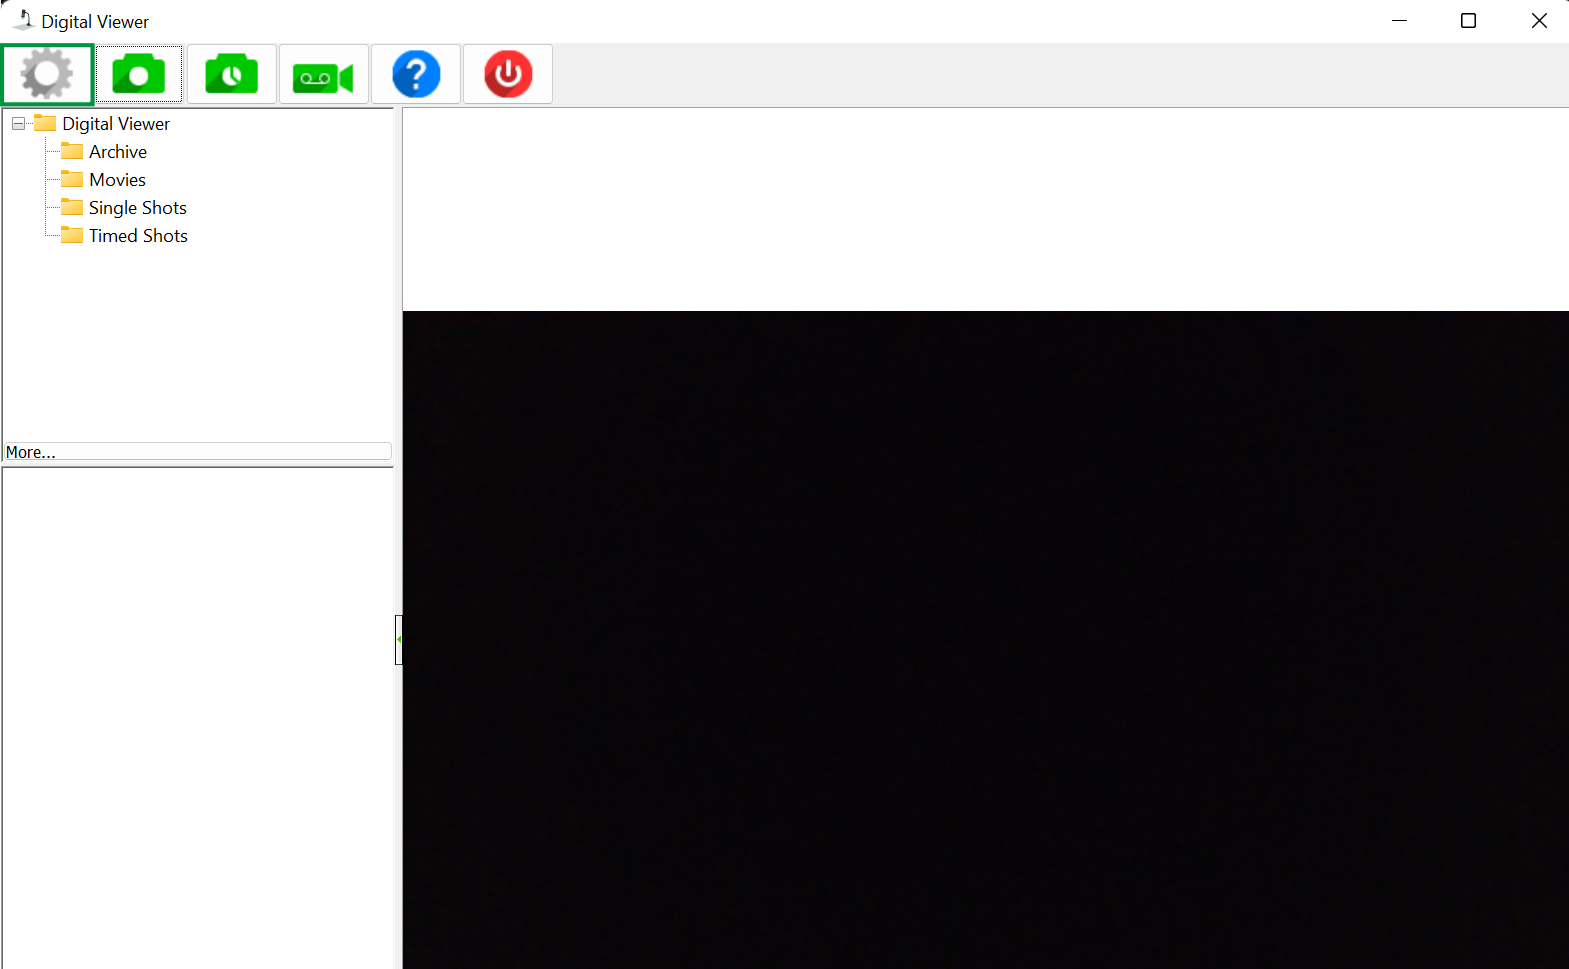
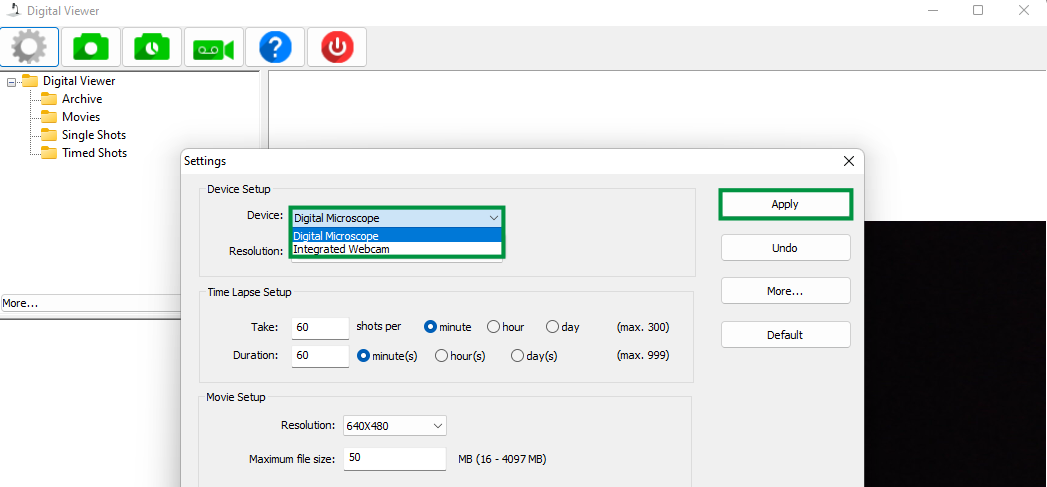
Click on the gear-shaped icon in the in the top left corner of the Digital Viewer window to enter the Settings. Then, click on the drop-down menu for Device, and pick the USB Microscope. Then click Apply to make the change.
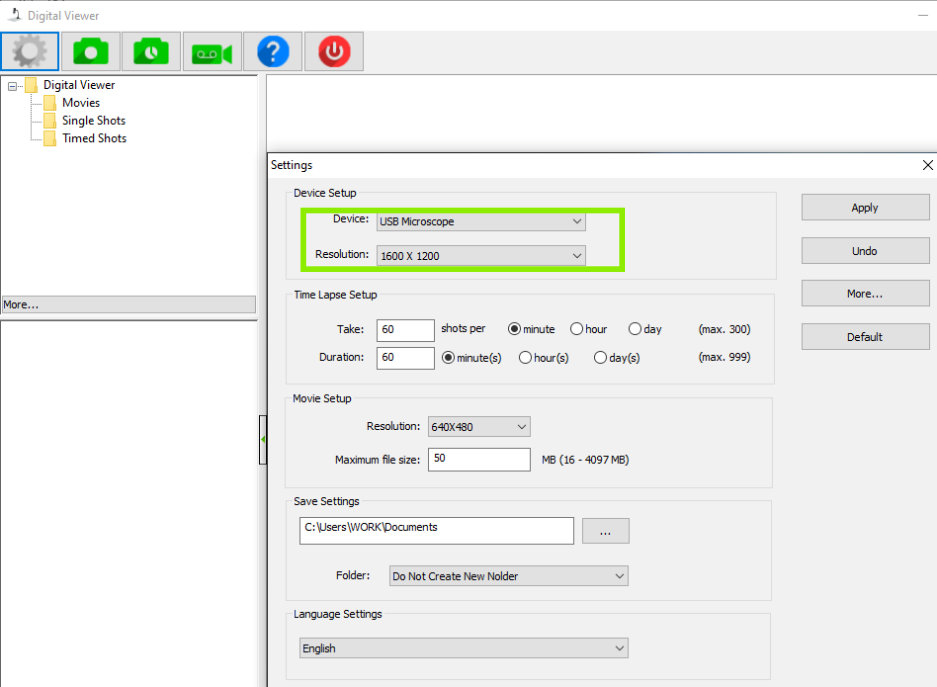
Now, you should see the USB Microscope is set as the default device. Feel free to change the resolution or other settings, and start examining things!
Click Here, to see an official article from Microsoft if you'd like to get further details about privacy and security settings.
Instructions for macOS
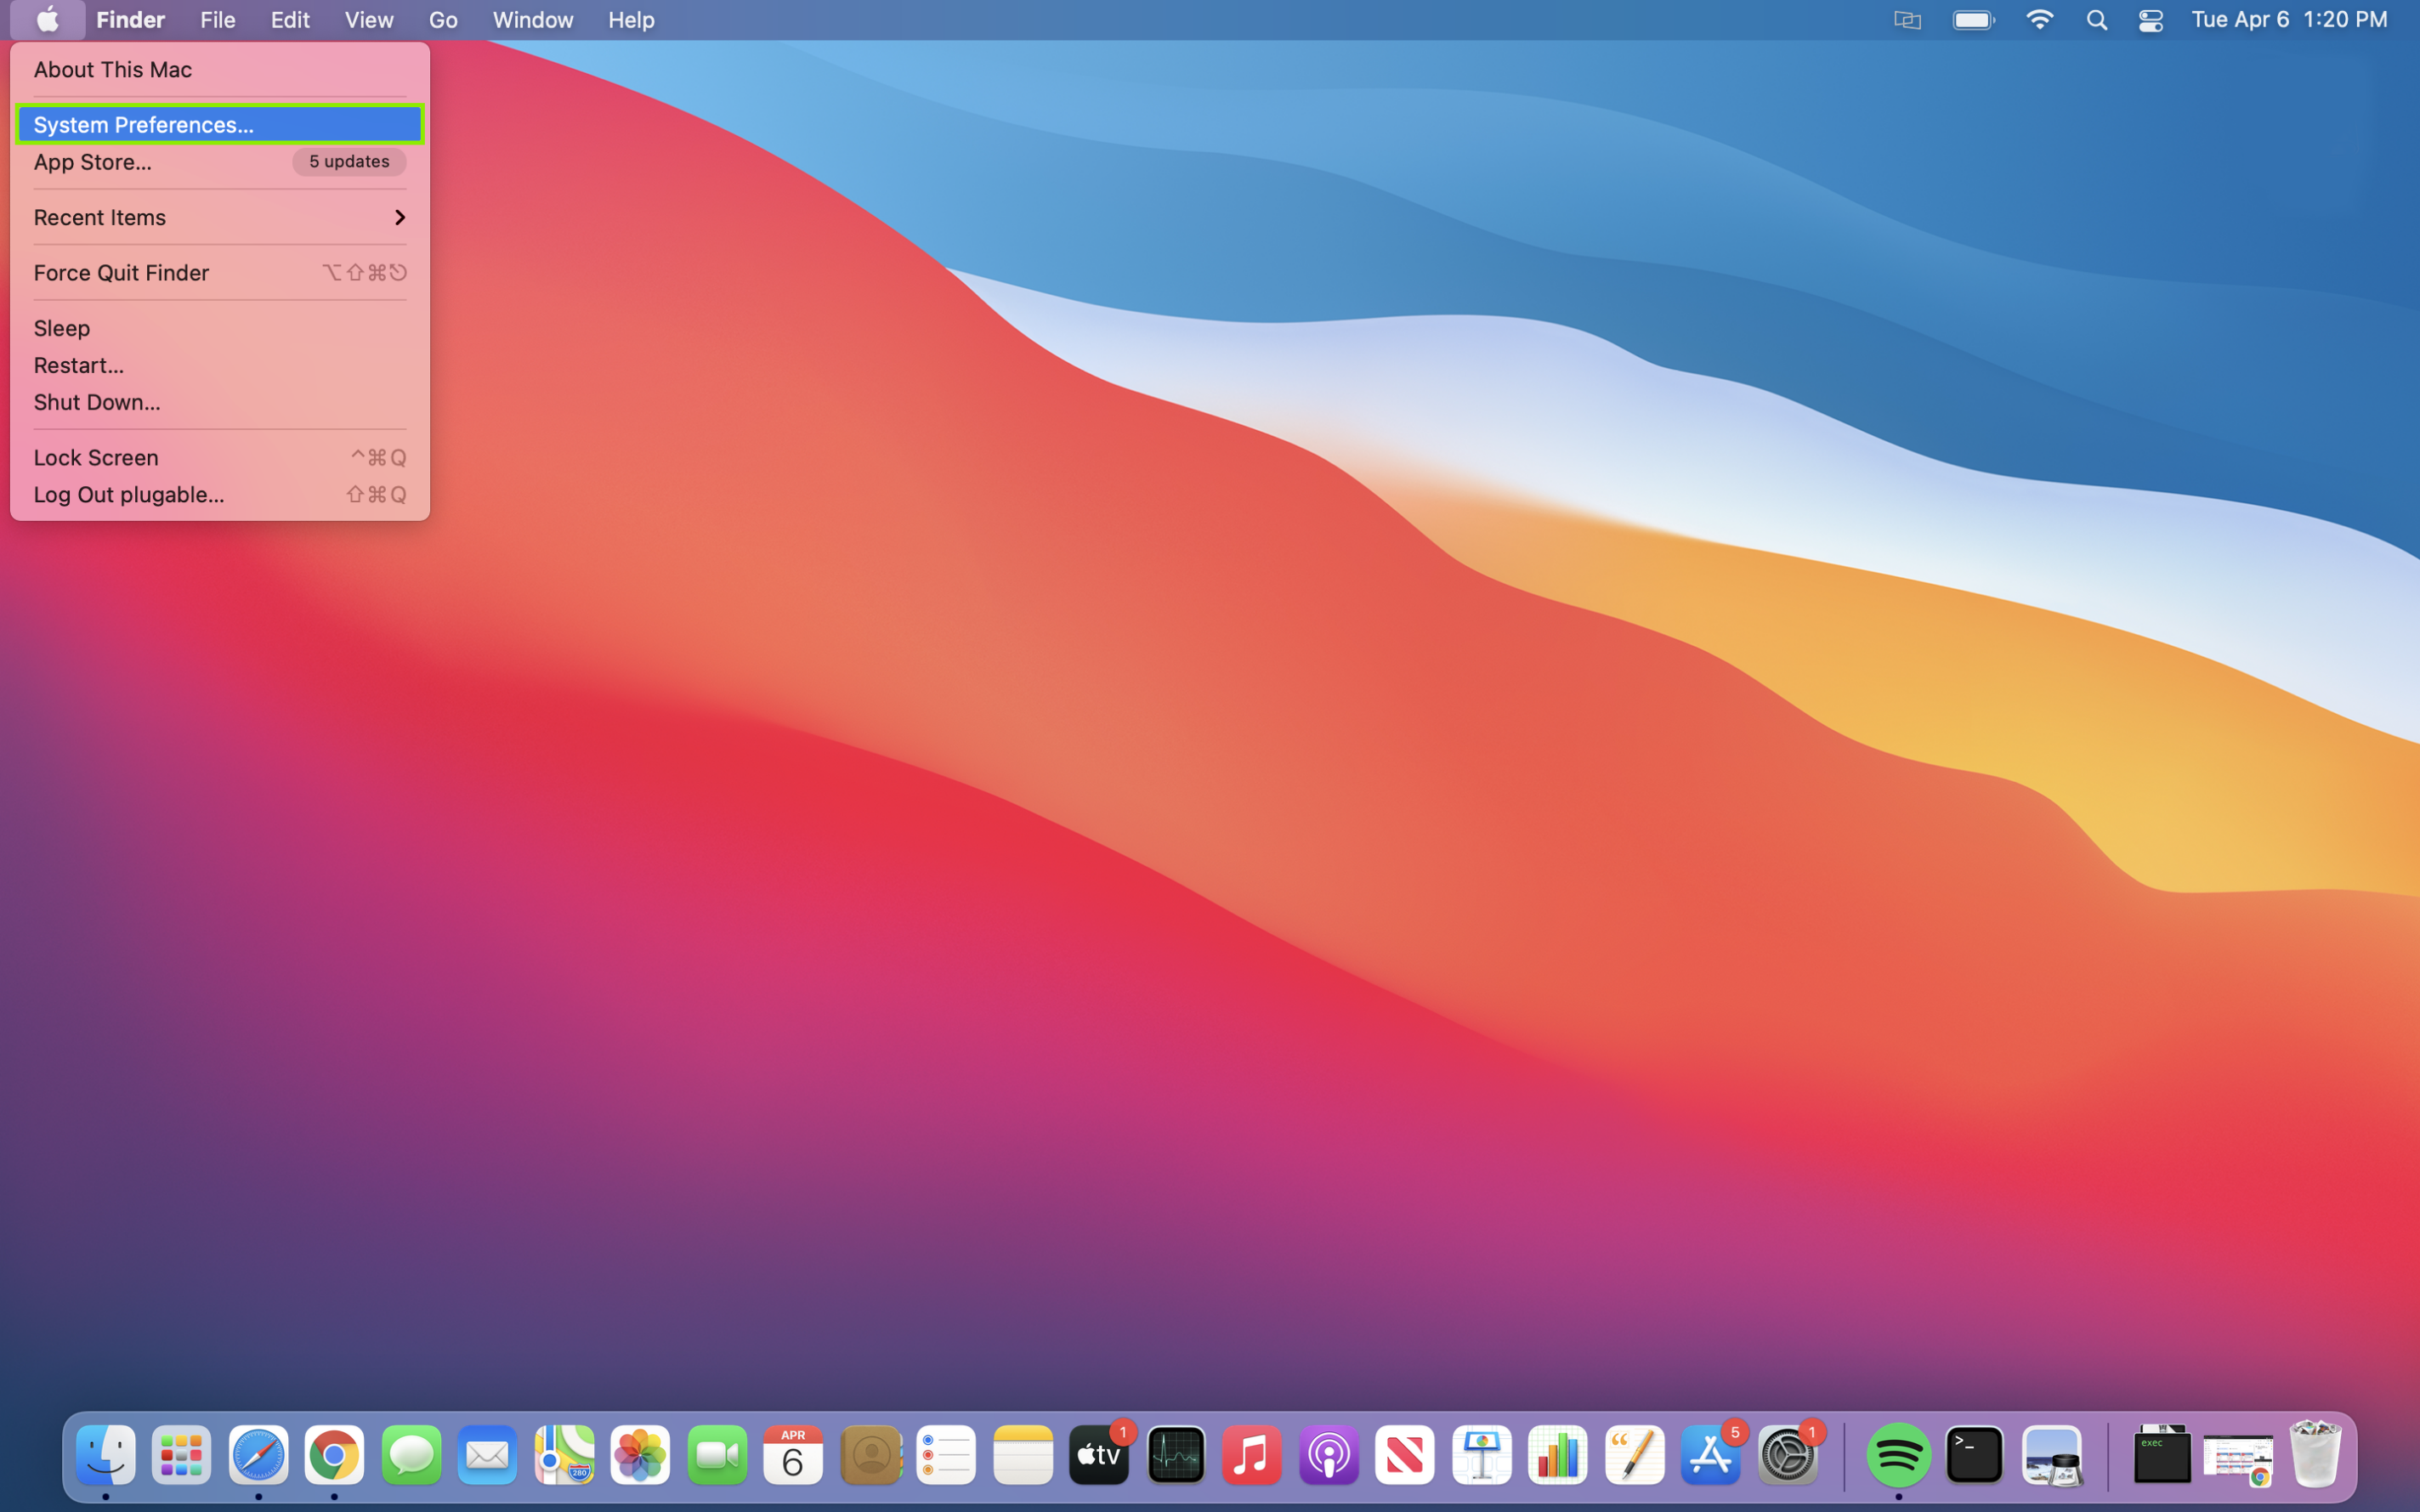
Click on the Apple Menu icon in the top left of your screen, and then click on System Preferences.
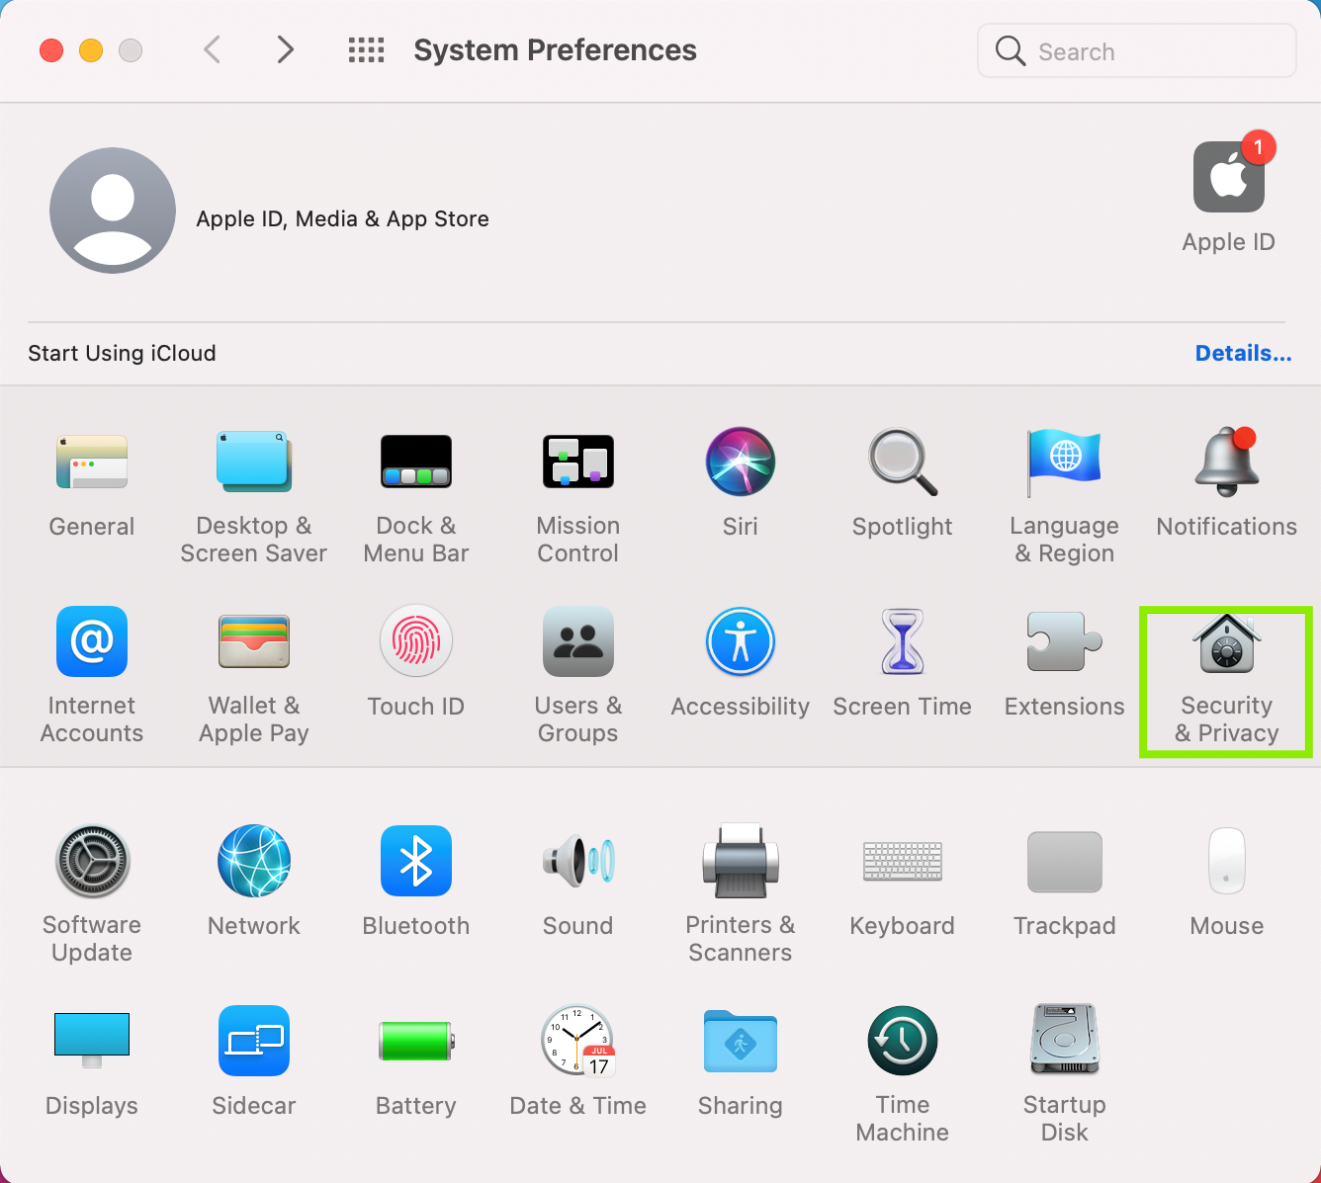
Click on Security & Privacy to open more options.
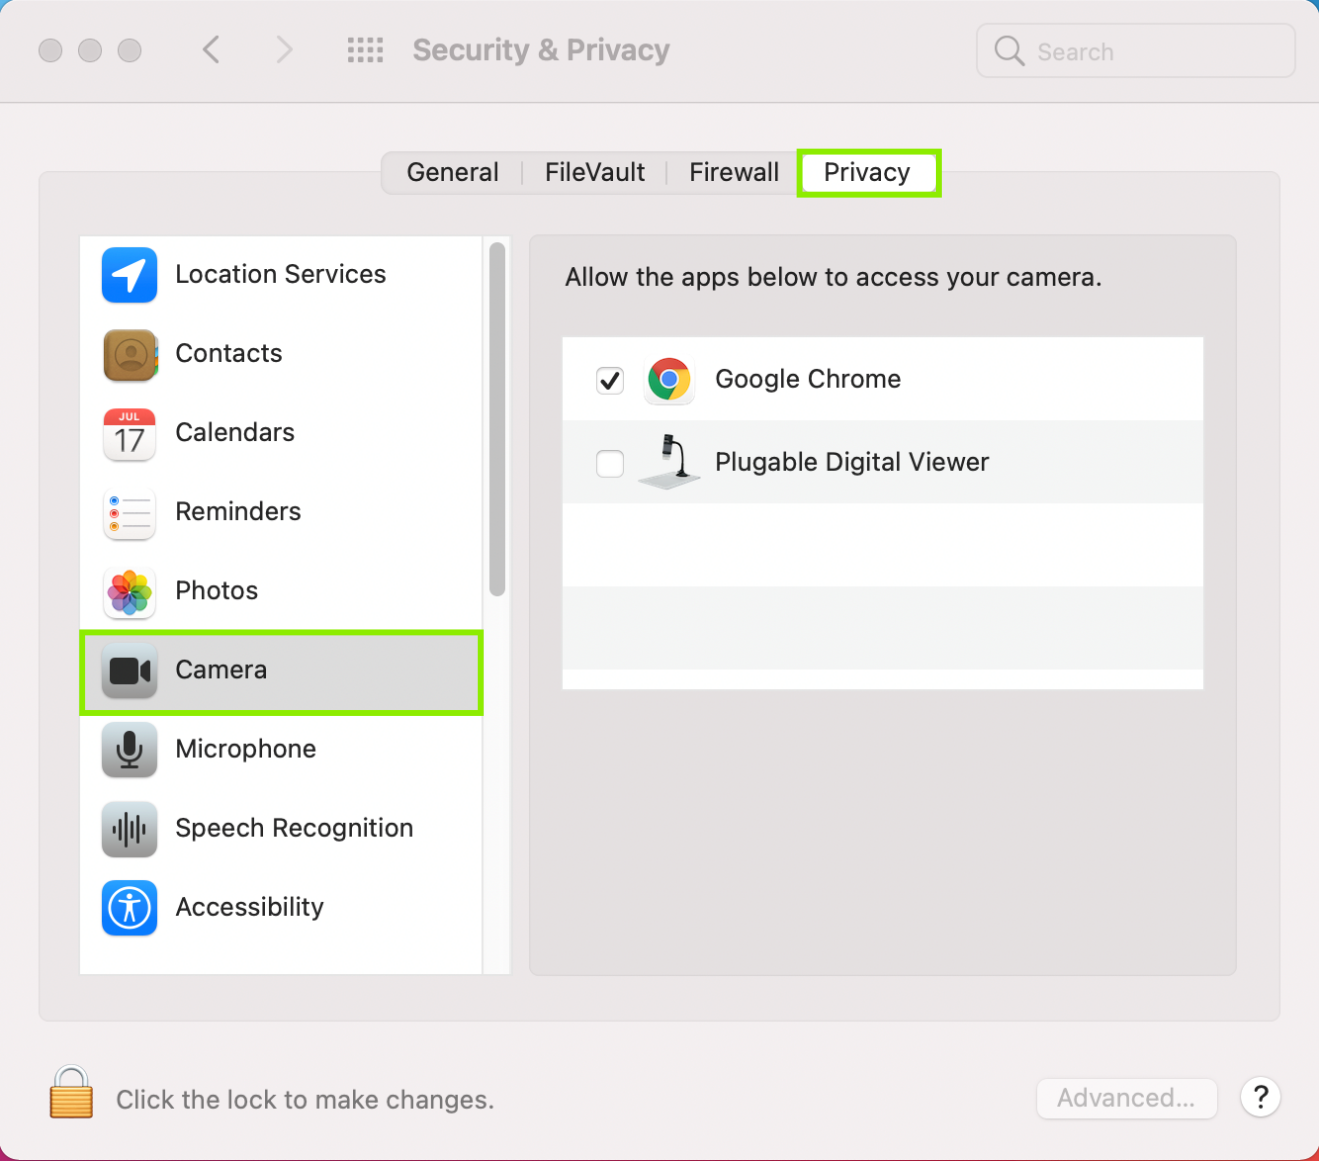
Click on Privacy, and then on Camera. You should see a listing for the Digital Viewer, and may see other other camera programs and capable apps listed as well.
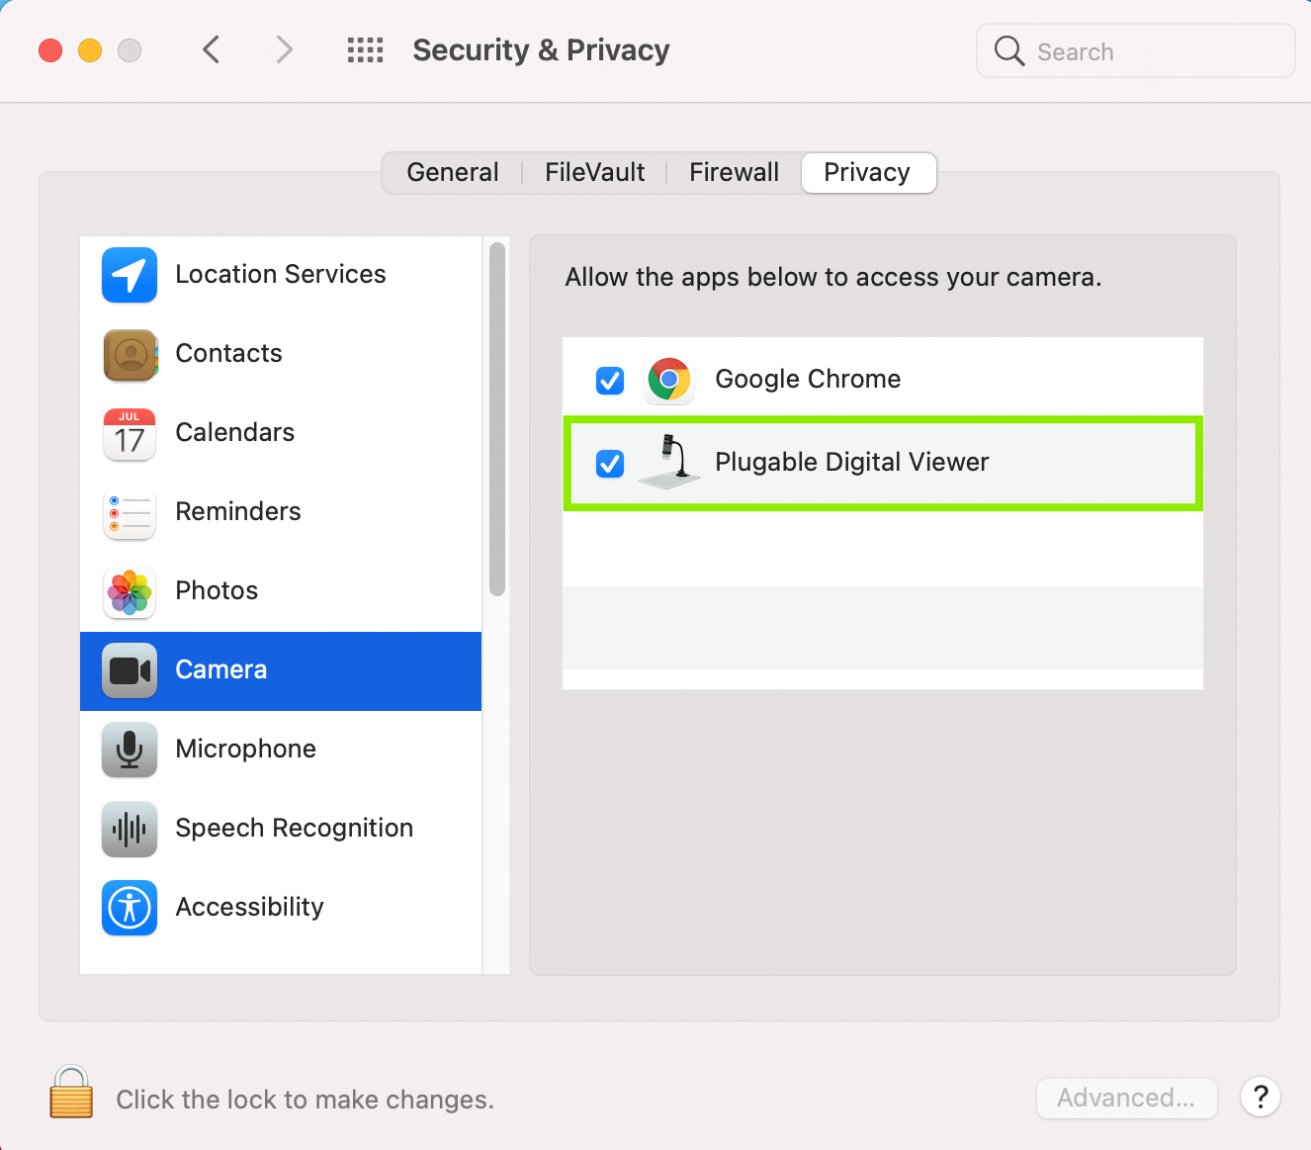
Check the box next to the Digital Viewer listing. Depending on your settings, you may need to click the lock at the bottom of the screen and put your password in to authenticate changes. Restart the computer once the Digital Viewer is checked.
Restart the computer after confirming the privacy settings are on. Once the computer reboots, please open the Digital Viewer program only. We want to make sure to leave other programs closed so we have a clean environment to test the microscope.
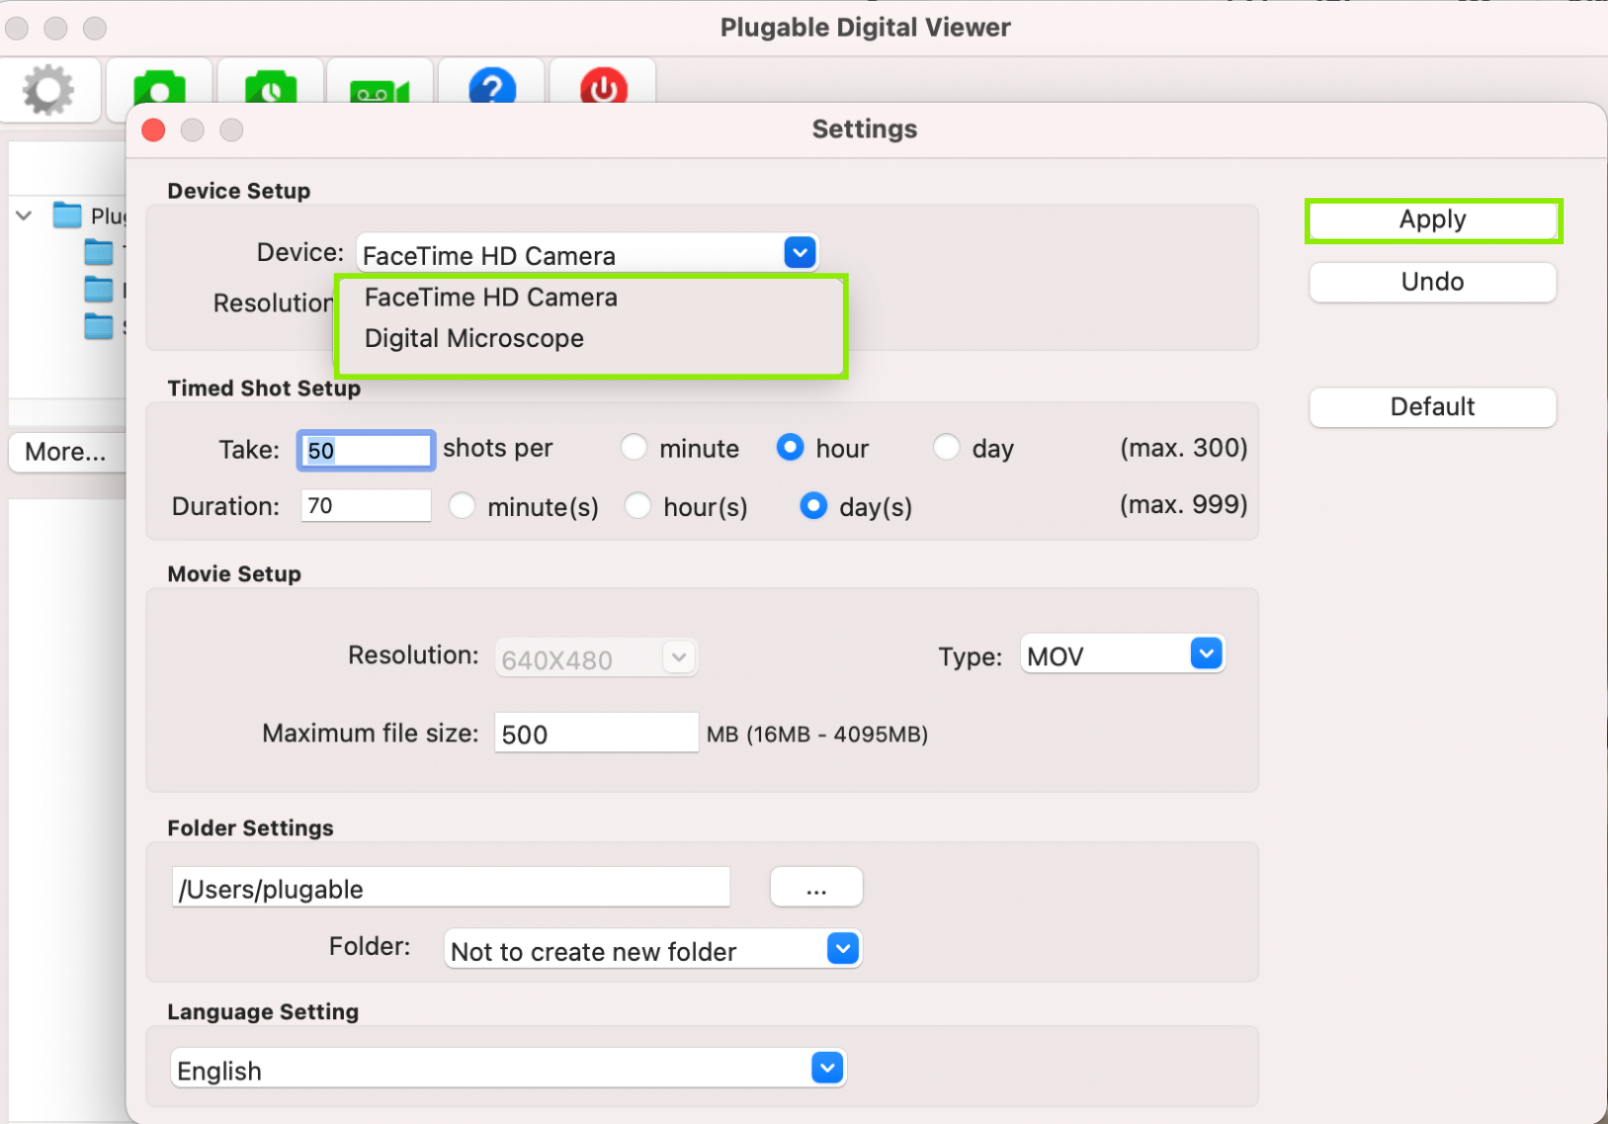
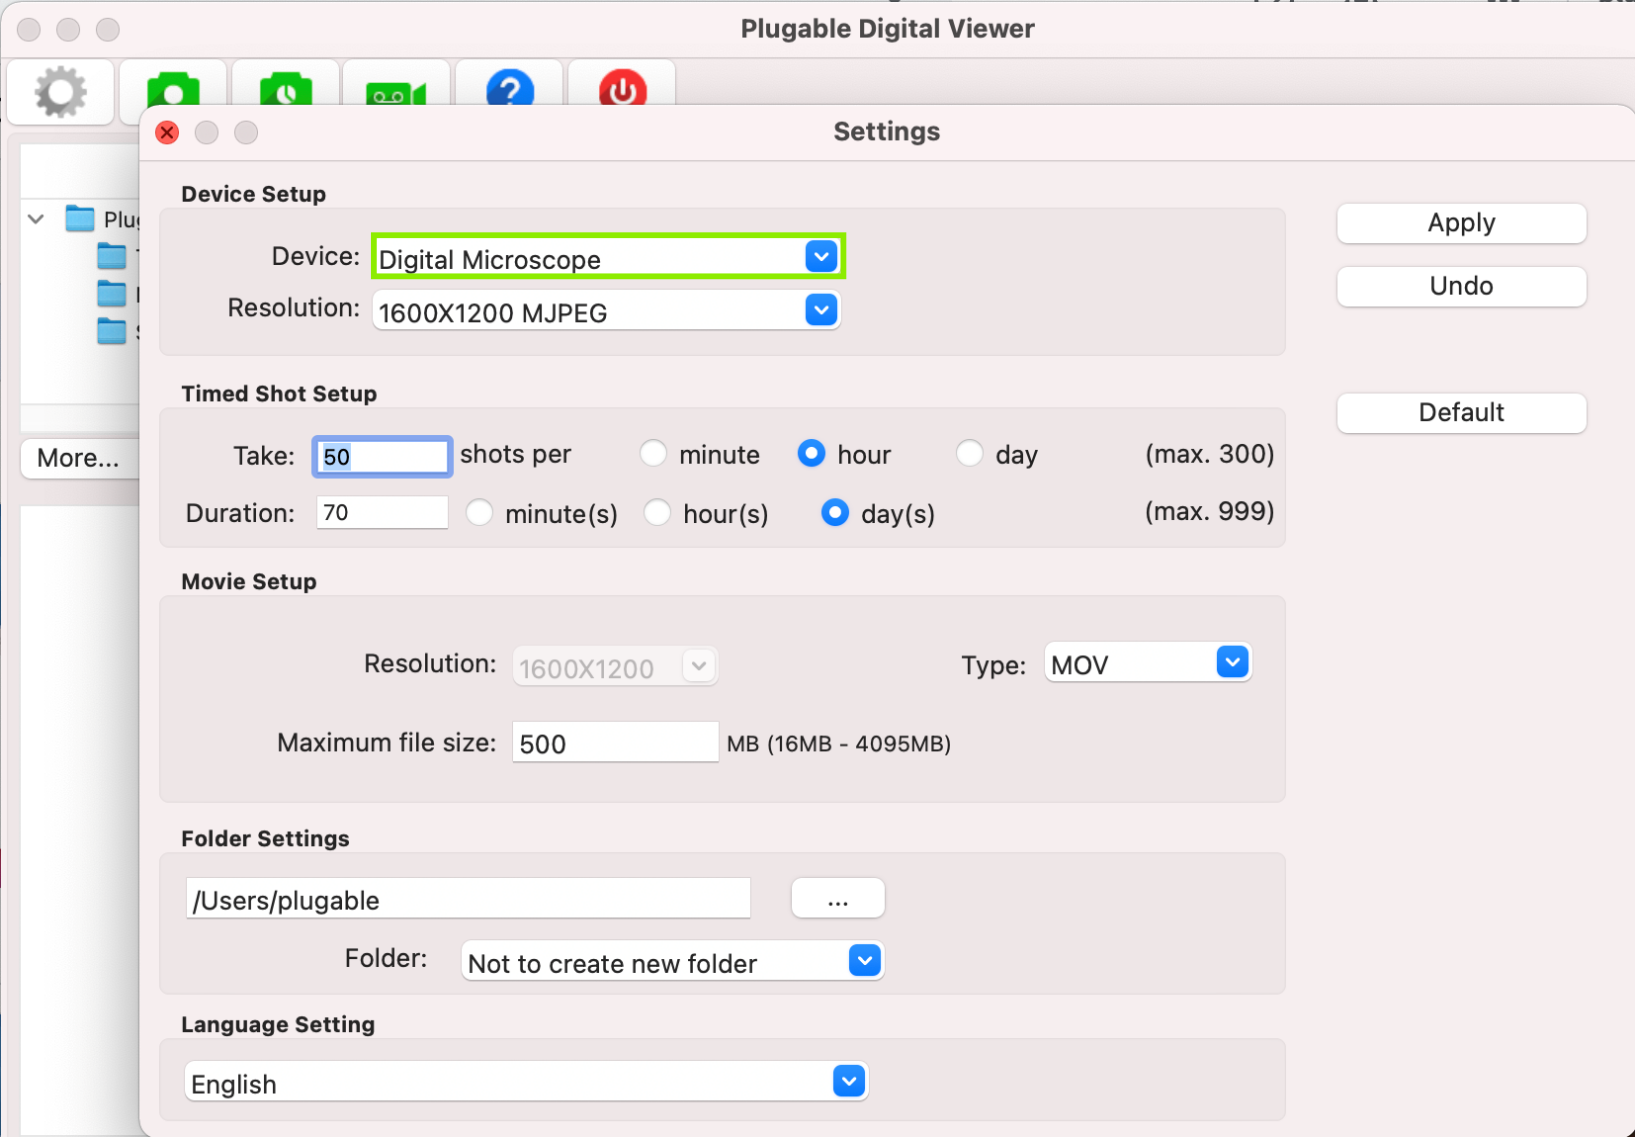
Click on the gear shaped icon in the top left corner of the Digital Viewer window to enter the Settings. Then, click on the drop-down menu for Device, and pick the USB Microscope. Then click Apply to make the change.
Now, you should see the USB Microscope is set as the default device. Feel free to change the resolution or other settings, and start examining things!
Click Here, to see an official article from Apple if you'd like to get further details about privacy settings for your Mac.
We hope this was helpful! Feel free to reach out to us directly at support@plugable.com if you have any questions or concerns, and we'll be here to help you.
Please note: From the factory, the LED control is in the off position. For most indoor lighting conditions, you will need to turn the LEDs on by rotating the grey light control wheel to see anything.
When you connect a Plugable USB2-MICRO-250X microscope to your system, the LED light will NOT turn on automatically. You must manually launch Digital Viewer or another webcam software to use the microscope. The LED will power on when the device is in use by an application.
First, make sure that the microscope is set as the default device in the Settings menu. The Settings menu can be opened by clicking on the grey gear-shaped icon in the upper left corner of the Digital Viewer window.
In some cases, the devices in this menu have the wrong name. If you have the microscope selected in this menu and still see output from another webcam, try selecting each device in this menu until the preview window shows output from the microscope.
Windows Camera Mix-up Issues
Windows has a specific issue that can pop up with the microscope. The microscope uses the same USB Video Class drivers as most built-in and external cameras which can cause Windows to mix-up the listing.
If you set the microscope as the default device but see your other camera its likely that the listing was mixed up. To check if listing was mixed up, try picking your other camera from the drop down menu, and see if the microscope view shows up instead.
If the microscope view shows up on your monitor after picking your other camera, the listing was mixed up. There are steps that we could try to see if we can fix the listing. We do need to be clear, that as this is a Windows issue, it may reoccur with Windows Updates and other events. Let's give these steps a try to see if it clears the listing up:
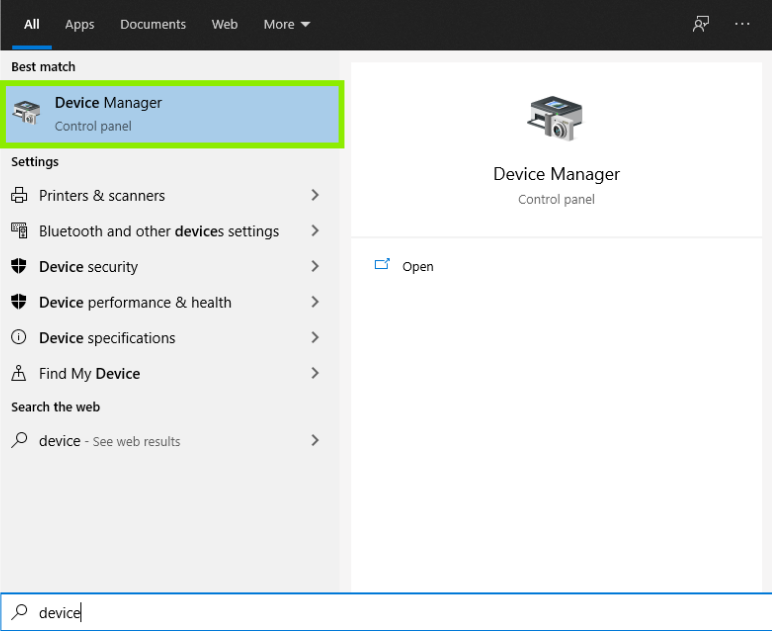
Press the Windows Key, and type in Device Manager. You should see a listing for the Device Manager in the search. Click on it to open the Device Manager
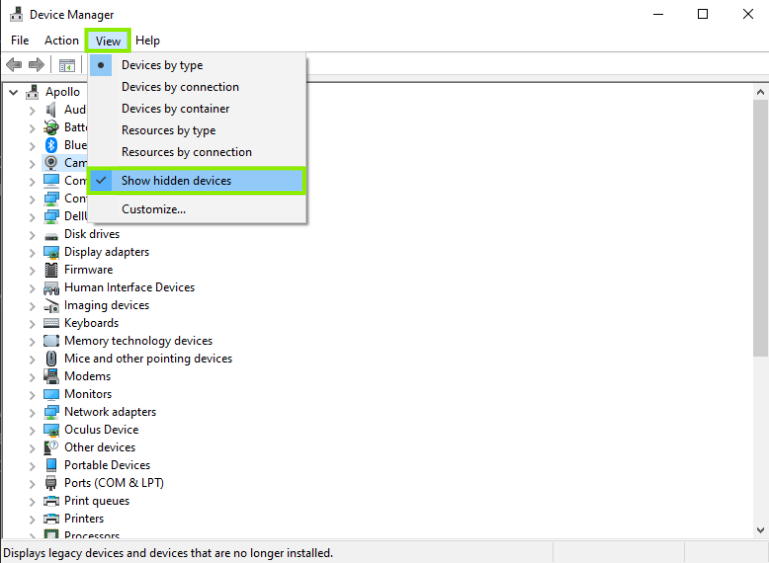
Now that we have the Device Manager open, click on View, and choose Show Hidden Devices. We want to be sure to remove all entries related to the microscope
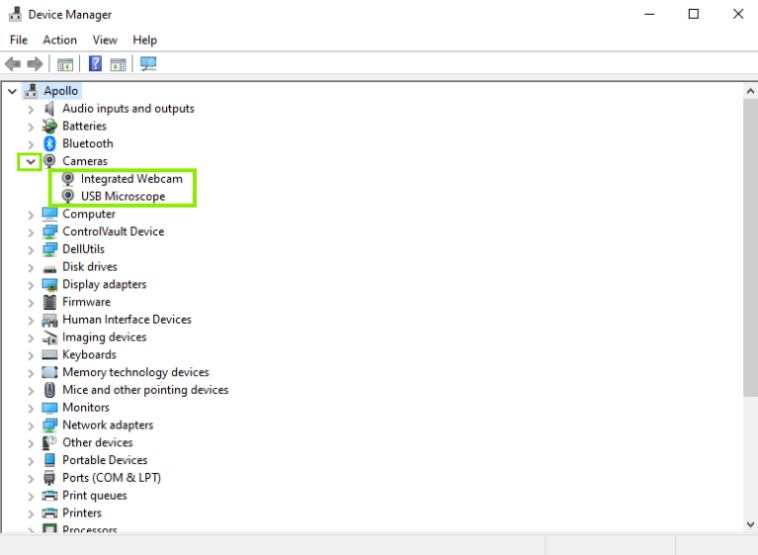
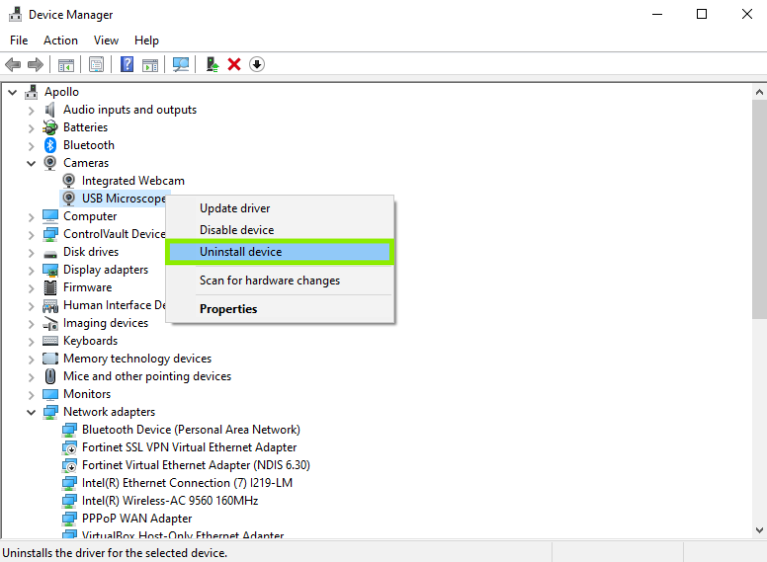
The microscope should show up in the Cameras section, but it may show up in Imaging Devices. Click the little arrow on these sections to expand the listings, and find the "USB Microscope" Listing (In the picture below, mine is right next to the on-board camera Windows is confusing it with.) You may see other listings that appear faint, or grayed out, which is why we checked for Hidden Devices
Once you've found the listing(s), try these steps:
Right Click on the USB Microscope, and click to Uninstall Device for each listing you see
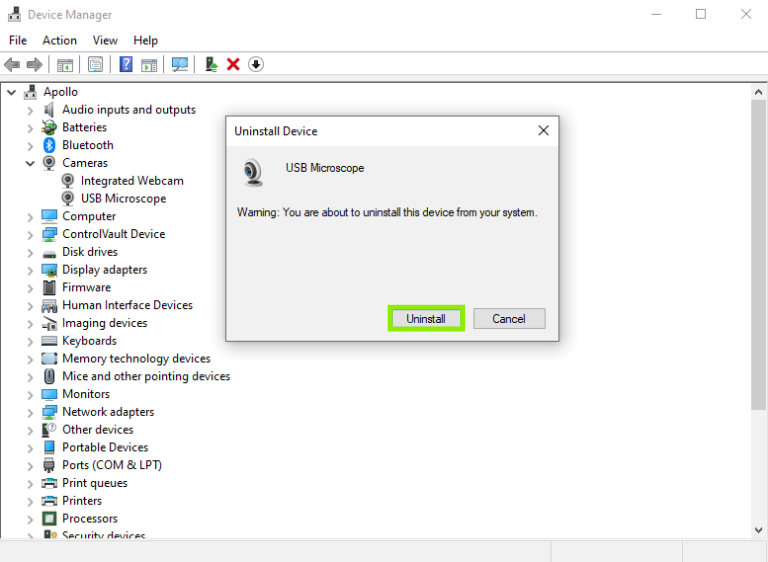
A message will pop-up telling you that you're about to uninstall the device from your computer. Click Uninstall to proceed
Restart the computer after the microscope has been uninstalled. After you restart, open the Digital Viewer software only, and check to see if the microscope shows up when you set it as the Default Device.
We hope this was helpful. Feel free to reach out to us directly at support@plugable.com with any questions or concerns.
Many expect the installer to create a shortcut on the desktop, but we decided not to do this as we don’t want to clutter your desktop space without permission.
Windows
The installer creates a shortcut in your start menu, the default location being:
Start > Programs > Plugable Technologies
This location will vary slightly depending on which version of Windows you are using. More information on the start menu can be found at the following page.
It depends on the Android system you are using. Not all Android tablets or phones are compatible with Plugable microscopes.
A Plugable microscope is recognized as a webcam by a system. To use the device, the system must:
Support a common UVC device driver (needs to be included in the OS and active)
The system allows to use an external webcam
Some Android phones or tablets may not support using an external webcam device. This depends on the device manufacturers and models. Unfortunately, this information is usually not published or documented. If you are uncertain about it, please contact the manufacturer of your system to confirm.
If the Android tablet/phone supports an external webcam, Plugable microscopes should work with the camera applications such as 'USB Camera'. Plugable doesn't provide webcam software for Android.
The microscope uses the same chipset as the Oculus DK2 sensors making the system believe it is just an additional Oculus sensor. In order to help the operating system correctly identify the microscope as a USB camera, we must change which driver the microscope uses. The steps below should correct this problem.
Disconnect all Oculus Rift devices.
Connect the microscope.
Open the Device Manager in Windows. This can be done several ways, if you’re uncertain how to access Device Manager perform these steps:
Press the Windows key and R (Win + R).
In the window that pops up, type devmgmt.msc, then click OK
Look for the microscope. It will likely be listed as a Rift DK2 sensor, under Oculus VR Devices.
If you’re not certain if you found it, disconnect the microscope and the entry should disappear. Reconnect the microscope and the entry should come back, that’s how we’ll know for certain we’re looking at the correct device.
Once you've identified the microscope, right-click on it and choose Update Driver > Browse My Computer For Driver Software > Let Me Pick From A List Of Device Drivers On My Computer
SelectUSB Video Device, then click Next to complete the driver installation.
NOTE: After completing these steps, Windows will still name the microscope as "Rift DK2 Sensor". To confirm these steps worked, look for an entry for Rift DK2 Sensor under Imaging Devices. You must select "Rift DK2 Sensor" to use the microscope in Plugable Digital Viewer or other applications.
From the factory, the LED control is in the off position. For most indoor lighting conditions, you will need to turn the LEDs on by rotating the grey light control wheel in order to see anything.
In some cases, this happens because the software does not have permission to access the microscope. If so, security settings in your operating system must be modified.
It is very exciting to see that iPads are now compatible with external cameras like our USB2-MICRO-250X! In order to use our microscope iPads must have:
A USB C port
iPadOS version 17.x or higher
You'll also need to install an additional camera app to see the microscope image like:
We've tested and confirmed compatibility with the apps listed above, but there are surely other compatible apps as well. After installing an app, start it with the microscope plugged in and you should see the microscope image. You may have to go into the settings for the camera app, and set the microscope as the default app.
We hope this was helpful! Have you found a compatible app you'd like to share? Feel free to reach out to us directly at: support@plugable.com with any questions or concerns!
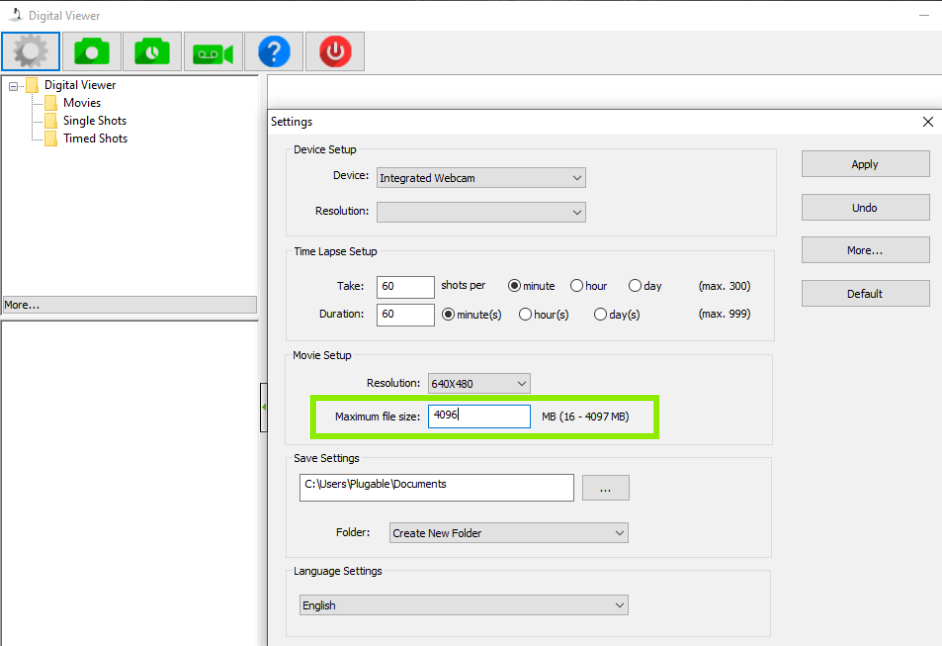
In a recent review of the Digital Viewer software, a typo was discovered in the maximum file size limitation instructions under Movie Setup. When the maximum file size is entered as shown (4097 MB), the following error message is displayed: “Video size setting is incorrect; out of range.” As a workaround, customers should enter 4096MB (or lower) as the maximum file size.
Make sure to click ‘Apply’ after your changes have been made.
Note: The Maximum File Size is a limitation of the software currently and may be raised at a later date in an updated version. We will update this document accordingly at that time
We hope this was helpful! Please feel free to reach out to us directly at support@plugable.com, if you have any further questions.
With microscopes on Chromebook, we need to be sure to check a few things:
We need to make sure that the Chromebook operating system is up to date. To do so, go into Settings > About Chrome OS > Check for updates. If an update is available, please let it run. (Click here, for official information from Google about updating.)
After that, let's check and make sure that the Camera app is the current version from the Chrome Webstore: Chromebook Camera App
Restart the Chromebook after the updates to make sure they finalize
After reboot, connect the microscope and launch the Camera App
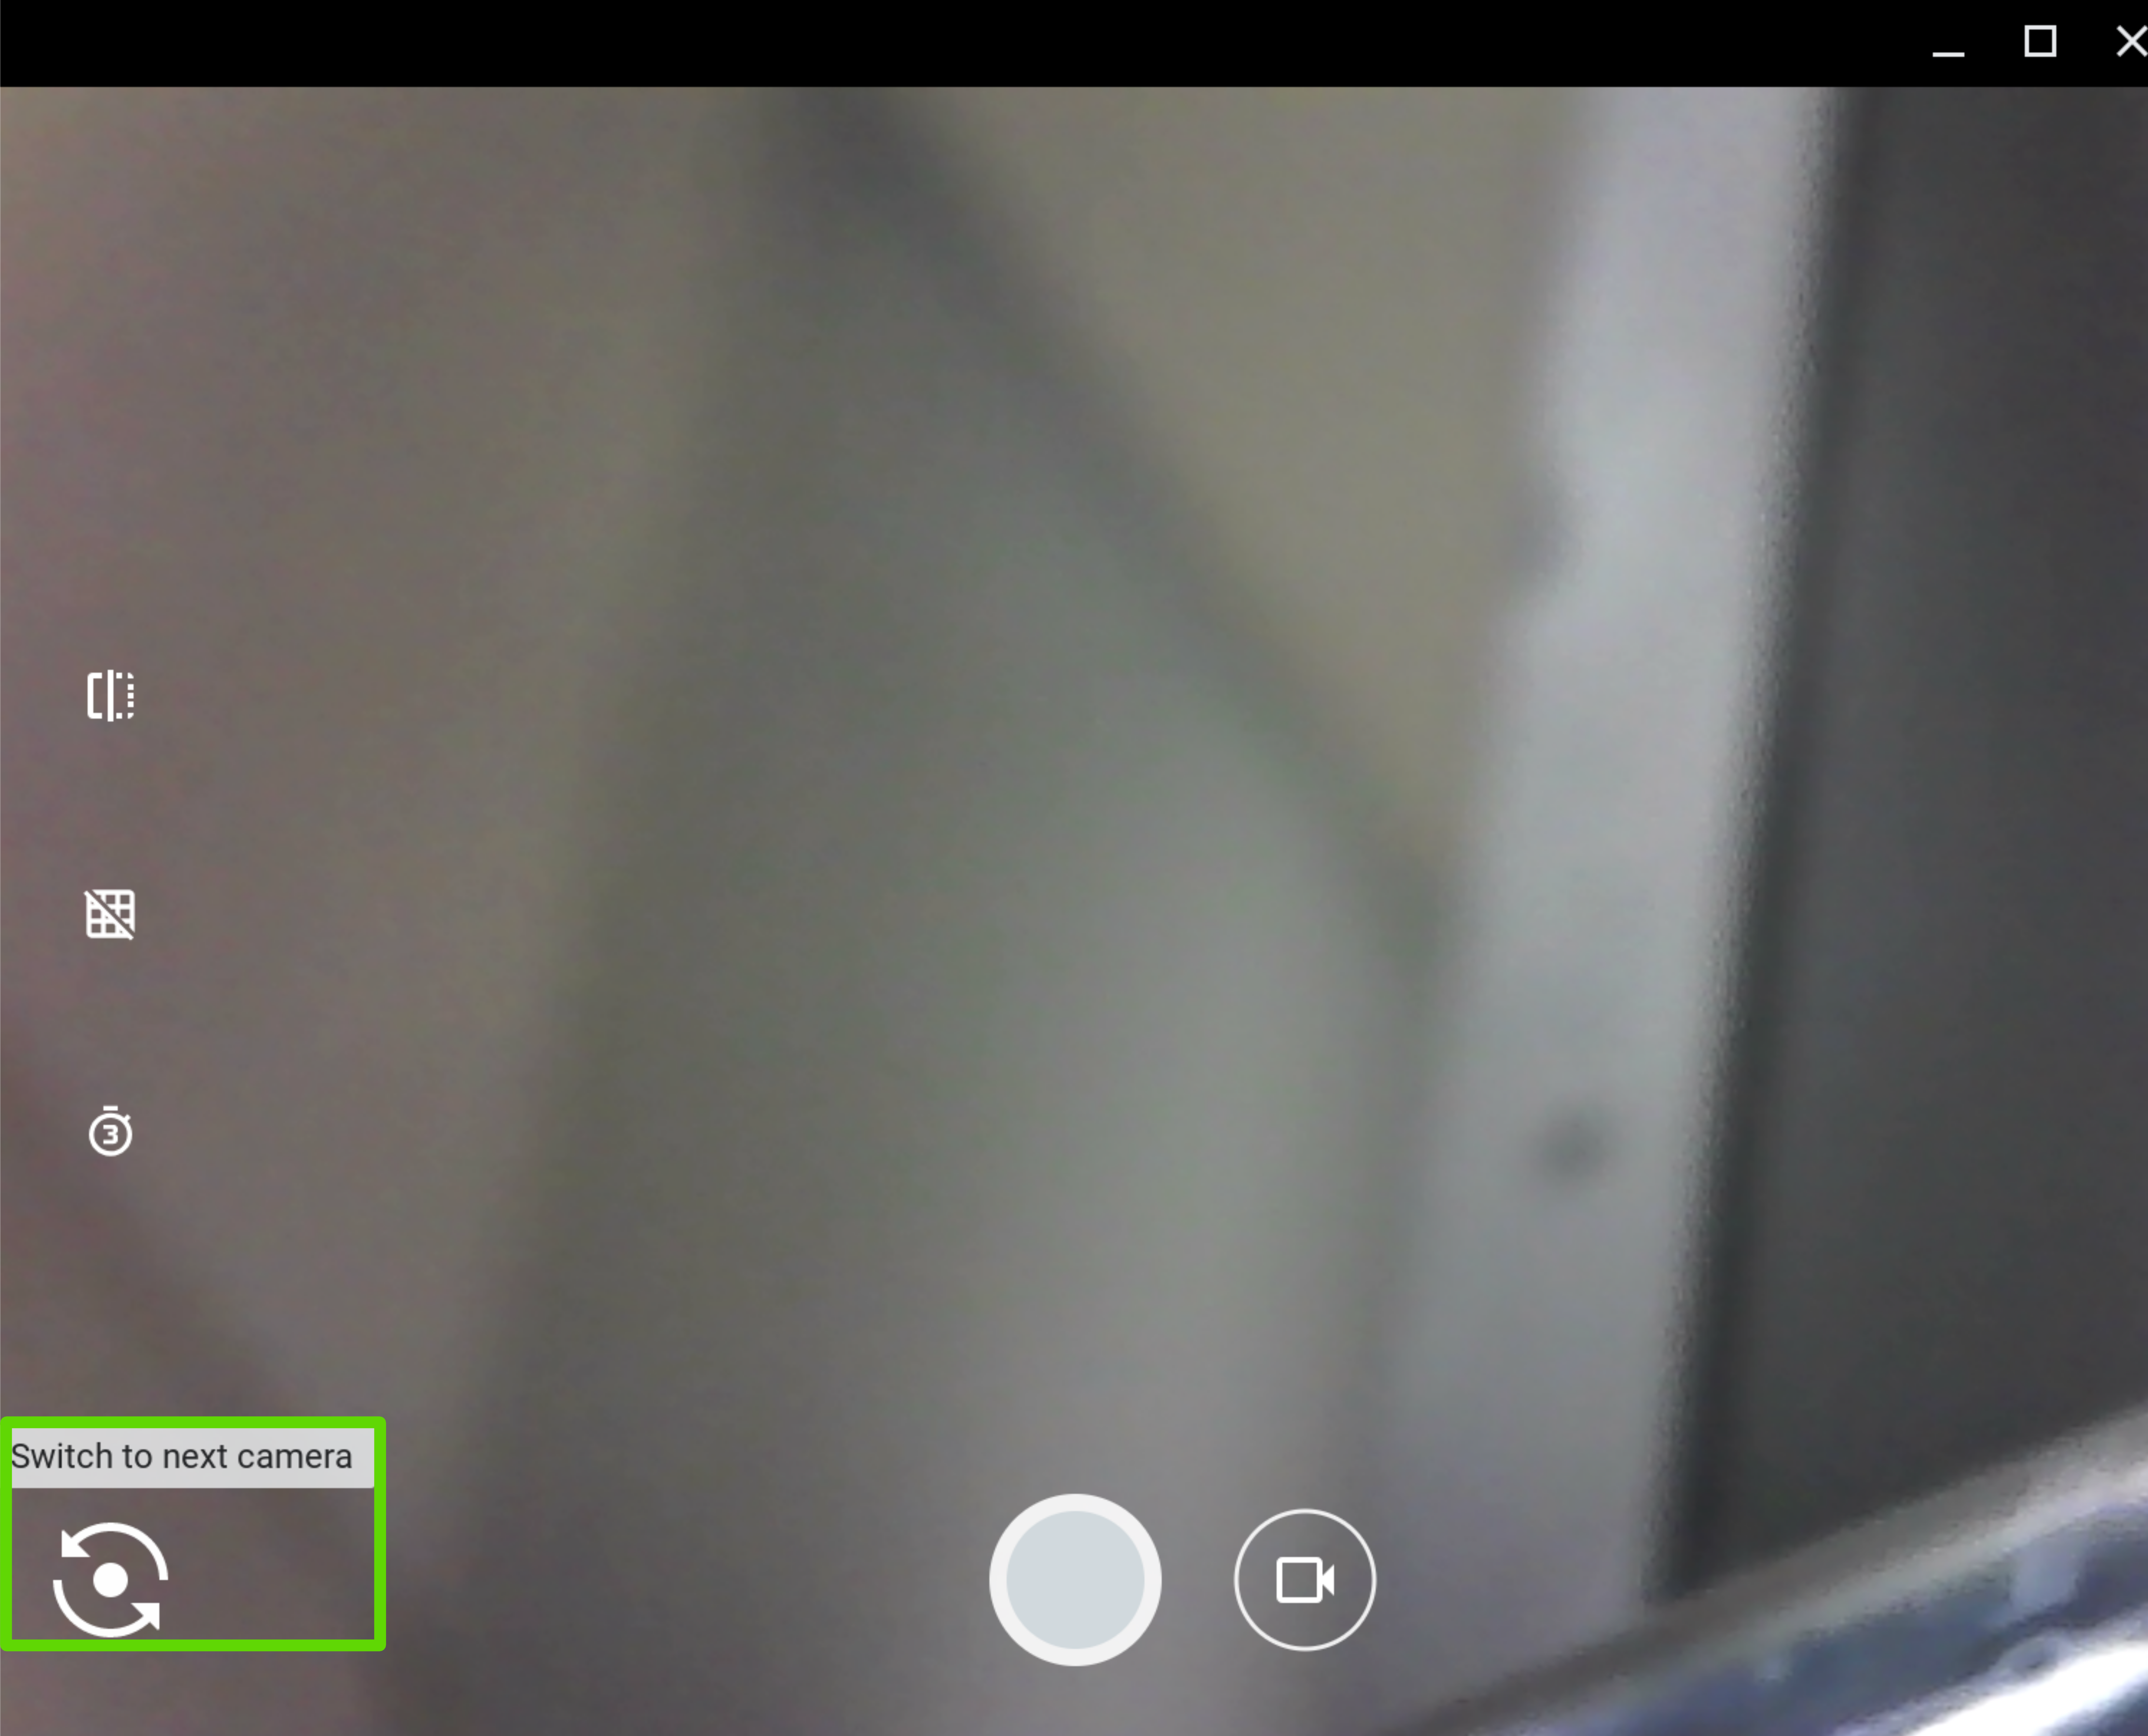
In the bottom left hand corner, there is a button with two arrows rotating around a circle. This button is there to "Switch to next camera". Click the button to switch over to the microscope
We hope this was helpful. Feel free to reach out to us directly at: support@plugable.com if you have any further questions or concerns.
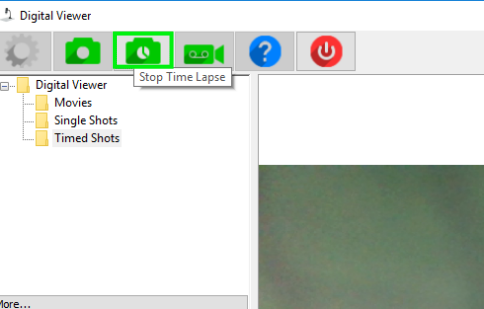
It sounds like the Time Lapse mode is on. This mode will continually take pictures at preset intervals until you click the button again to Stop Time Lapse.
Let's check and see if Time Lapse mode is on:
Open the Digital Viewer software
Hover your mouse over the icon of a camera with a clock inside, and see if a message pops up that says Stop Time Lapse
Click the button and the Time Lapse mode should stop
We hope this was helpful! Please feel free to reach out to us directly at: support@plugable.com with any other questions.
Camera on Chromebooks . Chromebooks use the built-in Camera application and need to be updated regularly for overall functionality. You may want to check with your Chromebook manufacturer for more information about your model
Great! I've downloaded and installed some software. What do I do now?
We need to start the software and set the microscope as the default device. Using our Digital Viewer software as an example, here's some basic steps to get you started:
Restart the computer for changes from installation to take full effect
Plug the microscope into a USB port
Start the software, and go into the Settings menu by clicking the Gear-shaped icon in the top left corner of the Digital Viewer screen
Then, click on the drop-down menu and set the microscope as the default device. Click Apply when you're finished
You should now be able to see the microscope image appear, and be ready to examine things! This is a fairly typical setup for most camera programs. But, it's always a good idea to review any instructions from the application developer for specifics.
We see a lot of people use the microscope for their coin and stamp collections, plants, circuits, and other hobbies. Here's an example of a few items under the microscope, including a speckled vinyl record, some moss spores, and a quarter:
We hope this was helpful! Have you found some new camera software we should test out? Feel free to reach out to us directly at support@plugable.com and let us know, or if you have questions or concerns.
In this knowledge base article, we aim to clarify the functionality of our USB2-MICRO-250X microscope, particularly regarding magnification and focus capabilities.
Understanding Magnification and Focus:
The USB2-MICRO-250X microscope does not feature a traditional zoom function. Instead, it offers magnification and focus functionalities to achieve varying levels of "zoom." Users can adjust the magnification and focus by moving the microscope closer to the object and adjusting the focus accordingly.
However, it's essential to note that our microscope does not have a digital zoom like some other cameras. Instead, it utilizes digital focus adjustment and magnification.
Usage Instructions:
Begin by placing the microscope on the observation pad grid, nose-down, and resting on the clear shield.
Rotate the focus lens mechanism fully in one direction until it stops.
Slowly rotate the focus lens mechanism in the opposite direction while observing the changes in the preview window of the camera viewing application until the object is in focus.
Observations:
At the closest distance with the clear shield touching the object, there are two possible magnifications.
The first magnification is approximately 60x, but by continuing to rotate the focus wheel, the image will initially become blurry and then sharp again at a much higher magnification.
There are two focal points with the clear shield touching the object, offering focus at two magnification levels.
If you have any further questions or require assistance, please don't hesitate to contact our customer support team at support@plugable.com.
Many users assume that USB-C devices can work with older Thunderbolt 2 Macs if they use a Thunderbolt 3 to Thunderbolt 2 adapter, such as the one made by Apple. However, this is not the case. These adapters are specifically designed to support Thunderbolt devices only -not standard USB-C peripherals.
While Thunderbolt 3 and USB-C share the same connector type, they use different underlying data protocols. Non-Thunderbolt USB-C devices, rely on USB standards for data and power. The Thunderbolt 3 to Thunderbolt 2 adapter does not carry USB signals; it only passes Thunderbolt data. Because of this, plugging a USB-C device into a Thunderbolt 2 Mac using this adapter will not work - the computer will not detect or communicate with the device.
If you need to connect peripherals to a Thunderbolt 2 system, we recommend using a USB-A dock or hub (if available on your system). This ensures compatibility without relying on unsupported adapter chains.
In short, even though the connectors may fit, USB-C devices are not compatible with Thunderbolt 2 Macs via Thunderbolt adapters - only Thunderbolt devices will work in that setup.
First, let's determine if your computer is correctly detecting the microscope.
1. Right-click on the Windows logo, select Device Manager.
2. With Device Manager open, expand the “Cameras” category and look for “Digital Microscope" or "Plugable Microscope". If it's listed here, that means it's being correctly detected.
Now that we know the microscope is detected, let's test it out with the Camera App.
3. Click the Start Menu, type Camera and select the Camera App.
4. With the Camera App open. You may need to cycle through your cameras if this is on a laptop. The cycle camera button should be in one of the corners of the application. In the image below, and on Windows 11, it's located in the top right corner. Note: If all you see is a black screen, ensure you turn up the dial on the microscope to increase the brightness; the LED on the microscope should be bright when adjusted.
For most modern Windows and Mac systems, Thunderbolt devices are automatically approved and will ‘just work’ once connected.
The main exception is Apple Mac laptops with Apple CPUs running macOS Ventura (13) or newer, where you’ll be prompted to manually approve the device the first time you connect it.
The summary table below provides the specific details at a glance, and the text that follows explains the table in more detail.
To expand further, Thunderbolt 3, 4 and 5 are in essence external connections to the host computer’s internal PCI Express bus. This type of low-level and high speed connection warranted security protocols to prevent unauthorized access to user data.
Windows: From Intel Software to Native OS Support
When Thunderbolt 3 Windows systems were first introduced in late 2015 it was necessary to use Intel Thunderbolt software to manually authenticate and approve external Thunderbolt devices.
With the introduction of Thunderbolt 4 Windows systems in 2020, it was still necessary to have Intel Thunderbolt software installed on the host computer. However, in most cases the authentication and approval process would happen automatically greatly simplifying the process.
Starting with Windows 11 version 21H2 released in October of 2021, Microsoft integrated support for both USB4 and Thunderbolt into the Windows operating system → LINK
This means that with most modern Thunderbolt 4 and Thunderbolt 5 computers running the latest version of Windows 11 it is no longer necessary to install Intel Thunderbolt software on the host computer in order to manage Thunderbolt devices. In most cases, the authentication and approval process will still happen automatically.
macOS: From Intel CPUs to Apple CPUs
When Thunderbolt 3 Mac systems with Intel CPUs were first introduced in 2016, the authentication and approval mechanism was built-in to macOS and was transparent to the end user.
Apple introduced Mac computers based on Apple CPUs in 2020. Macs based on Apple CPUs running macoS 11 Big Sur or macOS 12 Monterey would automatically approve and authenticate Thunderbolt devices when connected.
macOS 13 Ventura was released in 2022 and for portable Macs with Apple CPUs Apple introduced a feature known as ‘Accessory Security’ (also known as ‘Restricted Mode’) → LINK
By default, portable Macs (i.e. laptops) with an Apple CPU running macOS 13 Ventura or newer version of macOS will require the end user to authenticate and approve a Thunderbolt device when initially connected.
Stationary Macs (i.e. desktops) with an Apple CPU running macOS 13 Ventura or newer version of macOS do NOT implement the ‘Accessory Security’ feature. As a result, Thunderbolt devices will be automatically approved and authenticated when initially connected.
Apple Macs with Intel CPUs (both laptop and desktops) running macOS 13 Ventura or newer do NOT implement the ‘Accessory Security’ feature. As a result, Thunderbolt devices will be automatically approved and authenticated when initially connected.