


Hassle free, 2-Year Warranty
Fast, Free Shipping on Orders $35+
Lifetime Technical Support
30-Day Money Back Guarantee
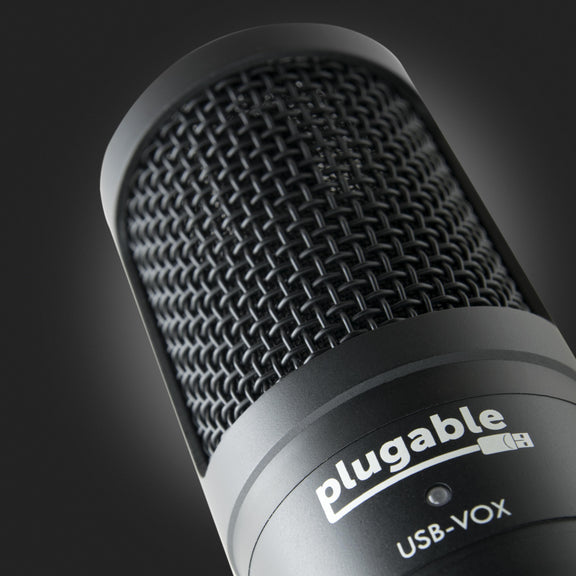
Plugable Studio Microphone for Recording and Broadcasting (Cardioid Condenser, USB)
$89.00 USD
SKU: USB-VOXAmazon Rating : (31 Reviews)
Features
- Sound Isolation— The Plugable Performance Studio-Grade USB Microphone is designed to isolate all the vocal and acoustic sound you want while eliminating unwanted background noise for professional, hassle-free streaming and recording audio fidelity
- High-Quality Audio— Designed for stream and content creation on Twitch, Mixer, YouTube, Facebook Live and other software like Discord, Slack, Skype, Facetime, Skype, Google Hangouts, GoToMeeting, and more
- Plug-and-Play— Condenser microphone with a simple to use USB interface with no additional drivers or software for hassle-free integration with your favorite streaming, recording, and conferencing software like Streamlabs, OBS, XSplit, and Audacity
- Compatibility— Supports 16-bit depth, 44.1Hz-48kHz sampling and 20Hz-16kHz frequency response via the Cmedia CM6400 chipset for wide compatibility with Windows, macOS, Linux, and Chrome OS devices
- 2-Year Coverage, Lifetime Support— Every Plugable product, including this USB studio microphone, is covered against defects for 2 years and comes with lifetime support. If you ever have questions, contact our North American-based team - even before purchase
For volume orders or business inquiries contact sales@plugable.com
Focus on Your Content, Not Your Setup.
The Plugable Performance USB Studio Microphone (USB-VOX) is designed with streamers and content creators in mind. The microphone's frequency response is specifically tailored to provide crisp and clear vocal capture for commentary, voice-over, and conferencing. The microphone also features a sound isolating condenser to filter out unwanted background noise, plug and play installation, and compatibility with nearly every USB-enabled PC. Getting the microphone working in your favorite applications is quick and easy!

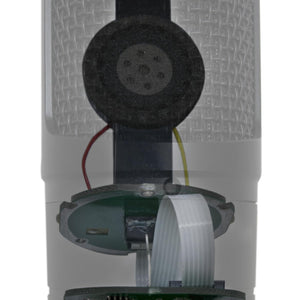
The Condenser. Record What Matters.
The design of the microphone naturally rejects unwanted sounds that are away from the microphone, resulting in a clear, clean sound quality that works perfectly for voice and acoustic music recording. The Plugable Performance USB Microphone is a condenser type microphone, which means that its diaphragm moves the metal plates of a capacitor to generate electrical current. As a cardioid mic, our microphone is unidirectional and picks up sound in a heart-shaped pattern that is perfect for studio-style recording with a boom arm but it also works great with the included tripod.

USB Connection. No Need for a Sound Card.
Installation of the Plugable Performance Condenser Microphone is a piece of cake. Just connect the included USB cable between the microphone and your PC, and change your preferred recording device in Windows (or your preferred OS). Using USB rather than External Line Return (XLR) makes it easier to be a pro-grade streamer on a budget without the need for an additional audio card.
Technical Specifications
- Element—Polarized Condenser
- Polar Pattern—Cardioid
- Chipset—Cmedia CM6400
- Frequency Response—20-16kHz
- Bit Depth—16-bit
- Sample Rate—44.1-48kHz
- Power Requirement—USB (5V DC)
- Weight—258g
- Overall Body Dimensions—14cm long, 17cm body circumference
- Connector Type—USB
Compatibility
- Windows
- macOS
- Chrome OS
- Other devices with USB audio microphone support
- Twitch, Mixer, YouTube
- OBS (Open Broadcaster Software), xSplit, Streamlabs OBS
- Discord, TeamSpeak, Ventrilo, Skype, Zoom, GoToMeeting, Slack
(Not officially endorsed by these platforms, these names are trademarked to their respective owners.)
Filter Help Articles and Frequent Questions by Category
Choose one or more filters within each category to narrow down the articles. Each selection will result in only displaying articles that include all of your choices.
Articles
Well how about that, it looks like we don't have any articles matching your filters! Try removing one of your choices or clear the filters to show all articles.
You can always contact support if you need help too!
No Sound? How to Change Your Default Audio Device to Your Plugable Product
Whether you're on Windows, macOS, or Linux, it's common to add new audio devices to your computer.
Some examples of additional audio devices you may want to switch to include:
- Bluetooth headsets, headphones, and speakers
- Speakers built into a display, such as a TV or monitor
- A USB sound card, digital audio converter (DAC), or analog to digital converter (ADC)
- USB microphones
- Audio jacks on a docking station
These steps don't apply to the Plugable Performance NIX HDMI Capture Card (USBC-CAP60).
Here are the steps that you need to set a new default audio recording or output device on different operating systems.
Set Audio Output Device
Set Audio Recording Device
Set Default Playback Device in Windows
- Check that your device is properly connected, and that any necessary drivers are installed
- It is also a good idea to make sure that your sound device is turned on, and that the device's volume control is not at the absolute minimum setting
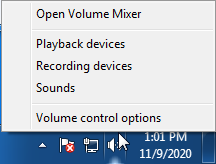
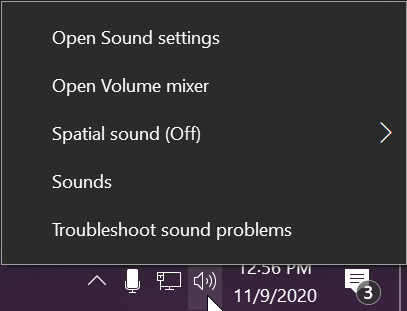
- Right-click on the speaker symbol in the Windows taskbar/system tray
-
Windows 7/8.x—Select Playback Devices. The Sound window will open with the Playback tab highlighted
-
Windows 10/11—Select Open Sound Settings then click the link under 'Related Settings' for Sound Control Panel, then click the Playback tab
- Alternatively, after selecting Open Sound Settings, use the dropdowns under the Output header
-
Windows 7/8.x—Select Playback Devices. The Sound window will open with the Playback tab highlighted
- Find your device in the window
- A Plugable USB 3.0 docking station or sound-enabled display adapter will appear as Plugable Audio
- A Plugable USB 3.0 Silicon Motion docking station or sound-enabled display adapter will appear as SMI USB Audio
- A Plugable USB 2.0 docking station will appear as USB Multimedia Audio Device
- A Plugable USB Audio adapter will appear as USB Audio Device
- Right-click on the device you found in step 3 and select Set as Default Device. A check mark should appear next to your device, and sound should now play through it
- Click OK to exit the window
Additional Configuration for Bluetooth
Please see our pairing and configuration guide for Bluetooth devices.
Set Default Playback Device in macOS
- Open System Preferences
- Click Sound
- Select Output
- Select the most appropriate device
- A Plugable USB Audio adapter will appear as USB Audio Device
Set Default Playback Device in Linux
- Ensure that you audio device is connected to the PC
- If the audio device is self-powered, it is a good idea to make sure that it is powered on, and that the device's volume control is not at the absolute minimum setting
- Launch the 'Settings' application in your distro
- Go to the 'Sound' option
- Find the dropdown for your 'Output Device', and change it to your preferred output device
- For additional sound device controls, you may want to consider using Pulseaudio Volume Controls (package name pavucontrol)
Set Default Recording Device in Windows
- Check that your device is properly connected, and that any necessary drivers are installed
- It is also a good idea to make sure that your sound device is turned on, and that the device's volume control is not at the absolute minimum setting
- Right-click on the speaker symbol in the Windows taskbar/system tray
-
Windows 7/8.x—Select Recording Devices. The Sound window will open with the Recording tab highlighted
-
Windows 10/11—Select Open Sound Settings then click the link under 'Related Settings' for Sound Control Panel, then click the Recording tab
- Alternatively, after selecting Open Sound Settings, use the dropdowns under the Input header
-
Windows 7/8.x—Select Recording Devices. The Sound window will open with the Recording tab highlighted
- Find your device in the window
- A Plugable USB 3.0 DisplayLink docking station or sound-enabled display adapter will appear as Plugable Audio
- A Plugable USB 2.0 docking station will appear as USB Multimedia Audio Device
- A Plugable USB Audio adapter will appear as USB Audio Device
- Right-click on the device you found in step 3 and select Set as Default Device. A check mark should appear next to your device, and sound should now play through it
- Click OK to exit the window
Additional Configuration for Bluetooth
Please see our pairing and configuration guide for Bluetooth devices.
Set Default Recording Device in macOS
- Open System Preferences
- Click Sound
- Select Input
- Select the most appropriate device
- A Plugable USB Audio adapter will appear as USB Audio Device
Set Default Recording Device in Linux
- Ensure that you audio device is connected to the PC
- If the audio device is self-powered, it is a good idea to make sure that it is powered on, and that the device's volume control is not at the absolute minimum setting
- Launch the 'Settings' application in your distro
- Go to the 'Sound' option
- Find the dropdown for your 'Input Device', and change it to your preferred input device
- For additional sound device controls, you may want to consider using Pulseaudio Volume Controls (package name pavucontrol)
Will This Microphone Pickup My Voice From a Distance?
Yes, our USB-VOX microphone is capable of picking up voices from a distance. However, you’ll need to turn up the gain in your preferred recording software settings as well as within your operating system’s recording volume settings. By turning up the gain or recording volume, you may also hear more ambient/room noise than you would with lower gain and volume settings recorded from a closer distance. For best results, we recommend being no more than 1ft away from the mic and adjusting volume and gain settings to your sound preferences.
My Microphone Does Not Seem to Work. What Should I Do?
Confirm that the blue LED illuminates while the mic is connected to your computer. If the LED does not illuminate double check that the USB cable is fully connected to both the bottom of the microphone and the USB port of the computer or USB hub being used. If the blue LED illuminates, but the mic isn’t recording any sound, you’ll need to check the control panel or system preferences of your system to ensure that the microphone is set as your default/primary recording device.

